Nails Inspiration Winter 2025 – 2025 21 Ideas
Winter is here and it’s time to freshen up your manicure style with some chic, eye-catching and sophisticated nail designs. What is trending in nail inspiration winter 2025 – 2025? Is it the almond shape that has dominated in recent seasons, or is there a new twist on classic colors like red, white and green? In this article, we explore nail ideas that are easy to recreate, elegant and stylish, giving you a complete guide to the winter manicure trends for 2025 and 2025. Let’s dive into this season’s hottest nail inspirations and discover how to make your nails stand out effortlessly.
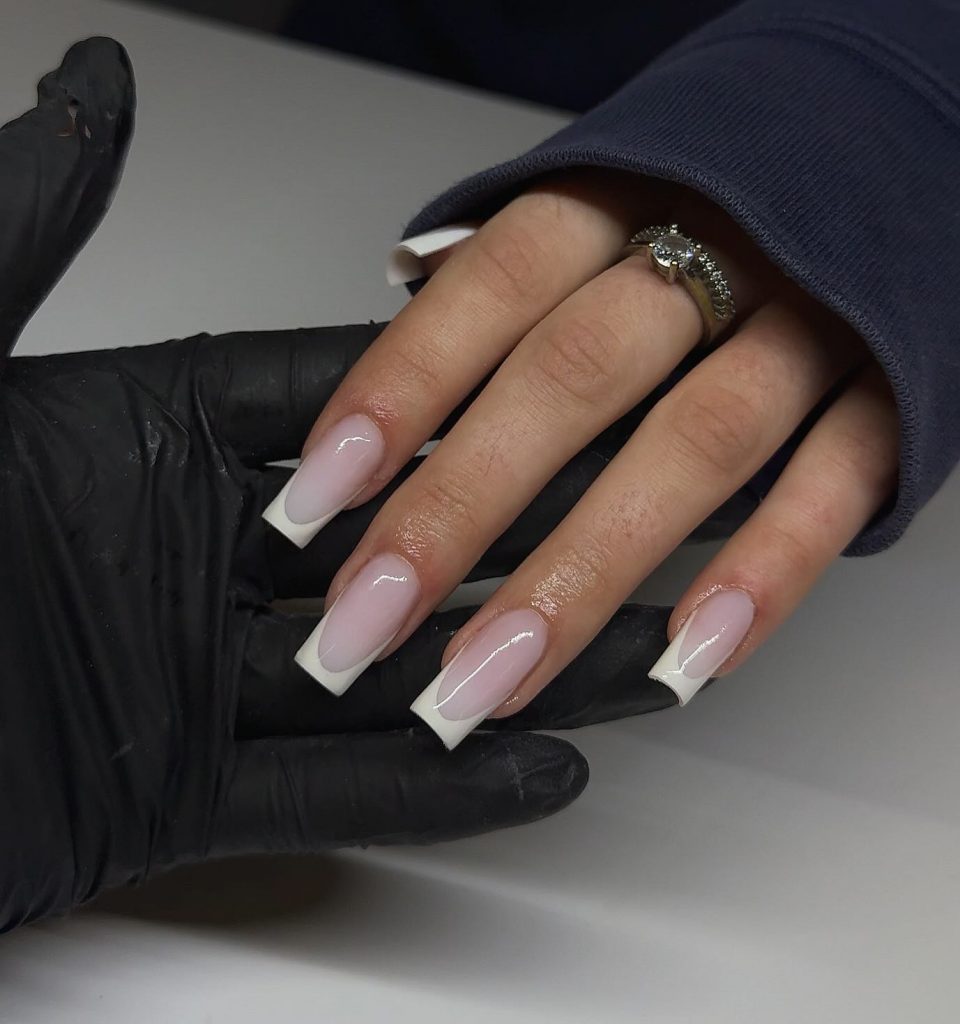
Almond French Winter Dream
This elegant almond-shaped design embraces a modern twist on the classic French manicure. With a base of soft pink and subtle white tips, this winter-friendly nail idea takes your look to the next level with delicate details. The almond shape adds a touch of elegance and keeps the look natural and stylish, perfect for both casual outings and formal events. The combination of subtle white and pink tones is both soft and versatile, ideal for the winter season.
Consumables
- Base coat: Essie ‘First Base’ nail primer
- Soft pink polish: OPI ‘Bubble Bath’
- White tip polish: Sally Hansen ‘White On’
- Top coat: Seche Vite Dry Fast Topcoat
How to make this design at home
- Start with a base coat to protect your natural nails.
- Apply two coats of the soft pink polish, allowing each coat to dry completely.
- Use a fine nail brush to create white dots, following the natural curve of your nails.
- Finish with a high-gloss top coat for extra durability and shine.
Deep green elegance
This deep, glossy green manicure is a winter classic. The rich shade provides a sophisticated touch that’s perfect for the cold season, while the square nail shape offers a modern, minimalist vibe. The green color pairs beautifully with winter outfits, from cozy sweaters to more formal evening wear, giving your nails a chic yet understated look.
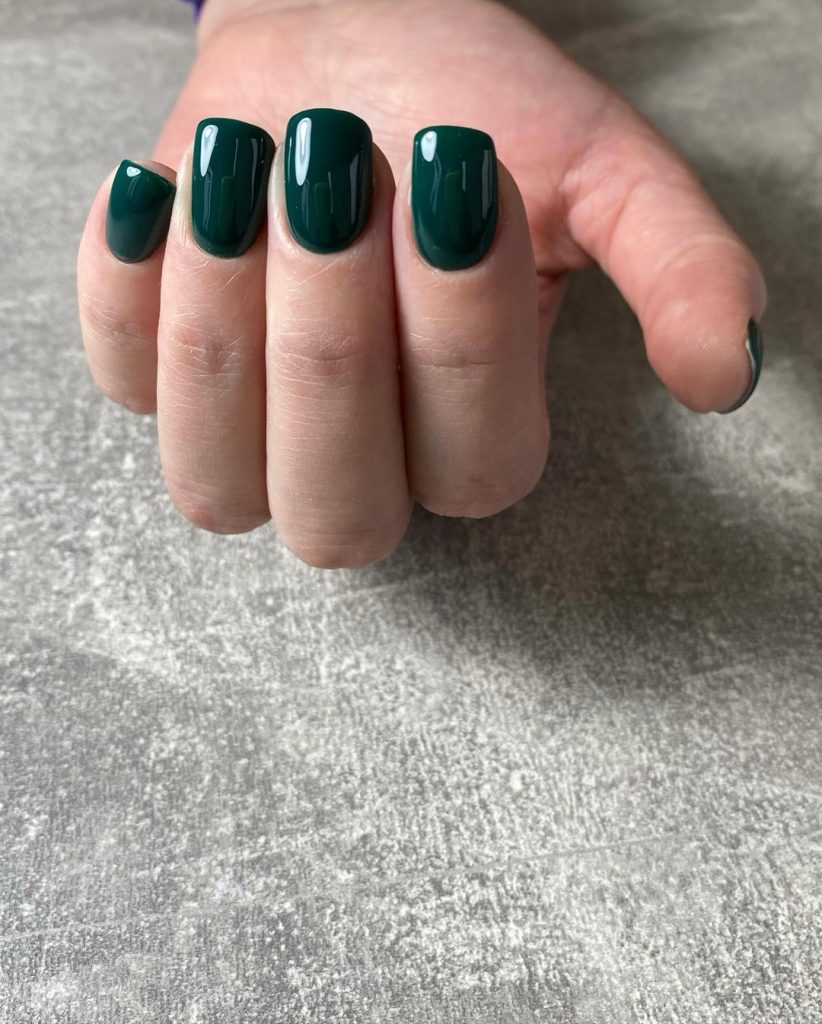
Consumables
- Base layer: Orly Bonder rubber base layer
- Dark green polish: Essie ‘Off Tropic’
- Top coat: Revlon quick-drying top coat
How to make this design at home
- Apply a base coat to prevent chipping.
- Add two coats of dark green polish for a striking, opaque color.
- Finish with a top coat to improve the shine and longevity of the manicure.
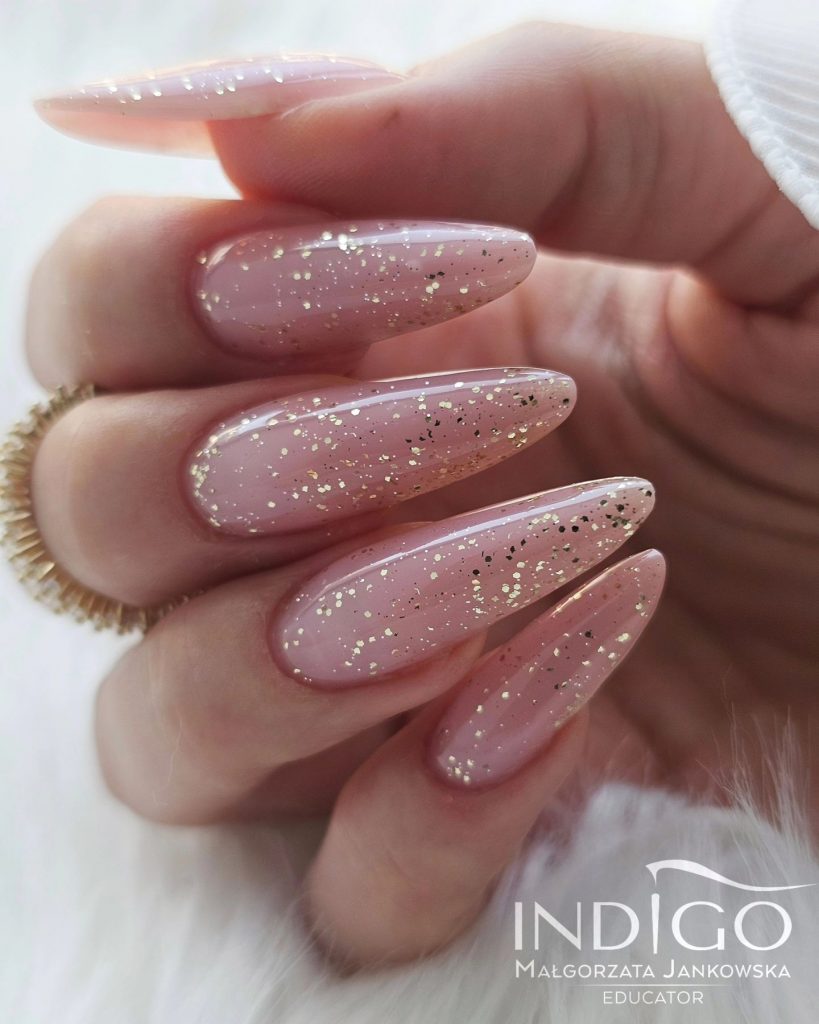
Shimmering naked sophistication
This shimmering nude nail design combines simplicity with glamour. A natural nude base is enhanced with a fine layer of glitter, creating a subtle sparkle that is perfect for both everyday use and winter parties. The square nail shape provides a sleek and modern look, while the glittering finish adds a touch of festive elegance.
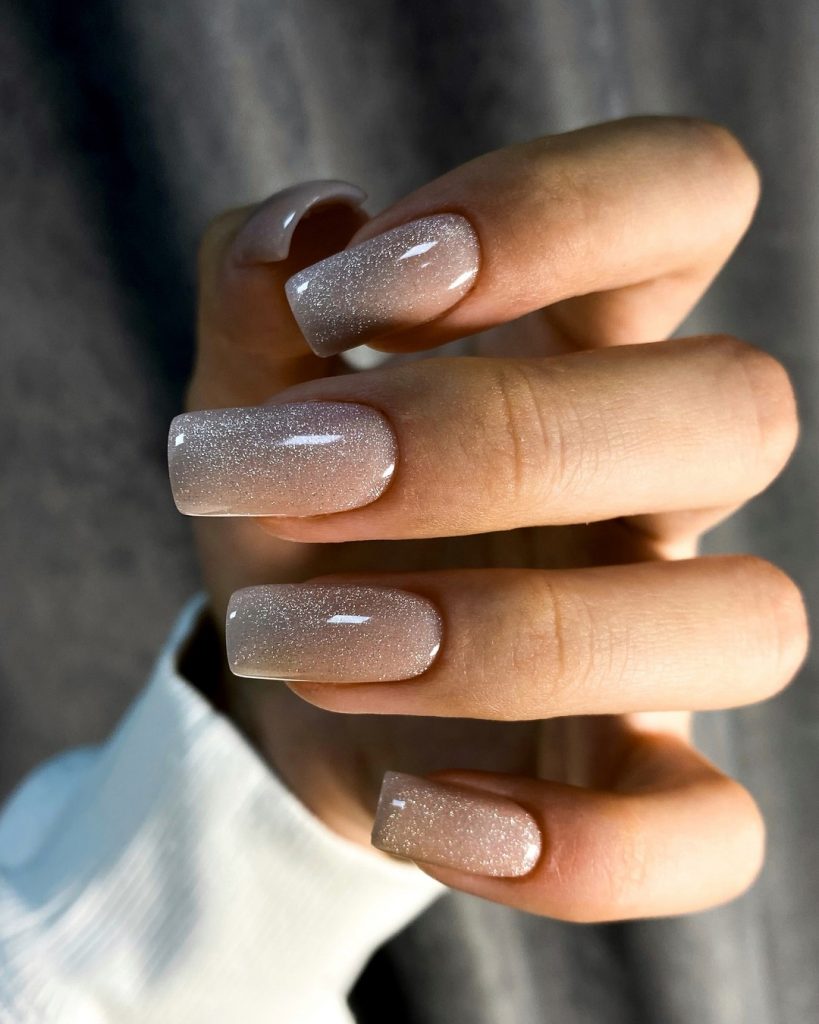
Consumables
- Base layer: Deborah Lippmann Hard Rock Nail Strengthener
- Nude lacquer: Zoya ‘Cala’
- Glitter top coat: ILNP ‘Blushing’ holographic glitter
- Top coat: OPI Nail Lacquer Top Coat
How to make this design at home
- Start with a strong base coat to support the shine.
- Apply two coats of nude polish and let each coat dry.
- Add a layer of glitter polish for a shimmering effect.
- Finish with a top coat to lock in the glitter and add shine.
Daring black-red winter drama
For a cool and edgy look this winter, the combination of black and red is unparalleled. This design alternates between black and deep red on each hand, creating a striking contrast that commands attention. The glossy finish enhances the drama of this ballerina-shaped manicure, making it ideal for winter parties and festive events.

Consumables
- Base layer: OPI Nail Envy Strengthener
- Black polish: Sally Hansen ‘Black Heart’
- Red polish: Chanel ‘Rouge Noir’
- Top coat: Essie Gel Setter Topcoat
How to make this design at home
- Start by applying a protective base coat.
- Paint one hand with two coats of black polish and the other hand with two coats of red polish.
- Allow both colors to dry before sealing them with a gloss top coat for a polished finish.
Purple French twist
This purple French manicure takes a modern approach to the classic look. The almond-shaped nails have a neutral base with a hint of striking purple tips. This playful variation on the traditional French manicure gives your nails a unique, striking look and is still practical and easy to maintain during the winter months.
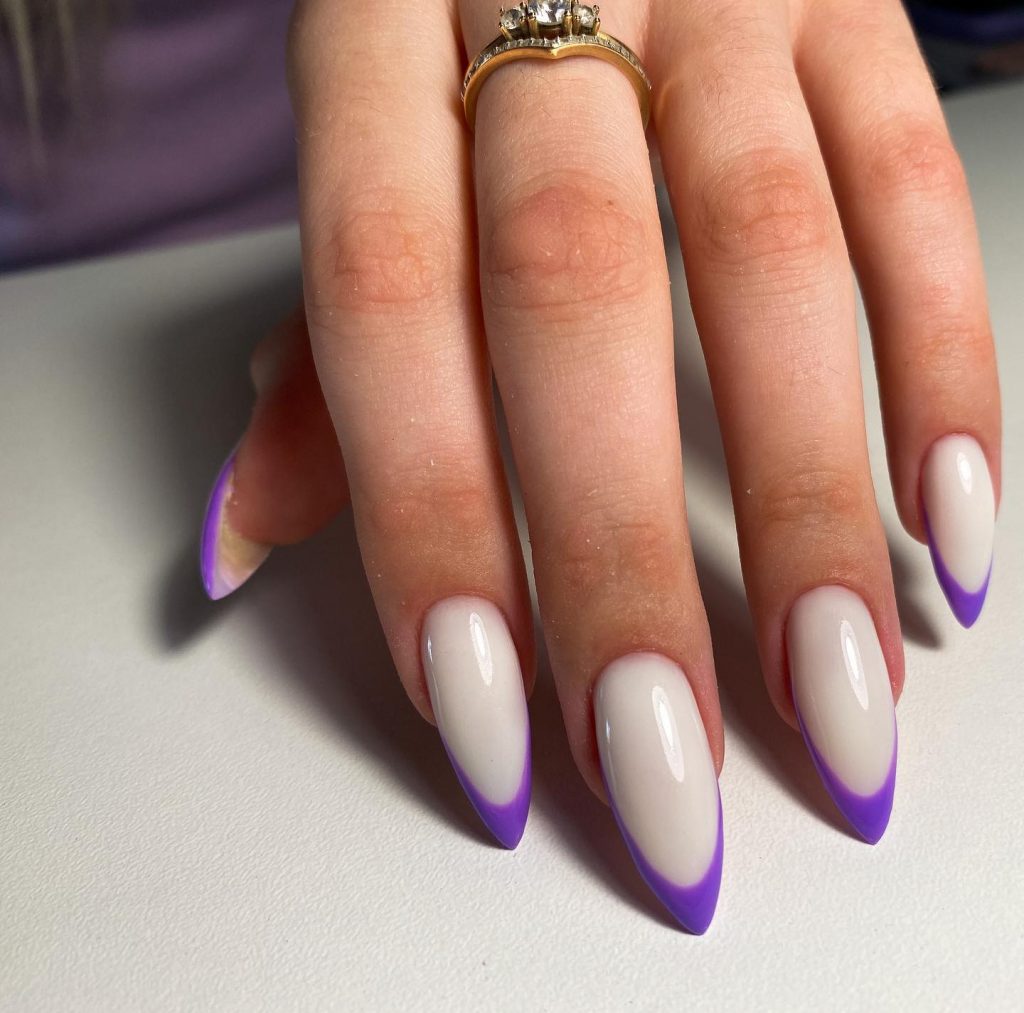
Consumables
- Base Coat: OPI natural nail base coat
- Neutral base coat: Butter London ‘Mum’s The Word’
- Purple point lacquer: China Glaze ‘Plur-ple’
- Top coat: Seche Vive Instant Gel Effect Topcoat
How to make this design at home
- Apply a base coat to protect your nails.
- Paint the nails with two layers of neutral nail polish and let each layer dry.
- Use a fine brush to add purple dots for a French twist.
- Finish with a high-gloss top coat to lock in the color and design.
Elegance of lace and glitter
This design combines a soft pink shimmer with intricate lace details, creating a look that is delicate yet luxurious. The lace accent on one nail provides a vintage touch, while the subtle glitter on the other nails gives it a wintery, magical feeling. This style is perfect for those who love a mix of elegance and simplicity, ideal for winter weddings or holiday parties.
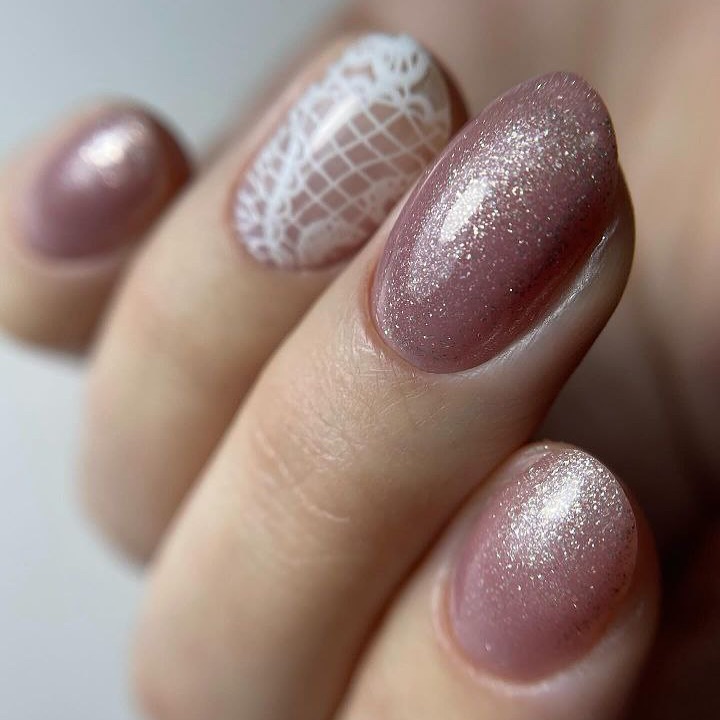
Consumables
- Base layer: Orly Bonder rubber base layer
- Gloss varnish: Zoya ‘Aurora’
- White lace sticker: Whats Up Nails ‘Lace It Up’
- Top coat: Essie Gel Couture Topcoat
How to make this design at home
- Start with a base coat to protect the nails.
- Apply two coats of the gloss varnish and allow each coat to dry completely.
- Place the lace decal on one or two accent nails and press firmly.
- Finish with a gloss top coat to seal the design and add shine.
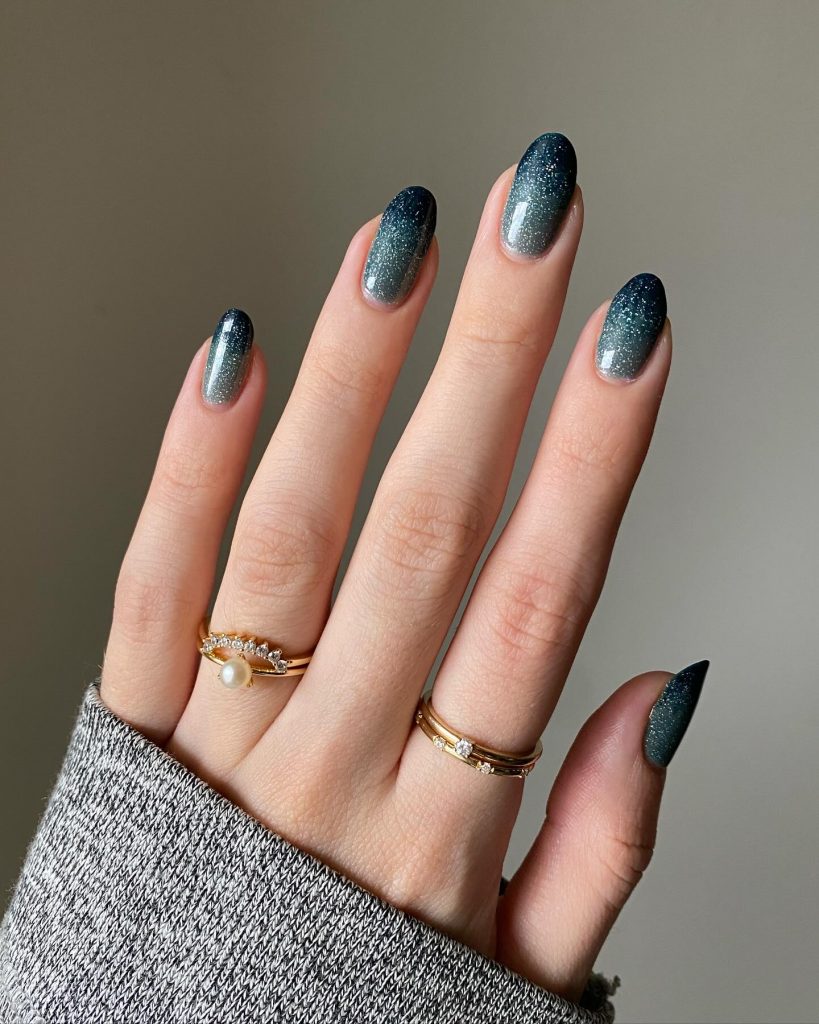
Gradient winter blue
This ombre design goes from light gray at the base to deep blue at the ends, with a hint of glitter for extra winter sparkle. The gradient effect mimics a cold winter sky, making it perfect for the colder months. The soft almond shape elongates the fingers and the glitter adds a festive touch without being too noticeable.
Consumables
- Base layer: CND Stickey base layer
- Light gray paint: OPI ‘I Can Never Hut Up’
- Dark blue paint: Essie ‘Aruba Blue’
- Glitter top coat: ILNP ‘Diamond Dust’
How to make this design at home
- Start with a base coat for long-lasting color.
- Using a makeup sponge, create the gradient by applying the light gray at the base and the dark blue at the ends.
- Apply a glitter top coat to blend the colors smoothly and add shine.
- Finish with a high-gloss top coat to maintain the gradient effect.
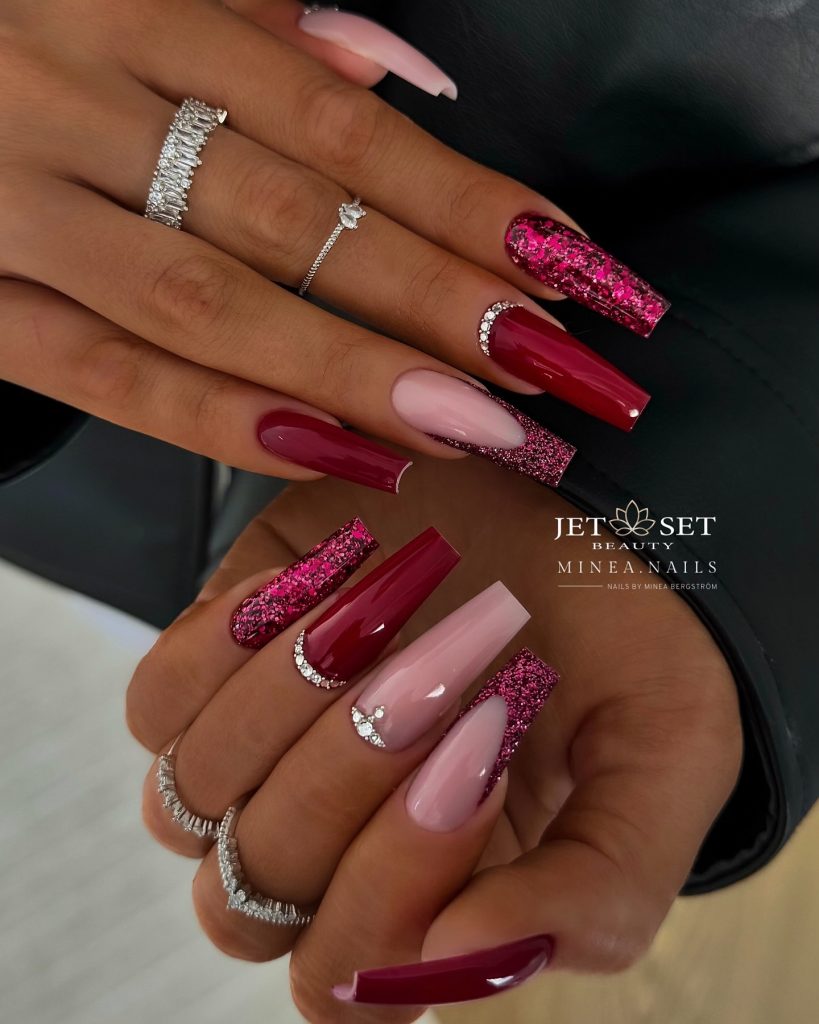
Glamorous red and pink glitter
If you’re looking for a bold and glamorous look for winter, this combination of deep red, pink and glitter is a must-try. The ballerina-shaped nails are accentuated by the mix of colors, rhinestones and glitter tips, making this an ideal manicure for holiday parties or a special night out. This design is sure to turn heads and make a powerful statement.
Consumables
- Base Coat: Essie ‘Ridge Filling Base Coat’
- Deep red polish: Dior Vernis ‘Red Royalty’
- Pink polish: Essie ‘Ballet slippers’
- Pink glitter: OPI ‘Pink-ing of You’
- Rhinestones: Swarovski nail crystals
- Top layer: Sally Hansen ‘Insta-Dri’
How to make this design at home
- Apply a base coat to protect your nails.
- Alternate between the red and pink nail polish on each nail and apply two coats of each nail.
- Add glitter tips to the pink nails for extra shine.
- Place rhinestones along the cuticle line for extra glamor and finish with a top coat.
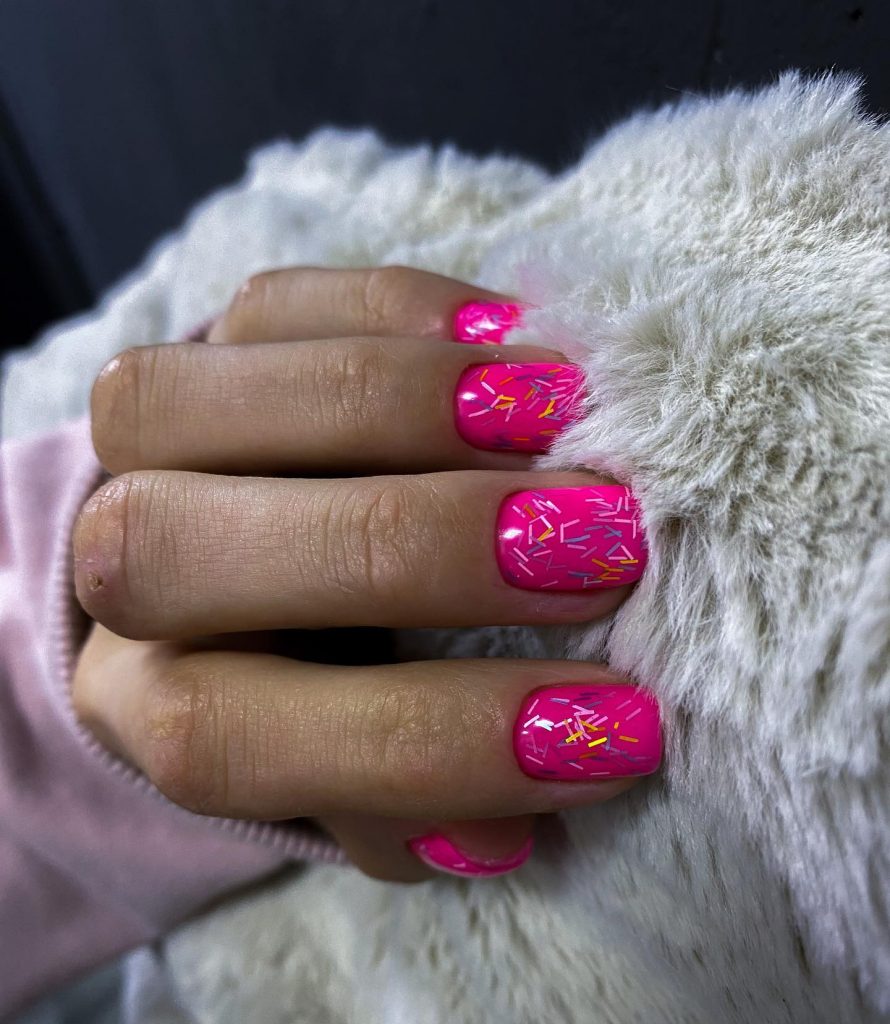
Bright pink confetti
For those who love fun and playful designs, these short pink nails with multi-colored confetti are a bright and cheerful option. The striking pink base makes the confetti stand out, while the short length makes it practical for everyday use. This look is ideal for anyone who wants a pop of color during the winter months, and wants to add a little brightness to cold days.
Consumables
- Base coat: OPI Infinite Shine Primer
- Pink polish: China Glaze ‘Shocking Pink’
- Confetti: Essie ‘Confetti Party’
- Top coat: Revlon quick-drying top coat
How to make this design at home
- Start with a protective base coat.
- Apply two coats of bright pink polish and let it dry between coats.
- Dab confetti polish on the nails for a festive, playful look.
- Seal with a top coat for shine and durability.
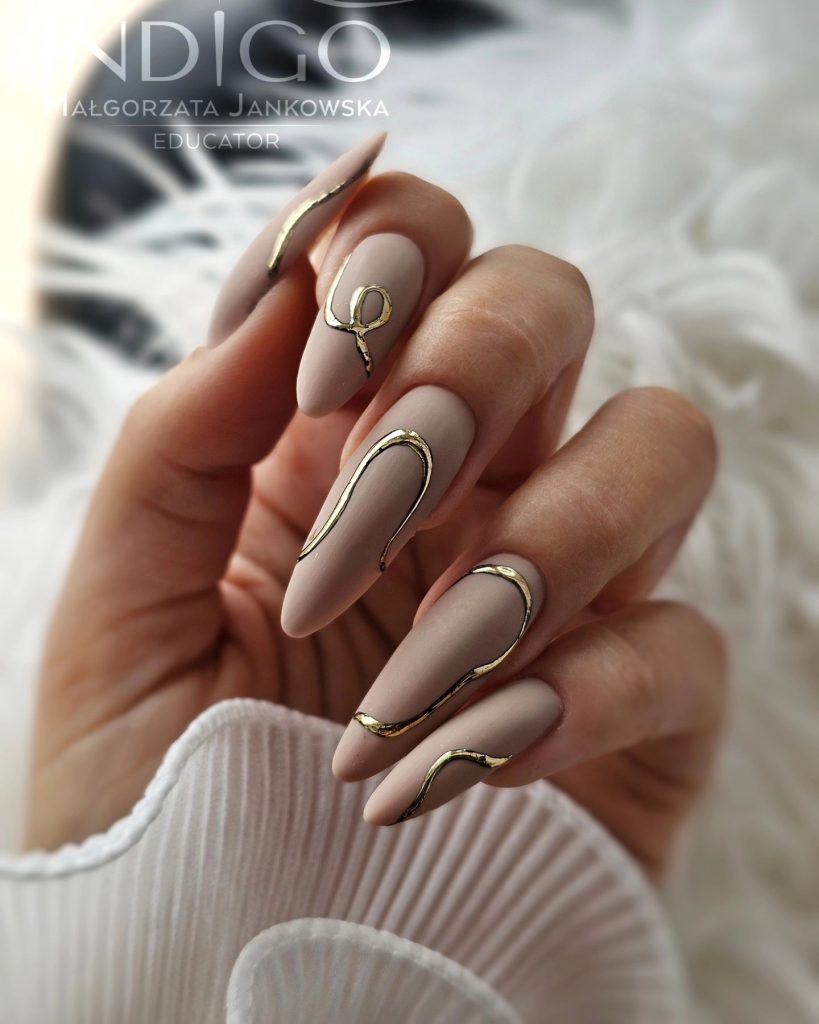
Matte nude with gold accents
This almond-shaped manicure has a matte nude base with delicate gold accents. The minimalist design with flowing gold lines gives the nails a modern, sophisticated touch that is both subtle and elegant. The nude shade is perfect for winter, while the gold accents add a luxurious element, making this design perfect for special occasions.
Consumables
- Base Coat: Zoya ‘Anchor Base Coat’
- Nude lacquer: OPI ‘Samoan Sand’
- Gold foil accents: Gold Nail Foil from Born Pretty
- Matte top coat: OPI Matte Topcoat
How to make this design at home
- Start with a base layer for protection.
- Apply two coats of nude polish, allowing them to dry completely.
- Use gold foil or a thin brush to create gold accents along the nails.
- Seal the design with a matte top coat for a smooth, velvety finish.
Glittering nude glamour
This delicate almond-shaped manicure has a nude pink base, embellished with soft gold glitter. The design is understated yet glamorous, making it perfect for winter festivities or a sophisticated everyday look. The glitter adds a touch of sparkle and creates a beautiful balance between elegance and fun. This look is ideal for those who love a minimalist vibe with just the right amount of shine.
Consumables
- Base coat: OPI Infinite Shine Primer
- Nude pink polish: Essie ‘Mademoiselle’
- Gold glitter: CND ‘Gold Sparkle’
- Top coat: Seche Vite Dry Fast Topcoat
How to make this design at home
- Start by applying a base coat for smooth nail coverage.
- Apply two coats of nude-pink nail polish and allow each coat to dry completely.
- Add a layer of gold glitter for a festive touch.
- Seal with a glossy top coat to enhance shine and protect the glitter.
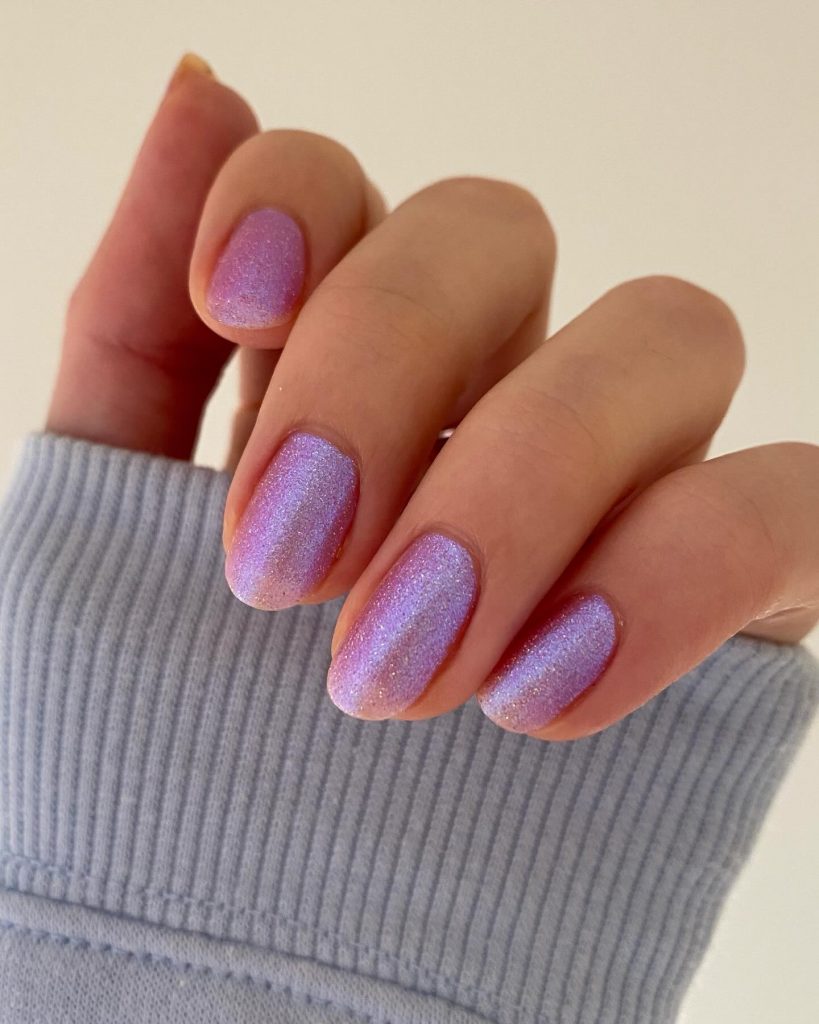
Lilac holographic shine
These short lilac nails with a holographic shine are both chic and playful. The shimmering effect adds depth and dimension to the simple lilac base, making them perfect for winter when you want to keep it subtle yet striking. This design is great for those who like to experiment with color but prefer a more subdued approach.
Consumables
- Base layer: Orly Bonder rubber base layer
- Lilac polish: ILNP ‘Dream Girl’ holographic
- Top coat: Sally Hansen Miracle Gel
How to make this design at home
- Apply a base coat to prepare the nails.
- Paint the nails with two layers of lilac holographic nail polish.
- Let the nails dry and finish with a high-shine top coat for extra durability.
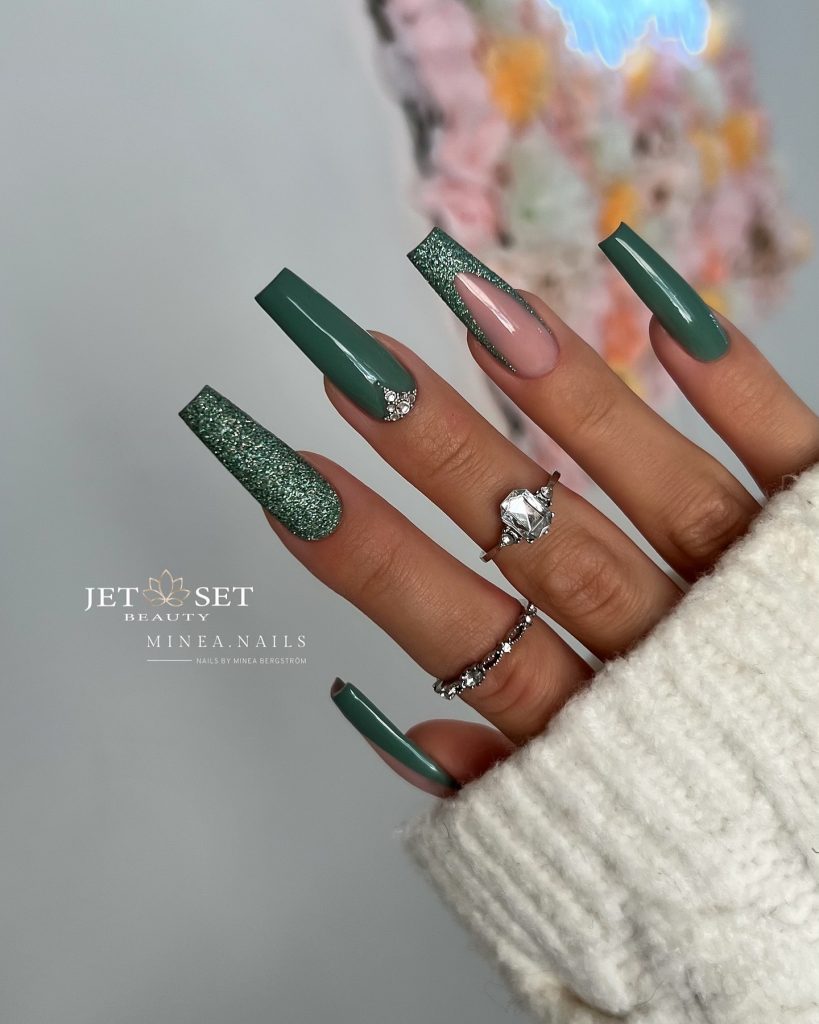
Striking green and glitter accents
This striking ballerina-shaped manicure combines green and glitter for a striking winter look. The glitter on alternate nails adds a touch of glamour, while the deep green polish keeps the design grounded and chic. The rhinestone accents give this style a luxurious look, making it perfect for a special occasion or holiday event.
Consumables
- Base layer: CND Stickey base layer
- Green polish: OPI ‘Keep off the lawn’
- Glitter polish: Essie ‘Set in Stones’
- Rhinestones: Swarovski crystal nail accents
- Top coat: OPI GelColor Topcoat
How to make this design at home
- Start with a base layer for protection.
- Paint the nails alternately with green nail polish and on others with glitter.
- Add rhinestones to the base of the green nails for a glamorous finish.
- Seal with a top coat for extra shine and longevity.
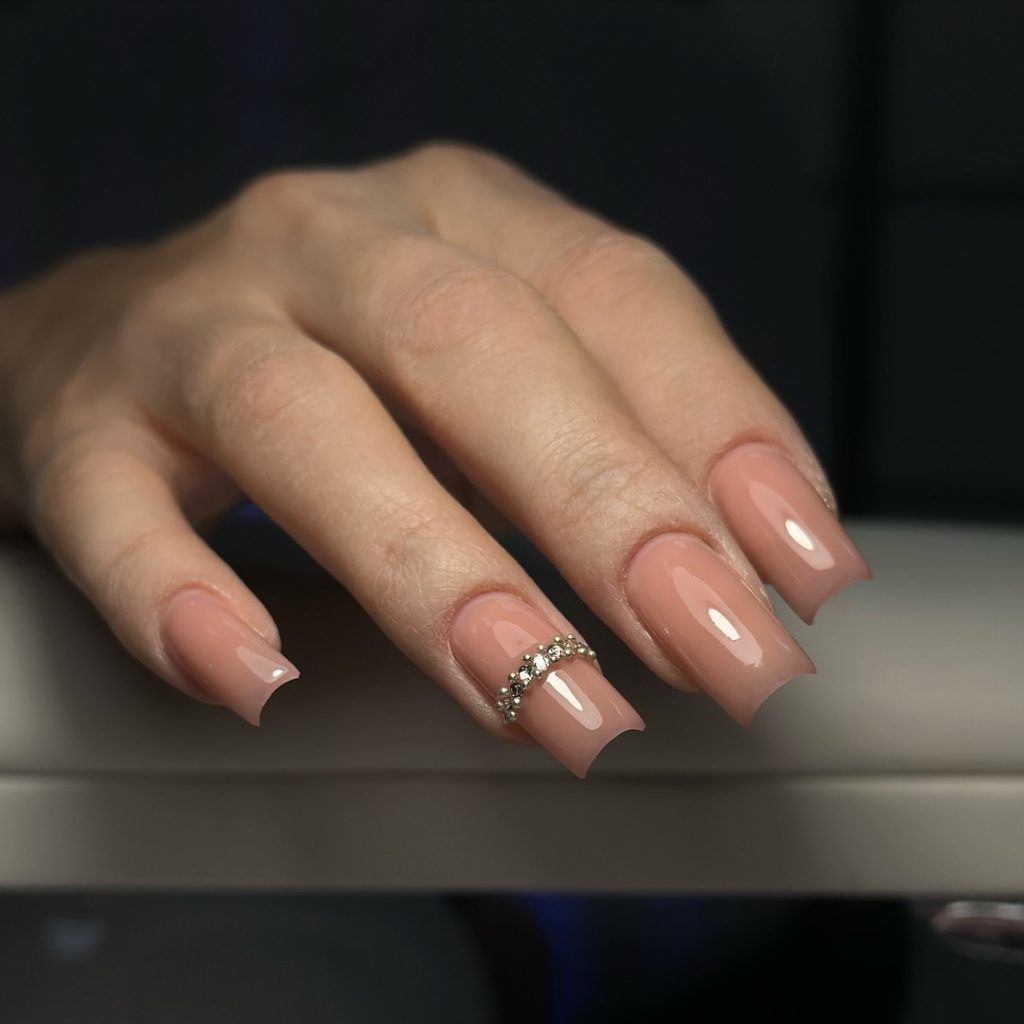
Nude with elegant rhinestone accent
This nude manicure with rhinestone accent is perfect for those who prefer a sleek, sophisticated look. The soft nude shade will match any outfit, while the rhinestone accent adds just the right amount of sparkle to make this manicure stand out without being too flashy. Ideal for professional environments or formal events, this look offers understated elegance.
Consumables
- Base layer: Deborah Lippmann ‘All About That Base’
- Nude lacquer: OPI ‘Samoan Sand’
- Rhinestones: Nail Art Rhinestones from Born Pretty
- Top coat: Revlon quick-drying top coat
How to make this design at home
- Apply a base coat to prepare the nails.
- Apply two coats of nude polish and let each coat dry thoroughly.
- Place a row of rhinestones on one accent nail for a touch of sparkle.
- Finish with a top coat to keep everything in place.
Matte gold and brown Winter Luxury
This matte almond-shaped manicure has a refined mix of gold and brown tones. The matte finish gives the look a modern touch, while the gold accent nail adds a touch of winter luxury. The geometric details on the accent nail add artistic flair, making this design perfect for those who want something unique and high-fashion for the colder months.
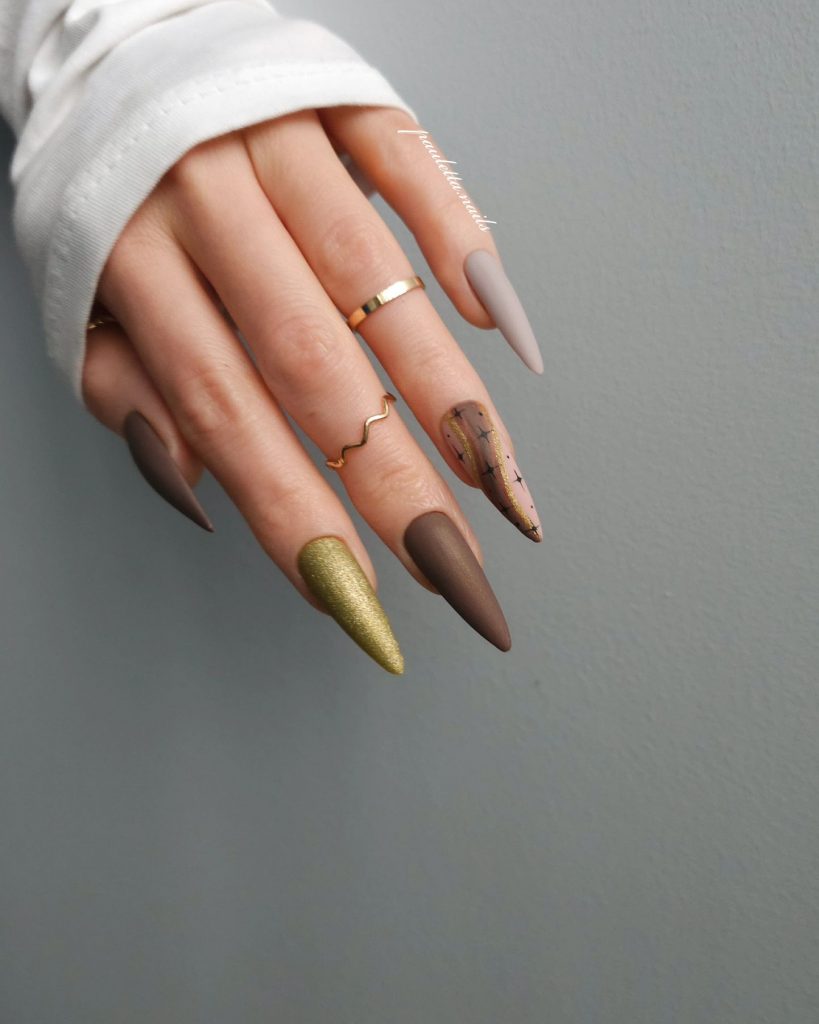
Consumables
- Base Coat: OPI natural nail base coat
- Matte brown polish: Essie ‘Clothing Optional’
- Gold glitter polish: Zoya ‘Astrid’
- Matte top coat: OPI Matte Topcoat
How to make this design at home
- Apply a base coat to protect your nails.
- Paint the nails alternately with brown and gold nail polish, making sure each coat dries completely.
- Add geometric details on one nail for an artistic accent.
- Finish with a matte top coat for a smooth, modern finish.
Classic red elegance
These almond-shaped nails in striking red are a real classic. The glossy finish enhances the vibrant color, making it the perfect choice for anyone looking to make a bold statement this winter. Red nails are timeless and radiate self-confidence, making them suitable for both casual and formal occasions during the holidays.
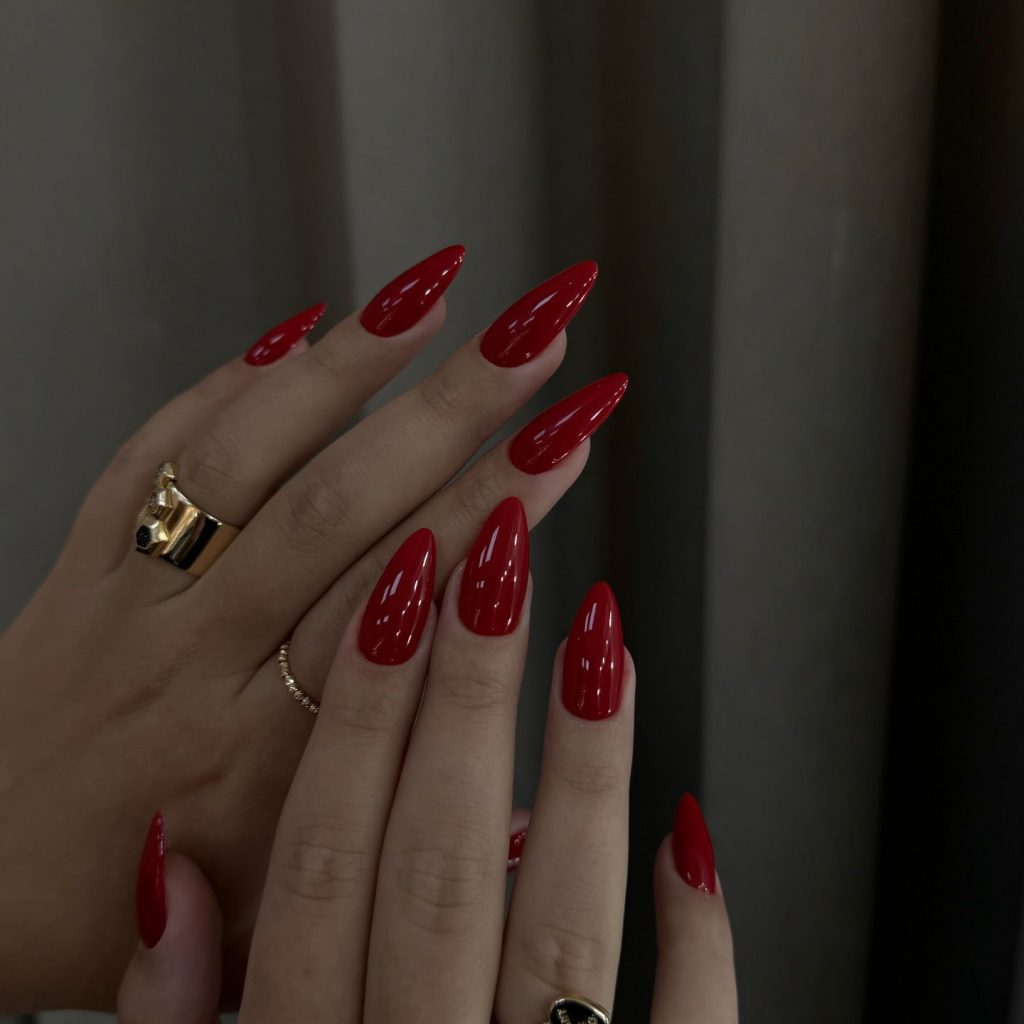
Consumables
- Base layer: Essie ‘Here to Stay’
- Red paint: OPI ‘Big Apple Red’
- Top layer: Sally Hansen ‘Insta-Dri’
How to make this design at home
- Start with a base layer for protection.
- Apply two coats of red polish and let each coat dry in between.
- Finish with a top coat for a glossy, long-lasting shine.
Dark wine ballerina
This ballerina-shaped manicure in deep wine is refined and powerful. The dark shade creates a sultry look, perfect for winter evenings or formal events. The glossy finish brings out the richness of the color and adds depth to this sleek design. Pair it with your favorite jewelry for an elegant, sophisticated look.
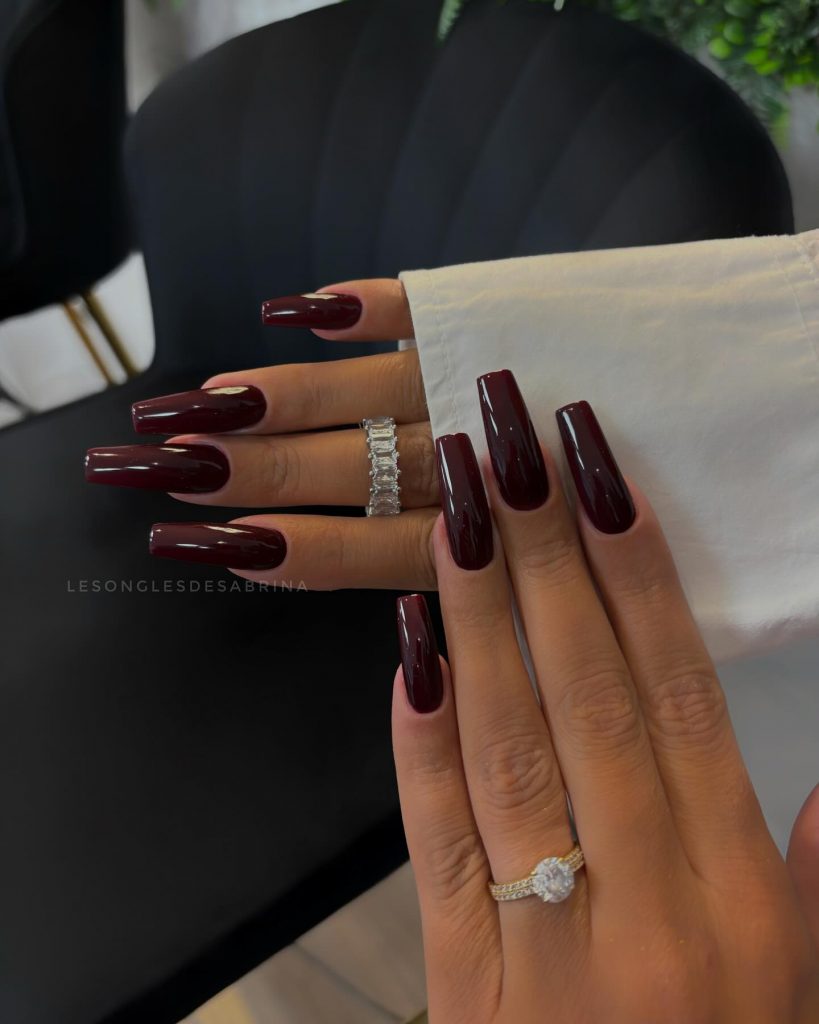
Consumables
- Base Coat: OPI natural nail base coat
- Dark Wine Lacquer: Dior ‘Rouge en Dior’
- Top coat: Revlon Extra Life No Chip Top Coat
How to make this design at home
- Apply a base coat to prepare the nails.
- Apply two coats of dark wine polish and let each coat dry.
- Seal with a top coat for extra shine and durability.
Silver lined French tips
This modern take on the classic French manicure features a sharp V-cut at the tip, outlined with delicate silver glitter. The ballerina shape adds elegance to the design, while the glitter accent adds a festive touch. This is the perfect manicure for those who love a minimalist style but want a subtle shine for winter parties.
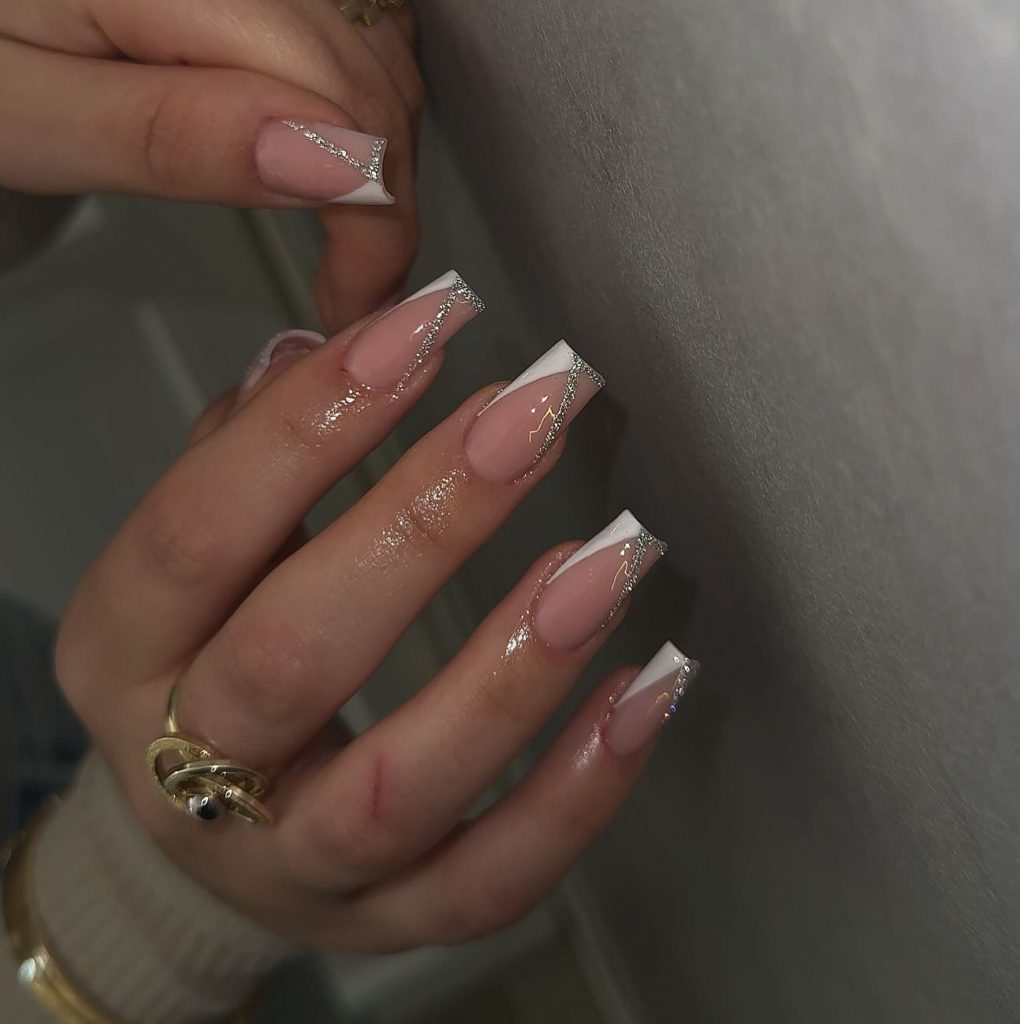
Consumables
- Base layer: Essie ‘First Base’
- Nude lacquer: OPI ‘Bubble Bath’
- Polish with white tip: China Glaze ‘White on White’
- Silver glitter: Essie ‘Set in Stones’
- Top coat: Essie Gel Couture Topcoat
How to make this design at home
- Start with a base coat for even coverage.
- Apply a nude polish, followed by white tips with a V-shaped design.
- Add a silver glitter outline along the ends and finish with a top coat.
Classic French with square tips
This square classic French manicure is timeless and chic. The simple nude base with pure white tips creates a sophisticated look, ideal for both everyday wear and formal occasions. The square shape adds a modern touch to the traditional design, making it perfect for those who prefer clean, polished nails.
Consumables
- Base Layer: OPI ‘Nail Envy’ Amplifier
- Nude: Essie ‘Mademoiselle’
- White tip polish: Sally Hansen ‘White On’
- Top coat: Seche Vite Dry Fast Topcoat
How to make this design at home
- Start with a protective base coat.
- Apply a nude polish and then paint white dots along the edge of the nails.
- Finish with a gloss top coat for a smooth, shiny finish.
Matte gold and neutral combo
This combination of matte gold glitter and soft nude nails is an elegant choice for winter. The alternating square nails combine the sparkle of gold with the subtlety of matte nude, creating a balanced, chic look. The gold glitter adds a festive touch, making this design ideal for holiday parties or winter events.

Consumables
- Base layer: Zoya Anchor base layer
- Nude matte polish: Essie ‘Clothing Optional’
- Gold glitter polish: Zoya ‘Aphrodite’
- Matte top coat: OPI Matte Topcoat
How to make this design at home
- Start with a base layer for protection.
- Alternate between gold glitter and nude matte nail polish on each nail.
- Seal the design with a matte top coat for a modern, smooth finish.
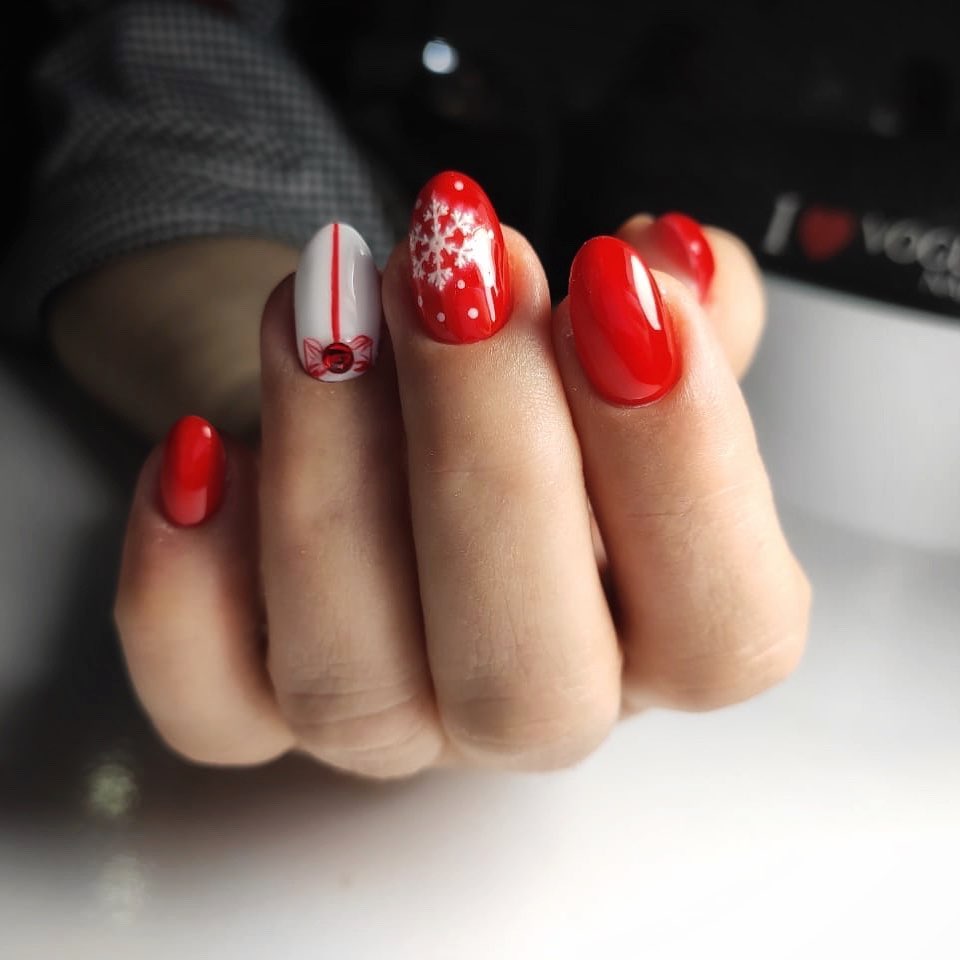
Red and white holiday cheer
This festive design features red nails with a cute Christmas accent in white, decorated with a ribbon and snowflake. The almond shape adds elegance to the playful design, making it a great choice for the Christmas season. The white accent nail stands out against the striking red, creating a cheerful and stylish holiday look.
Consumables
- Base Coat: OPI natural nail base coat
- Red polish: Essie ‘Forever Yummy’
- White lacquer: Essie ‘Blanc’
- Nail art brush for snowflake design
- Top layer: Sally Hansen ‘Diamond Strength’
How to make this design at home
- Start with a base layer for protection.
- Paint the nails red, leaving one accent nail for the white design.
- Use a fine brush to create a ribbon and snowflake pattern on the white nail.
- Finish with a top coat to fix the design.
Save pin


Namie O, a talented writer at Willtiptop, conveys her passion for fashion and beauty in every word she writes. With a keen eye for detail and a deep insight into the latest trends, Namie’s articles and insights captivate readers and provide them with valuable knowledge and inspiration. Through her engaging and informative writing style, Namie aims to empower individuals to explore their style, experiment with beauty techniques, and embrace their unique sense of self.