Exploring USA Nails 25 Ideas: Celebrating Patriotism with Style
What comes to mind when you think of American nails? Is it the striking red, white and blue? Or maybe it’s the stars and stripes that are reminiscent of the 4th of July? In this article, we delve into the world of patriotic nail designs and bring you a mix of simple, cute and sophisticated styles to suit every preference. Whether you’re getting ready for a national holiday or just want to show your pride all year long, these nail ideas will inspire your next manicure.
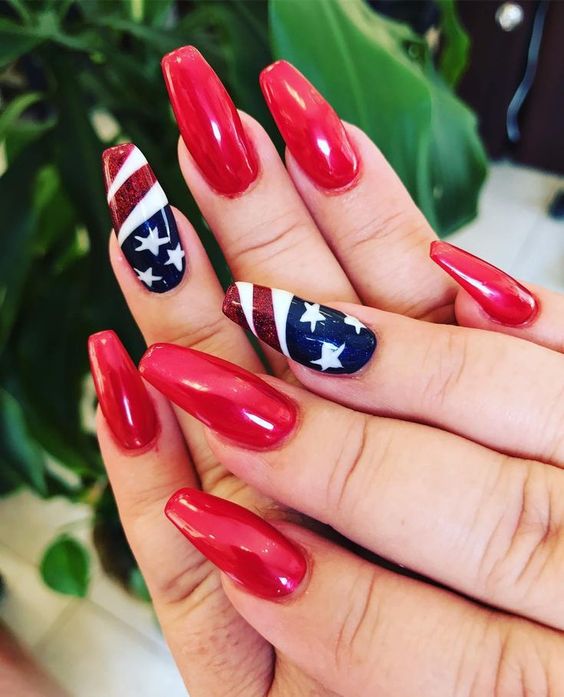
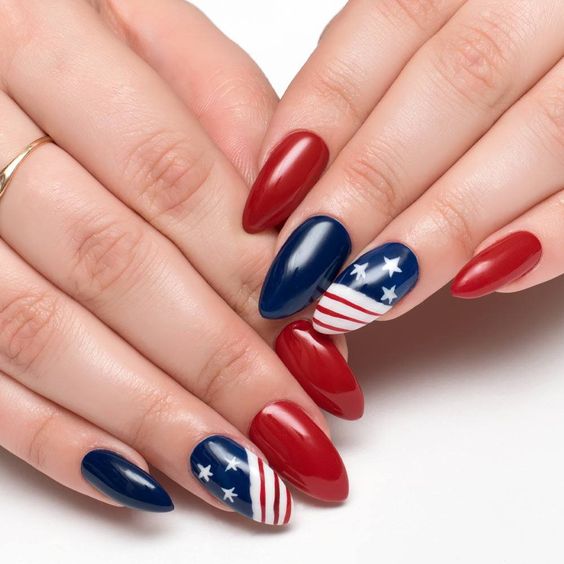
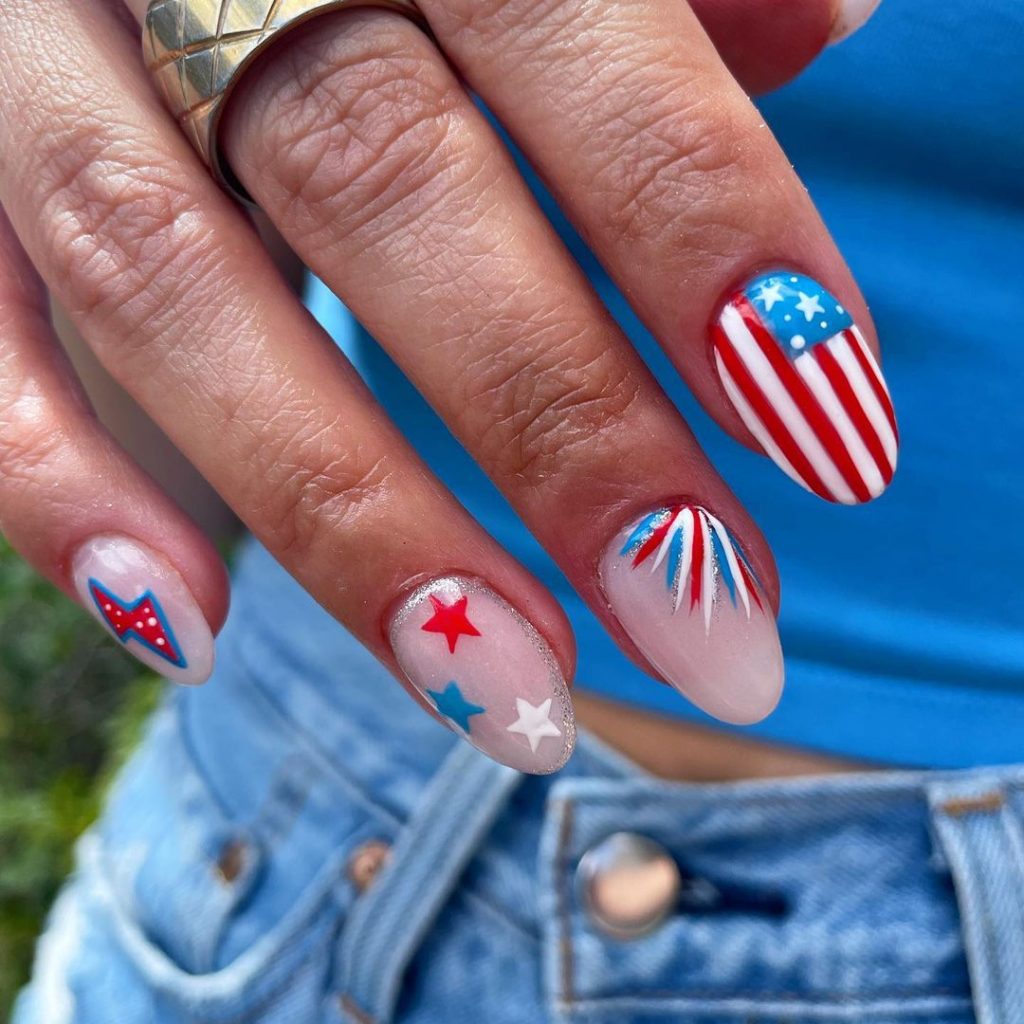
The classic American flag design
This nail set exudes patriotism, with bold stripes and star-spangled accents that are perfect for any 4th of July party. The vibrant blue and twinkling stars contrast beautifully with the shiny red and white stripes, creating a cute yet powerful display of national pride.
- Materials required:
- Red, white and blue polish (preferably OPI or Essie for their vibrant pigments)
- A fine brush for detailing
- Star stickers or a stencil
- Topcoat for a glossy finish
- Pro tip: Start with a white base coat to make the colors pop. Use the fine brush to create clean, crisp lines and apply the star stickers while the blue polish is still tacky so they adhere well.
DIY steps:
- Apply a base coat of white nail polish to all nails.
- For the stripes, paint the nails alternately with red nail polish and add white stripes with a fine brush.
- Paint a blue base on the remaining nails and apply star stickers.
- Seal with a high-gloss top coat to protect your design and add shine.
Subtle patriotic touch
If you prefer a more subtle approach to your American nails, this design offers a stylish yet understated way to wear your patriotism. Featuring a soft, matte finish with minimalist star patterns, this look is perfect for those who appreciate simple elegance.
- Materials required:
- Matte top coat (Matte About You by Essie is highly recommended)
- White and blue nail polish
- Star stickers or a small dotting tool
- Pro tip: Matte finishes can be tricky to master without streaks. Apply the matte top coat in one smooth motion and let it dry completely without touching.
DIY steps:
- Paint your nails with two coats of white polish.
- Once dry, strategically place blue stars on the ring and thumb nails for a touch of 4th of July flair.
- Finish with a matte top coat for a refined touch.
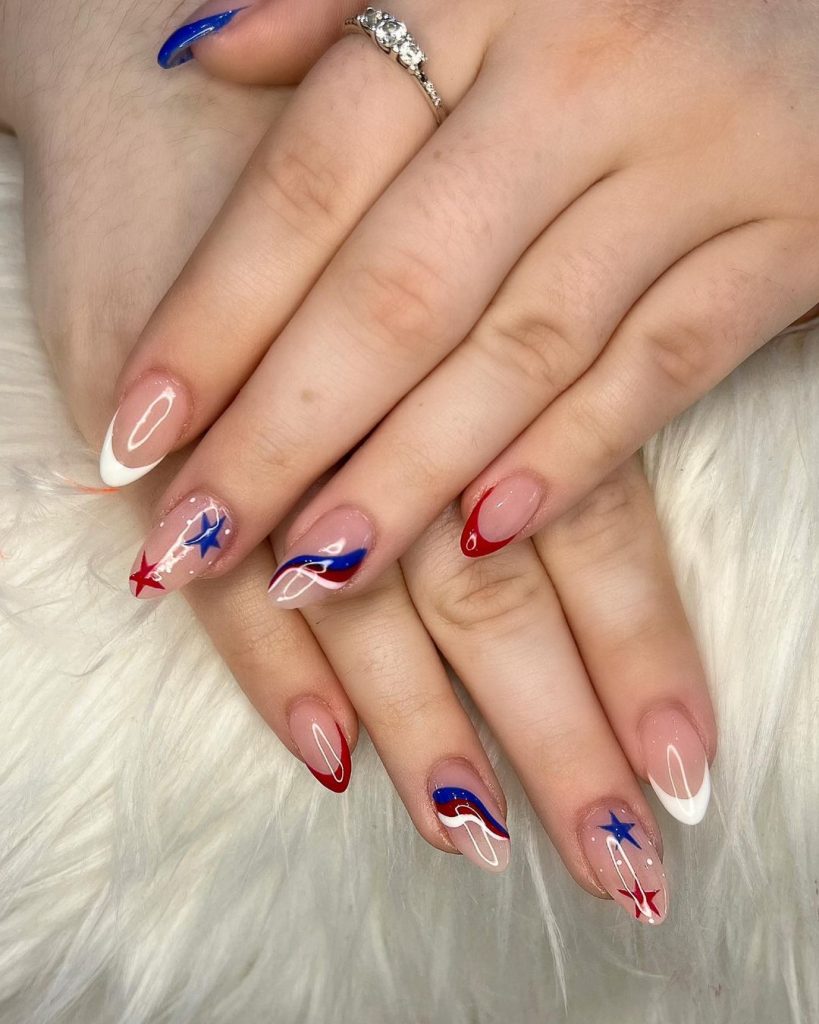
Elegant French tip with a twist
This design reinvents the classic French tip by integrating a blue stripe and a delicate star. It’s a sophisticated take on American nails that’s perfect for both office environments and festive gatherings.
- Materials required:
- Nude base coat
- White, red and blue paint for the tips
- A fine brush or striping tape for precision
- Pro Tip: Use striping tape to get neat, straight lines for your French tips. This ensures a professional looking finish.
DIY steps:
- Apply a nude base coat to all nails.
- Once dry, use striping tape to mark out the points, then paint the points white, red, and blue.
- Add a small star to one of the blue tips to connect the theme.
- Finish with a clear top coat for durability and shine.
Bold and brilliant fireworks
This nail design captures the essence of a 4th of July fireworks show with its explosive patterns and dazzling glitter. Featuring a mix of deep blue and vibrant red with silver accents, these nails are a celebration at your fingertips, perfect for any patriotic event or as a tribute to American pride all year long.
- Materials required:
- Deep blue, red and silver glitter polish
- Sponge for a gradient effect
- A small brush for detailed accents
- Silver rhinestones or glitter
- Pro tip: For the fireworks effect, use a sponge to apply the silver glitter over the blue base. This technique creates a diffused, sparkling look that mimics the night sky illuminated by fireworks.
DIY steps:
- Paint all nails with a base of deep blue nail polish.
- Use a sponge to apply red polish to the ends, creating a gradient effect.
- Dab silver glitter polish over the gradient for a sparkling fireworks effect.
- Decorate with silver rhinestones on the accent nails to enhance the festive look.
- Finish everything off with a glossy top coat to ensure your manicure shines brightly.
Patriotic tall almond glory
Celebrate the spirit of America with these long almond-shaped nails, which combine the traditional colors of the American flag in a stylish ombre effect. The almond shape is not only trendy, but also gives a sophisticated look to the simple yet striking design.
- Materials required:
- Red, white and blue nail polish
- A sponge for the ombre effect
- Fine glitter for a subtle shine
- Almond nail tips if extensions are needed
- Pro tip: Achieving a smooth ombre transition on long nails can be a challenge. To make it easier, apply the nail polish to a sponge first and then press it onto the nails in a stippling motion to allow the colors to fade naturally.
DIY steps:
- Apply a base coat to protect your nails and improve nail polish adhesion.
- For the ombre effect, apply stripes of red, white and blue polish next to each other on a sponge. Press the sponge onto the nails and repeat to intensify the color mixing.
- Add a layer of fine glitter over the ombre for a star-spangled sparkle.
- Finish with a high-shine top coat to make your American nails look polished and party-ready.
Casual Americana chic
Featuring a refreshing mix of matte orange and blue with star accents, this nail design offers a casual yet stylish way to wear American nails. It’s perfect for those who prefer a more relaxed look while still nodding to American symbols.
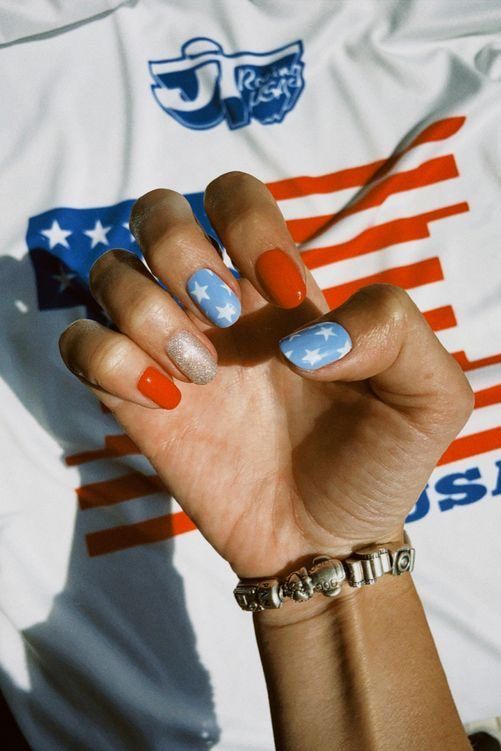
- Materials required:
- Matte orange and blue paint
- White paint for stars
- Matte top layer
- Pro tip: For perfectly shaped stars, use a thin detail brush or opt for ready-made star stickers that can easily be applied over the matte base.
DIY steps:
- Paint alternating nails with matte orange and blue polish.
- Using a fine brush, add white stars to the blue nails.
- Complete the look with a matte top coat to keep everything smooth and subtle.
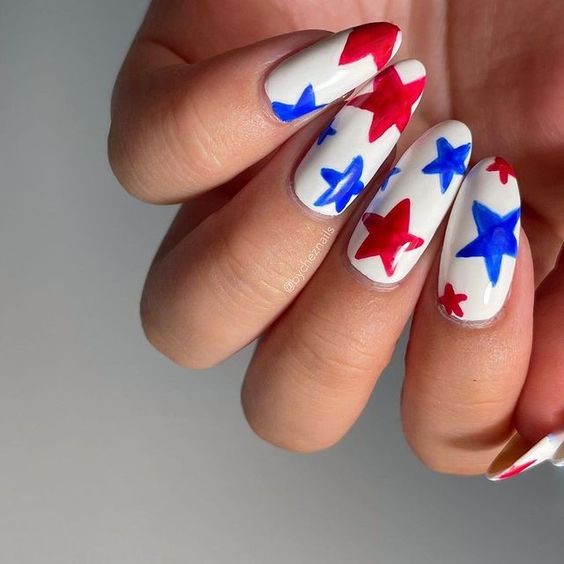
Lively party ready
This fun, vibrant design combines different patterns such as stripes, hearts and checks in classic red, white and blue. It’s a perfect choice for 4th of July celebrations or any patriotic event where you want to make a statement with your nails.
- Materials required:
- Red, white and blue paint
- Detail brushes for precise patterns
- A dotting tool or small brush for hearts
- Pro tip: Keep a steady hand for the detailed patterns and consider using thin striping tape to get clean lines.
DIY steps:
- Paint each nail with a different base color: red, white or blue.
- Add patterns: stripes on red, stars on blue and hearts on white.
- Seal with a glossy top coat to enhance the colors and ensure the design lasts.
Mixed media American pride
This design showcases a stunning mix of gloss and matte finishes with stripes and star details, creating a textured look that is both modern and patriotic. It’s a dynamic approach to American nails that stands out from the crowd.
- Materials required:
- Glossy and matte topcoats
- Red, white and blue paint
- Star stickers or a star punch
- Pro tip: Apply the glossy top coat over the colored parts and the matte top coat over the white to create a striking contrast.
DIY steps:
- Paint stripes in red and white and a full nail in blue.
- Add star stickers to the blue nail.
- Finish with alternating top coats: matte for white areas and glossy for colors.
Dynamic long almond art
This long almond-shaped design features swirling stripes and star accents in an American nails theme that’s perfect for making a bold statement. The glossy finish of these nails catches the light beautifully and reflects the vibrant spirit of America.

- Materials required:
- Red, white and blue paint
- Glitter polish for extra shine
- Almond nail tips for extension
- Pro tip: Use a fine brush to swirl the polish while it’s still wet to achieve the dynamic patterns seen here.
DIY steps:
- Apply a base coat of clear coat.
- Swirl red, white and blue polishes together on each nail.
- Add a touch of glitter for a festive sparkle.
- Finish with a glossy top coat for durability and shine.
Gentle patriot
This design offers a softer take on patriotic themes, featuring natural nails with subtle dot and stripe patterns in red, white and blue. It’s perfect for those who prefer a more understated yet stylish way to express their American pride.
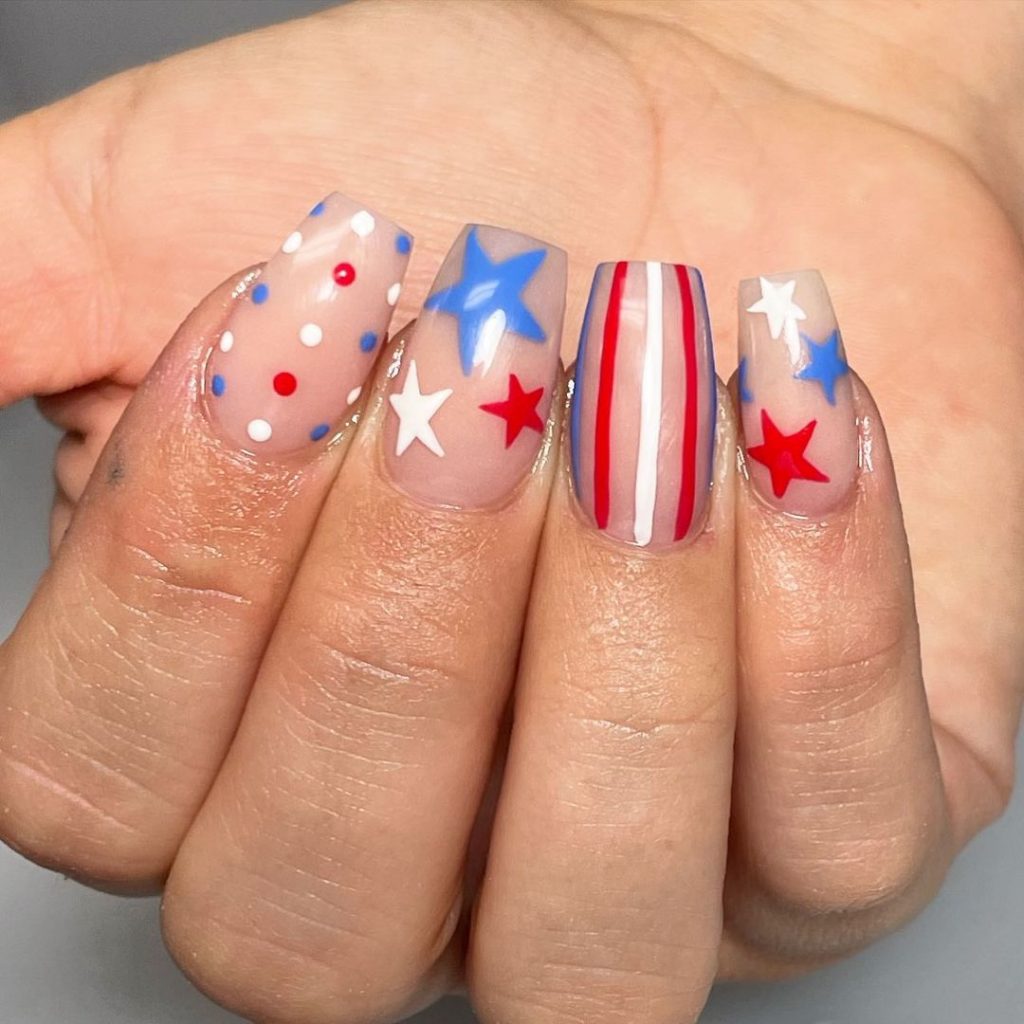
- Materials required:
- Natural nail-colored polish as a base
- Red, white and blue paint for accents
- A points tool
- Pro tip: Use a very light hand when applying the dots and stripes to maintain the subtlety of the design.
DIY steps:
- Start with a base coat of natural nail polish.
- Carefully add small dots and thin stripes in red, white and blue.
- Seal with a top coat to protect the design and prevent chipping.
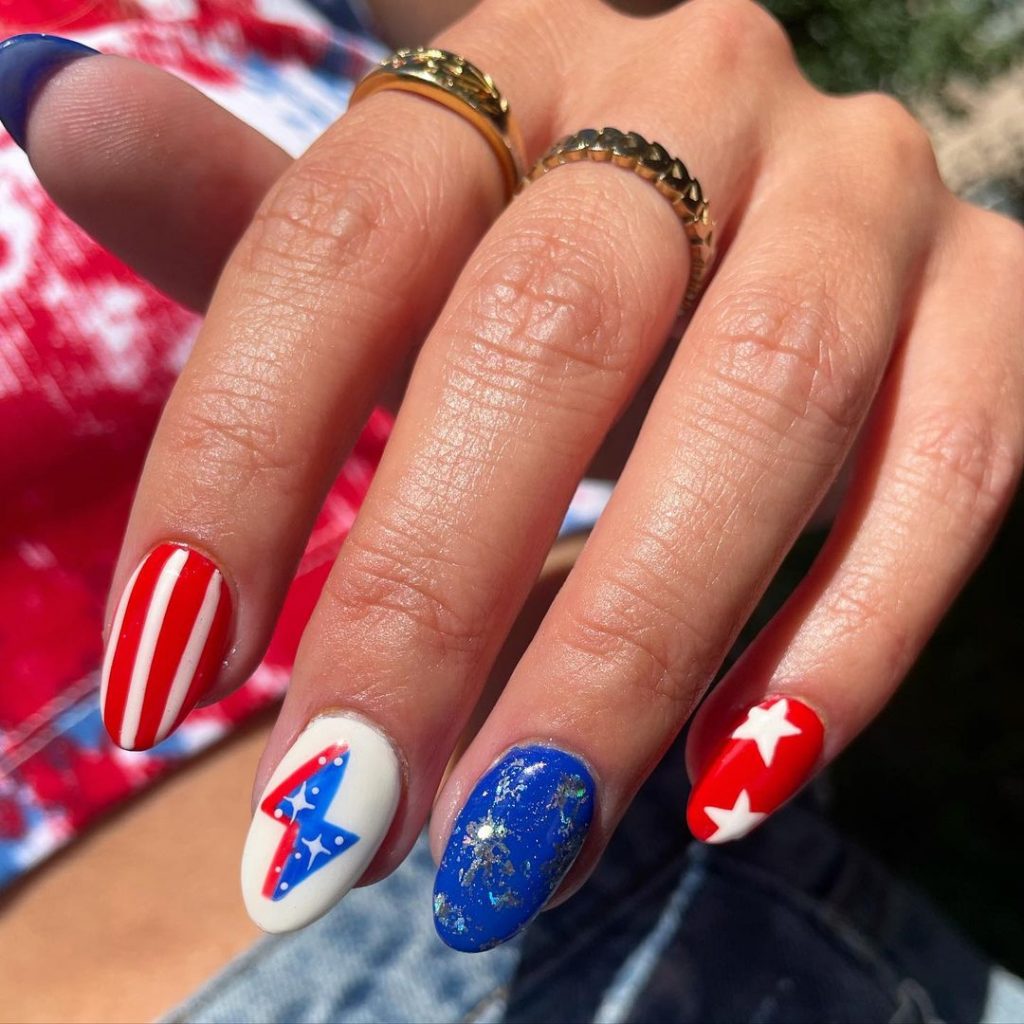
Delicate Touch: soft blue and striking red stars
This nail design combines the serene blue with vibrant red stars, giving a playful yet understated nod to the 4th of July. The short nails enhance the cute and simple aesthetic, making it perfect for everyday wear or a subtle party.
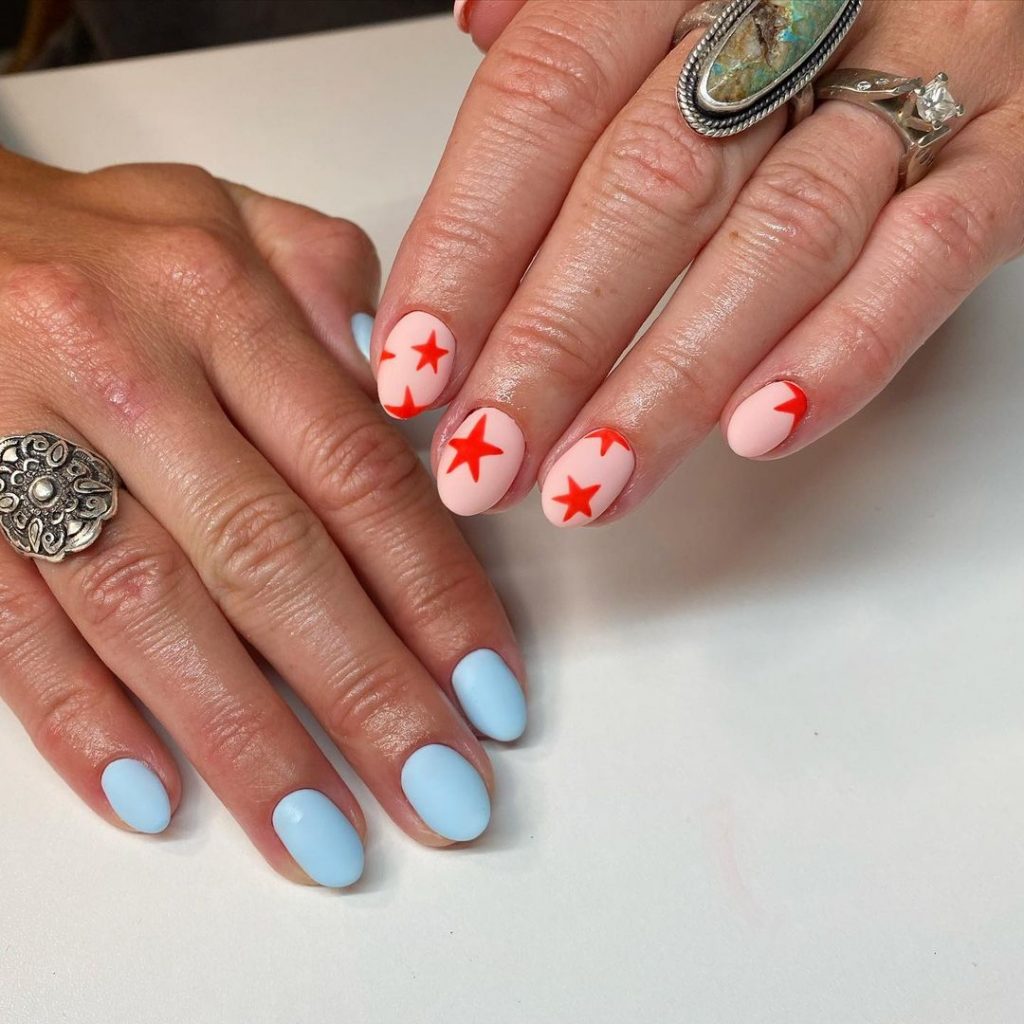
- Materials required:
- Soft blue polish: Essie’s bikini so small
- Red star stickers or decals
- Clear top coat: OPI top coat
Professional insight: The charm of this design lies in its simplicity. The soft blue provides a tranquil backdrop for the striking red stars, which pop up beautifully to attract attention.
DIY tips: Apply two coats of blue polish for a sturdy base. Place the star stickers carefully and seal them with a top coat to prevent peeling and prolong the wear of your manicure.
Sleek and modern: star almond accents
This almond nail design uses white as the canvas, accented by blue stars, creating a look that is both modern and festive. The clean lines and sharp contrasts make this design visually striking and distinctly patriotic.
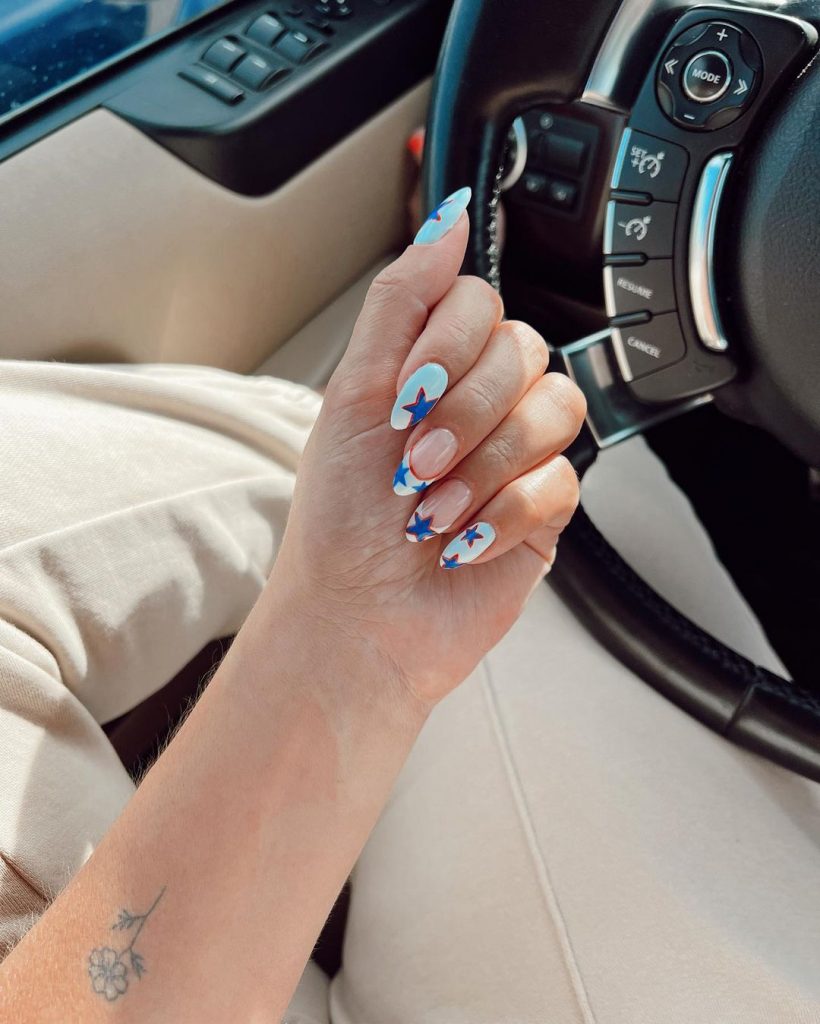
- Materials required:
- White paint: OPI Alpine Snow
- Blue Detailing Polish: China Glaze in Too Yacht to Handle
- Detailing brush
- Shiny top coat: Sally Hansen Insta-Dri top coat
Professional insight: Almond nails offer a refined silhouette that pairs well with detailed artwork. This design requires precision to maintain clean lines and sharp contrasts.
DIY Tips: Use a fine detailing brush to draw the stars. Be patient between coats to avoid smudging and always finish with a glossy top coat for protection and shine.
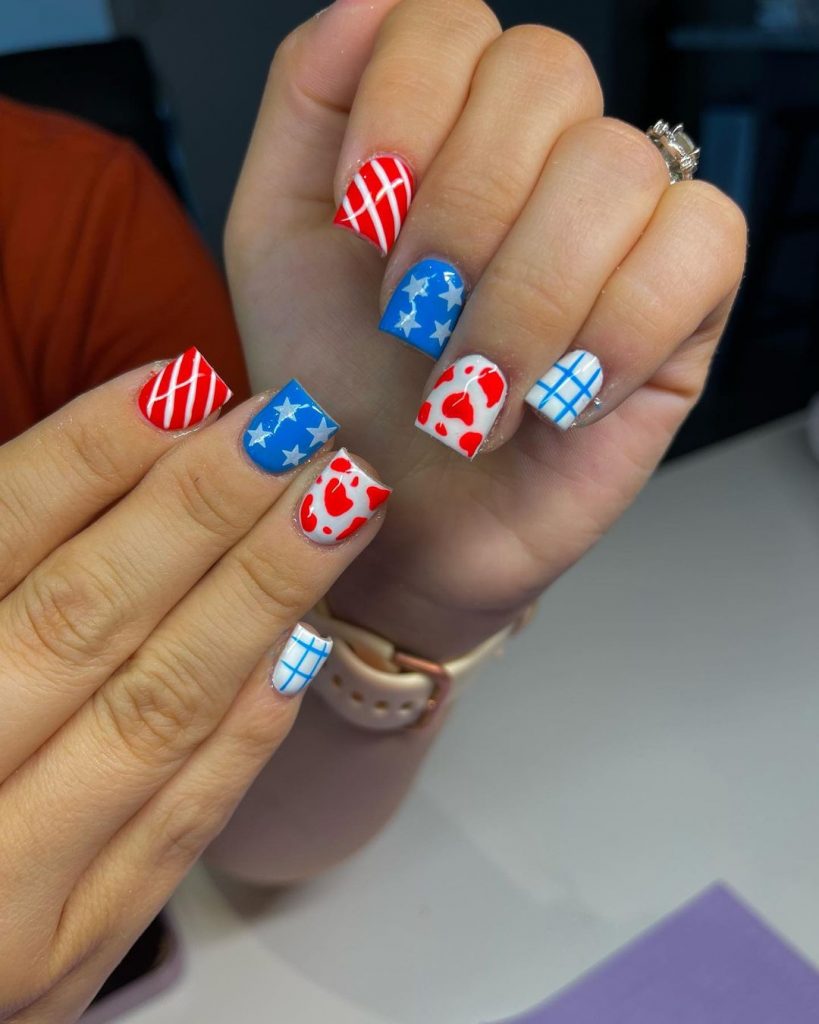
Eclectic artistry: mixed design manicure
This design is a true tribute to the diversity in nail art. Featuring an eclectic mix of patterns including cow prints, abstract shapes and patriotic motifs, it embodies a creative and spirited expression, perfect for 4th of July celebrations.
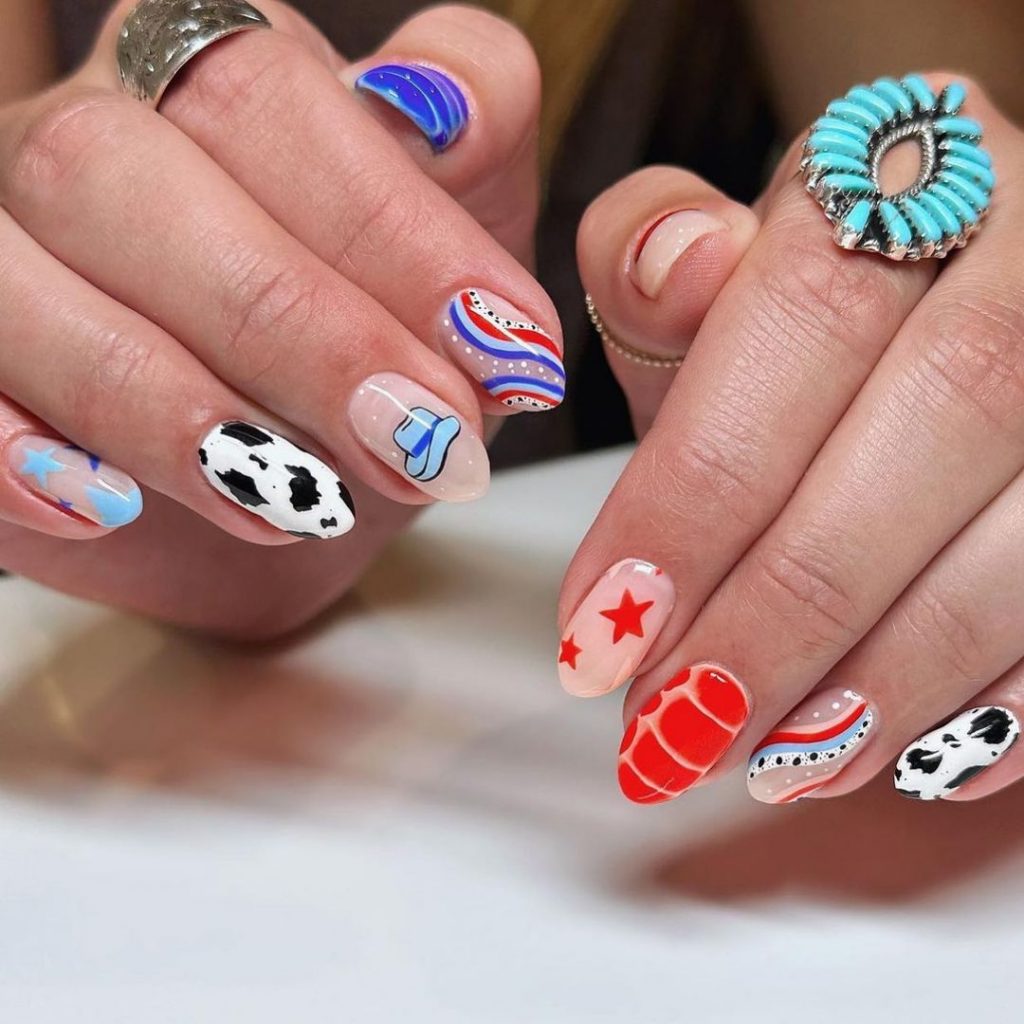
- Materials required:
- Variety of polishes: shades Essie, OPI and Sally Hansen
- Dotting Tools and Brushes for Intricate Designs
- Matte top coat: Essie Matte About You
Professional insight: This manicure is all about freedom of expression. Each nail acts as an individual canvas and showcases a different design, united by a cohesive color scheme.
DIY Tips: Start with a plan for each nail to keep the overall look uniform. Use a matte top coat to give the varied designs a refined finish.
Playful elegance: patriotic long nails
Long nails provide an ample canvas for intricate designs, as seen in this bold, colorful array of patriotic themes mixed with summer icons like ice cream and watermelons. This vibrant design is perfect for those who like to make a statement.
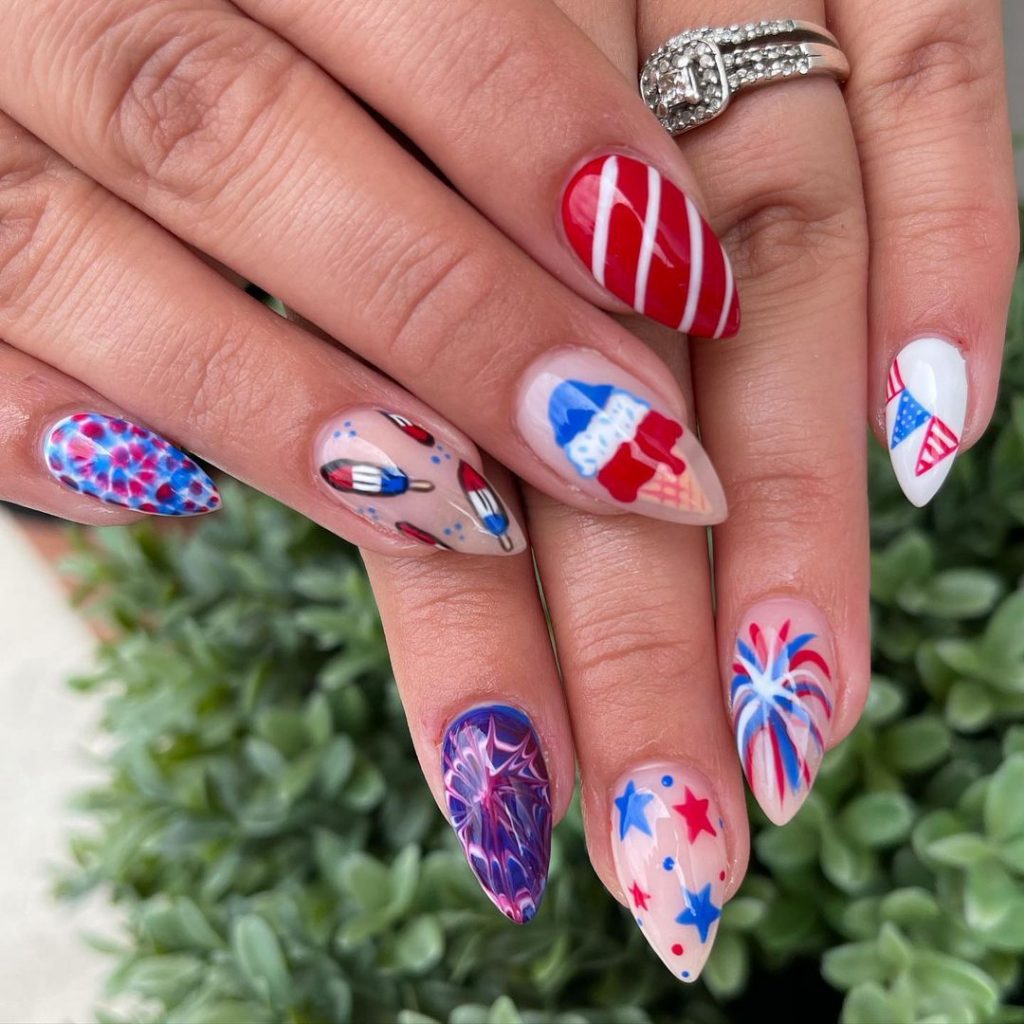
- Materials required:
- High pigment polishes: for bright and vibrant colours
- Fine detail brushes
- Sealing top layer: Seche Vite Dry Fast
Professional insight: Long nails make for more complex and detailed art. This design takes advantage of the extra space to combine iconic summer images with patriotic themes for a fun and festive look.
DIY Tips: Make sure each layer is dry before adding new details to avoid smudging. Finish with a quick-drying top coat to maintain the design and improve durability.
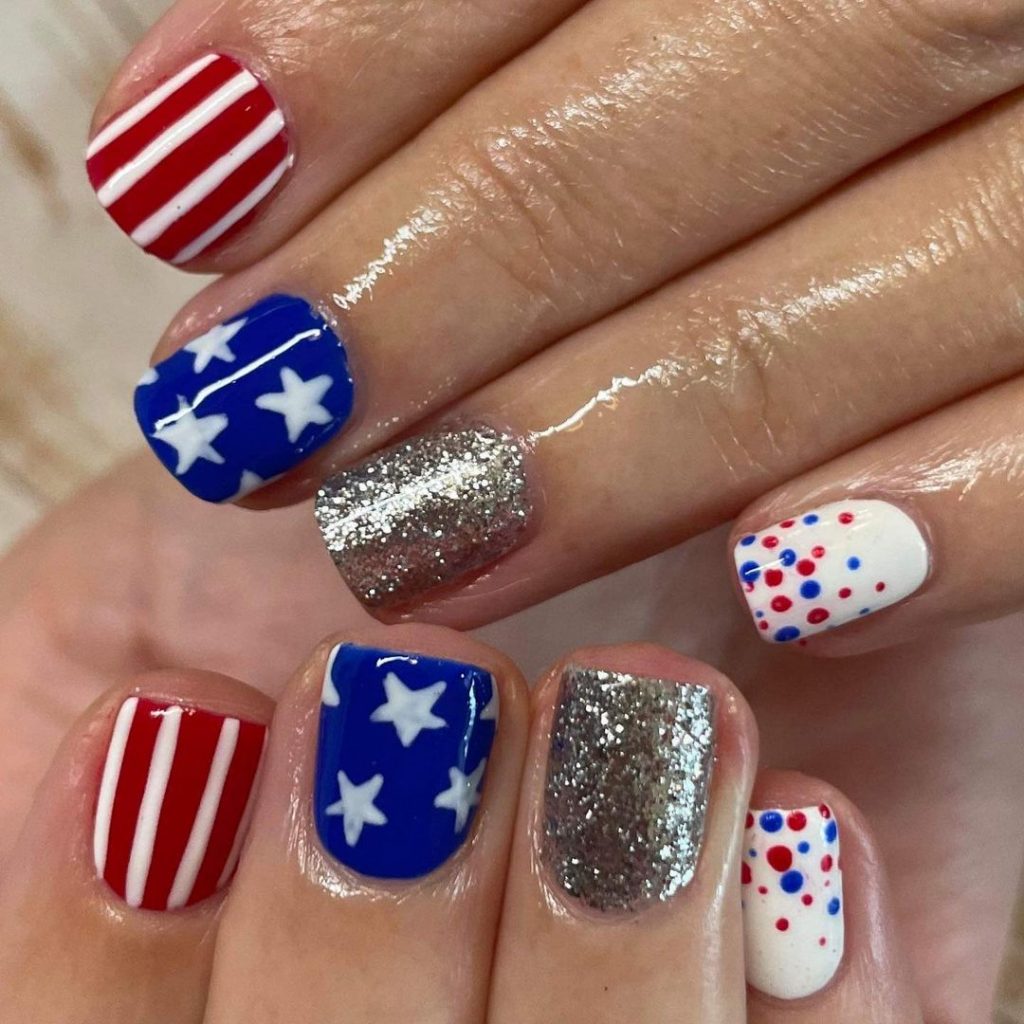
Glitter and glamour: sparkling patriotic nails
These nails shine with an array of glitter, stripes and star details, offering a glamorous take on the 4th of July theme. The use of glitter gradients and precise stripes creates a dazzling effect that is perfect for any festive party.
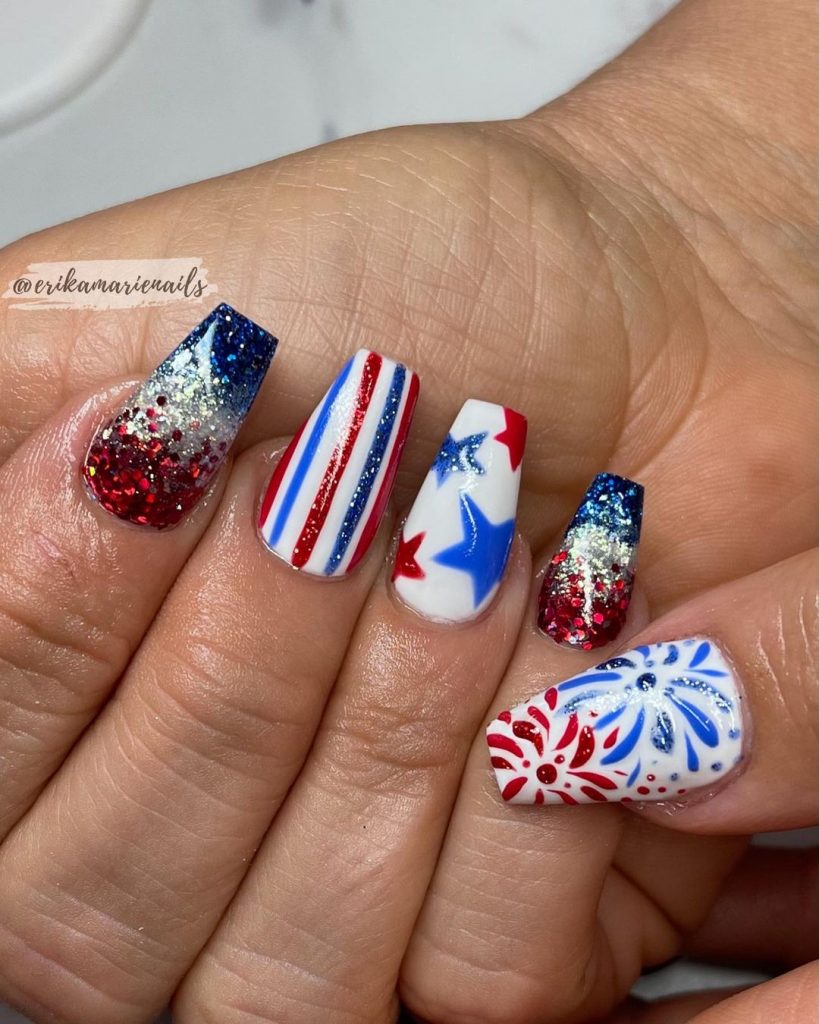
- Materials required:
- Red, white and blue glitter
- Strip tape
- Star stickers
- Strong hold top coat: CND Vinylux Long Wear top coat
Professional insight: Incorporating glitter into your nail design not only adds sparkle, but also texture and depth. Accurately applying striping tape ensures clean, sharp lines.
DIY tips: Apply glitter with a sponge for a more concentrated look. Use striping tape to create perfect lines and patterns and always finish with a strong top coat to keep everything in place.
Contemporary swirls: a modern artistic twist
This nail design features an elegant blend of soft nude tones and bold accents, creating a fluid swirl that brings a fresh perspective to 4th of July motifs. The design combines subtlety with boldness, ideal for someone who wants to combine traditional themes with contemporary art.
- Materials required:
- Nude Paint: Essie’s topless and barefoot
- Red and blue detailing polish: OPI Big Apple Red and Euro Euro
- Fine detailing brush
Professional insight: The swirls require a steady hand and a little practice to perfect. The soft nude background allows the vibrant red and blue colors to stand out, drawing attention to the delicate artwork.
DIY Tips: Start with a very light hand when painting the swirls. You can always add more shine, but correcting lines that are too thick is more challenging. Seal with a gloss top coat for a durable finish.
Bold blue elegance: deep blue with a hint of stars
This design exudes elegance with its deep blue hue, complemented by minimal star accents, making it a sophisticated yet festive choice for any 4th of July party. The sleek, glossy finish adds a touch of luxury.

- Materials required:
- Deep Blue Polish: Sally Hansen Insta-Dri in the Navy Fleet
- White star stickers or paint
- High-gloss top coat: Revlon Extra Life No Chip Top Coat
Professional insight: The key to this look is the richness of the blue, which provides a deep, vibrant backdrop for the stars. This design is perfect for those who prefer a more understated yet elegant approach.
DIY tips: Apply two coats of blue for opaque coverage. Use star stickers for a flawless application or paint stars by hand with a fine brush for more control.
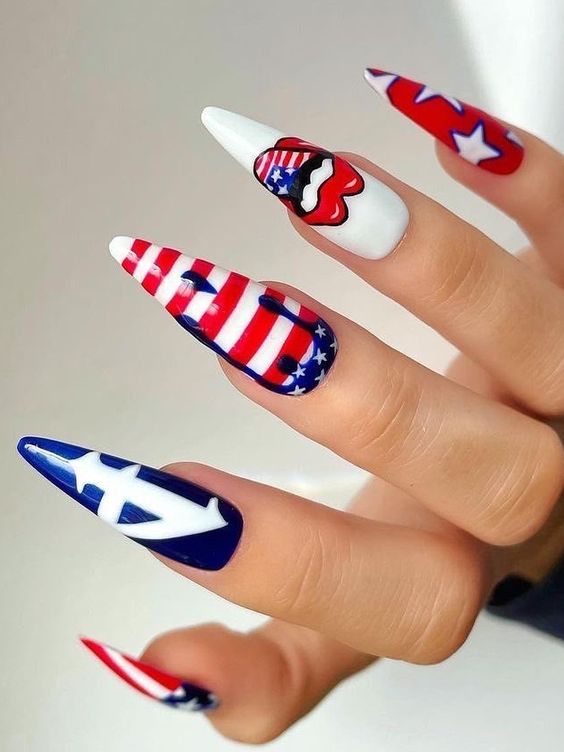
Playful Americana: varied designs for festive fun
This nail set is all about playful variety, featuring stripes, stars and burst designs that are iconic to American symbolism. Each nail tells part of the story, making this design perfect for showing off your patriotic spirit.
- Materials required:
- White, red and blue paints: OPI Alpine Snow, Big Apple Red and Euro Euro
- Detailing brushes and point tools
- Protective top coat: Essie Gel Setter Topcoat
Professional Insight: This eclectic approach allows for creative expression. The variety of designs takes some skill, but the end result is a fun and captivating look that captures the essence of the holiday.
DIY Tips: Plan your designs in advance. Use thin brushes for stripes and a dotting tool for precise star shapes. Finish with a gel-like top coat for a glossy, long-lasting finish.
Summer picnic: bright, playful patterns
Embrace the summer vibe with this fun and bright nail design, featuring playful patterns like cherry and gingham, alongside patriotic stars and stripes. It’s a playful take on 4th of July nails that perfectly combines seasonal themes with festivities.
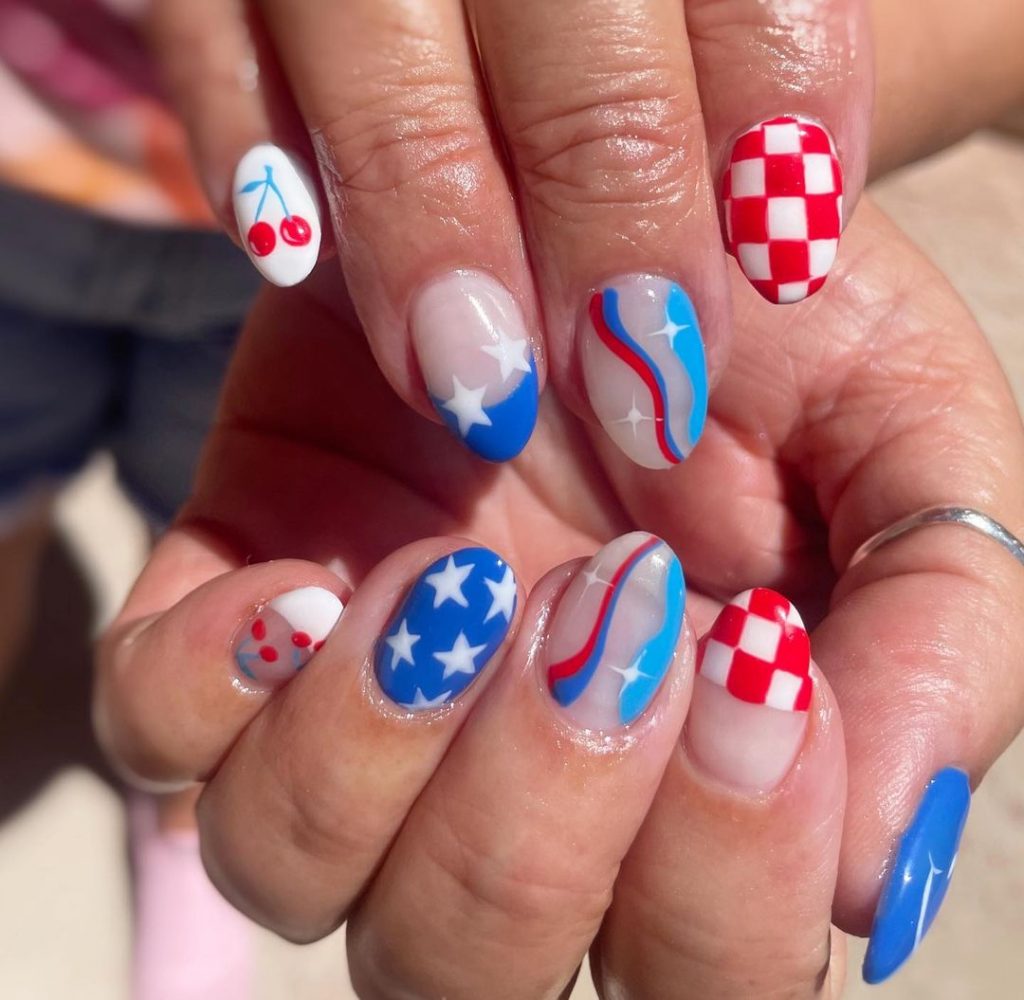
- Materials required:
- Various polishes: red, white and blue shades from Essie and OPI
- Striping tape for precise lines
- Matte top coat: Matte About You from Essie
Professional insight: This design is about combining fun with festivity. The gingham and cherry patterns put a unique spin on typical patriotic themes, making this set stand out.
DIY Tips: Use striping tape to create neat, precise lines for the gingham pattern. Apply a matte top coat to enhance the soft, summery feel of the design.
Classic Americana: bold stripes and baseball themes
This design celebrates classic American symbols with bold stripes and baseball motifs, mixed with star patterns for a quintessential patriotic look. The rich blue and vibrant red make every nail pop with color and theme.
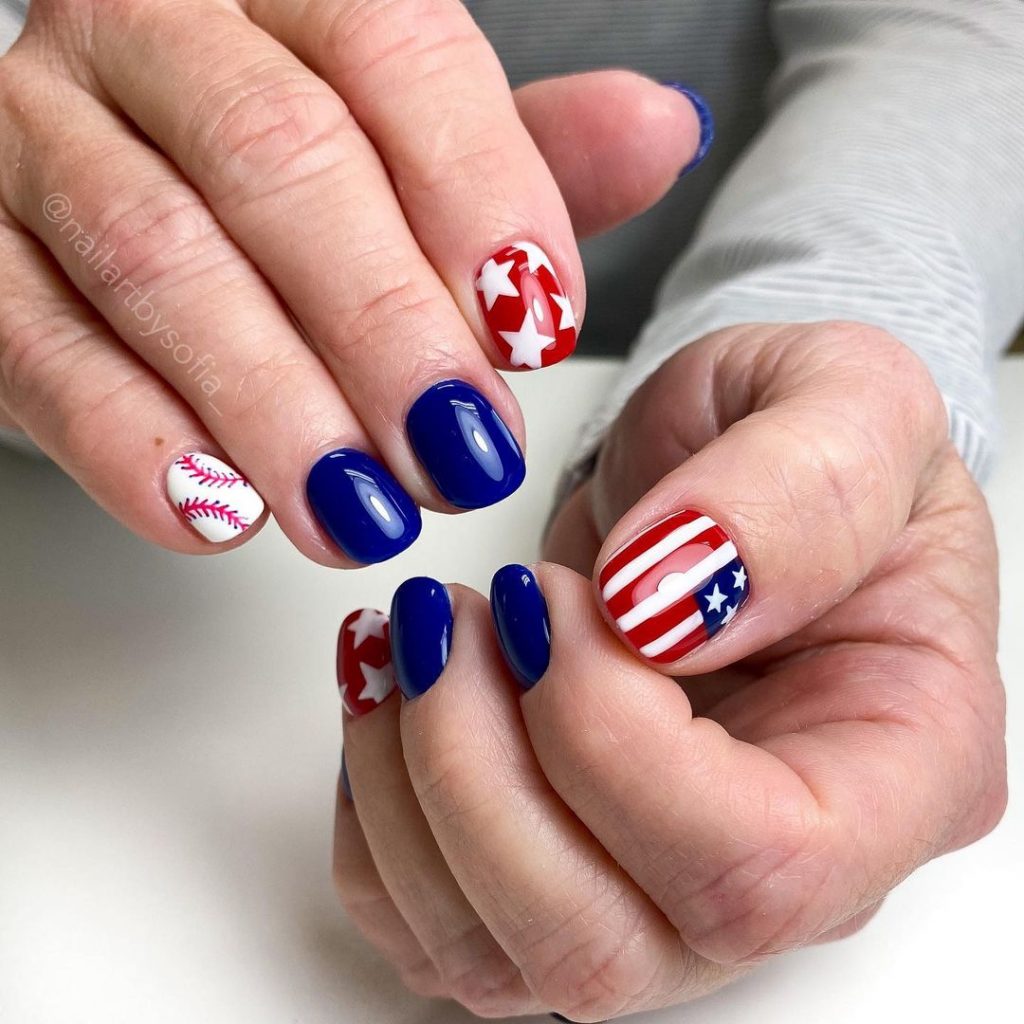
- Materials required:
- Deep blue and vibrant red polishes: Essie’s Butler Please and Real Red
- White for details: OPI Alpine Snow
- Sporting emblems: baseball and stars
- Durable top coat: Seche Vite Dry Fast Top Coat
Professional Insight: The integration of sports themes with traditional patriotic colors creates a dynamic and eye-catching design, perfect for sports fans and patriots alike.
DIY Tips: Place the decals carefully to ensure they are the focal point of your design. Seal with a high-quality top coat to protect and polish the decals from chipping.
Dramatic elegance: high-art Americana
This nail design is a striking expression of American pride with its dynamic use of red, white and blue, and intricate details such as stars and stripes on long, sharply pointed nails. The variety of patterns, ranging from simple stars to complex swirls, demonstrates a high level of artistry and skill.
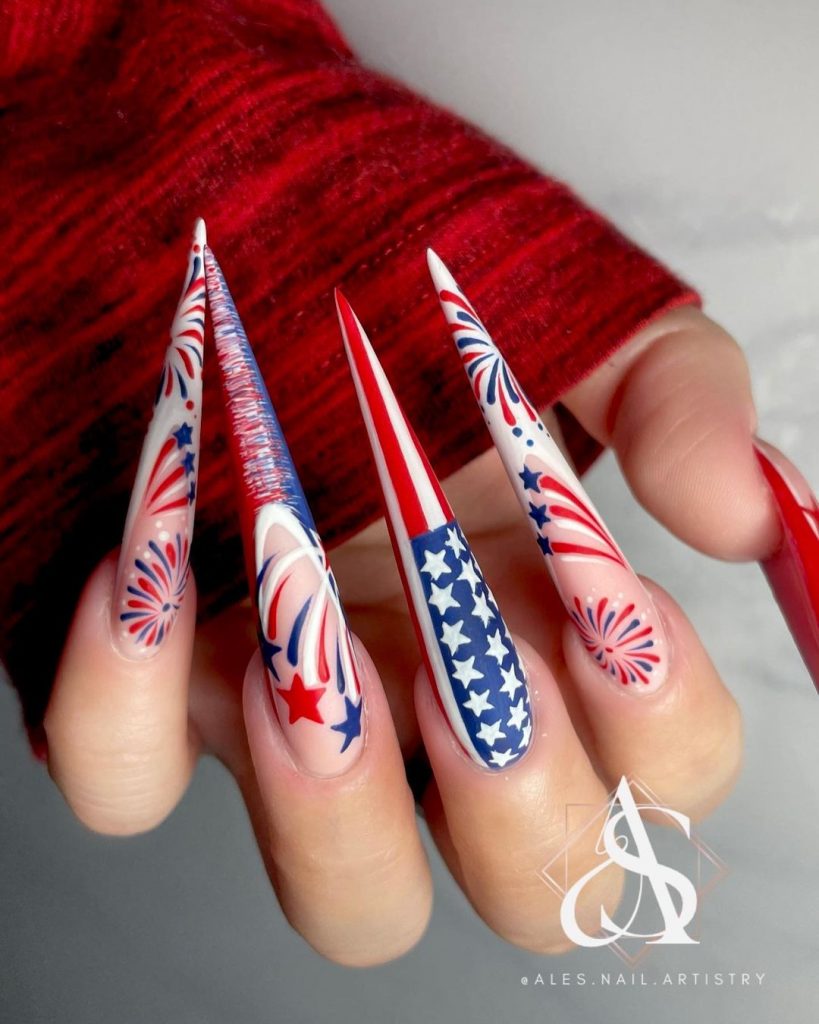
- Materials required:
- Basecoat: OPI natural nail basecoat
- Red, white and blue polishes: Essie’s Russian Roulette, Blanc and Butler please
- Detailing brushes for fine lines and stars
- Shiny top coat: Seche Vite Dry Fast Top Coat
Professional insight: The variety of patterns requires precision and patience. The pointed shape of the nails provides an excellent canvas for showcasing detailed designs.
DIY tips: Use fine brushes for the intricate patterns. Practice the designs on paper before applying them to the nails to ensure confidence and stability in the hand.
Soft elegance: subtle patriotism
This design shows a softer approach to 4th of July nails, featuring a sheer white base with minimal red and blue accents. The simplicity of the design emphasizes the elegance, making it perfect for a subtle yet festive look.
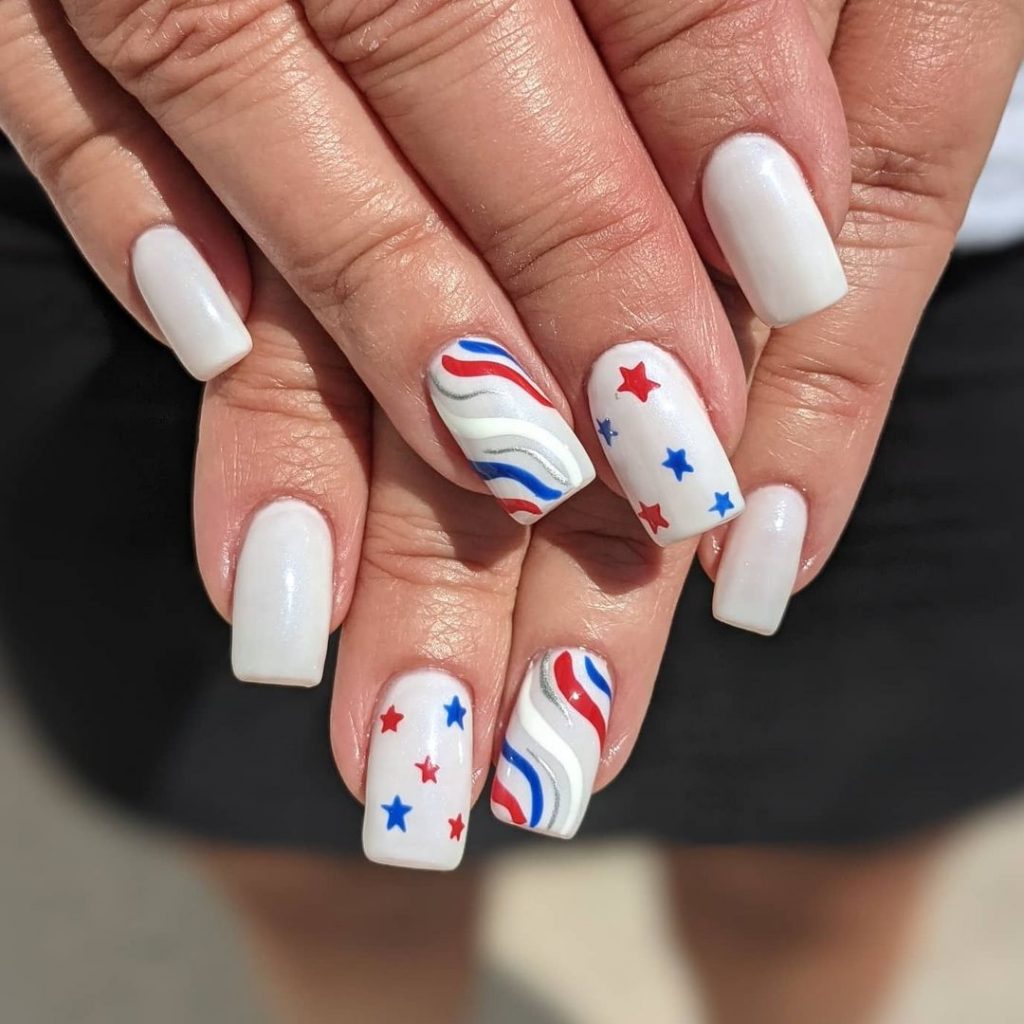
- Materials required:
- Pure white polish: Essie’s Marshmallow
- Red and blue strip tape
- Star stickers
- Matte top coat: OPI Matte top coat
Professional insight: The pure base with minimal use of color emphasizes sophistication and is ideal for those who prefer understated nail art.
DIY tips: Apply the pure white polish evenly. Use striping tape for sleek, straight lines and finish with a matte top layer for a contemporary look.
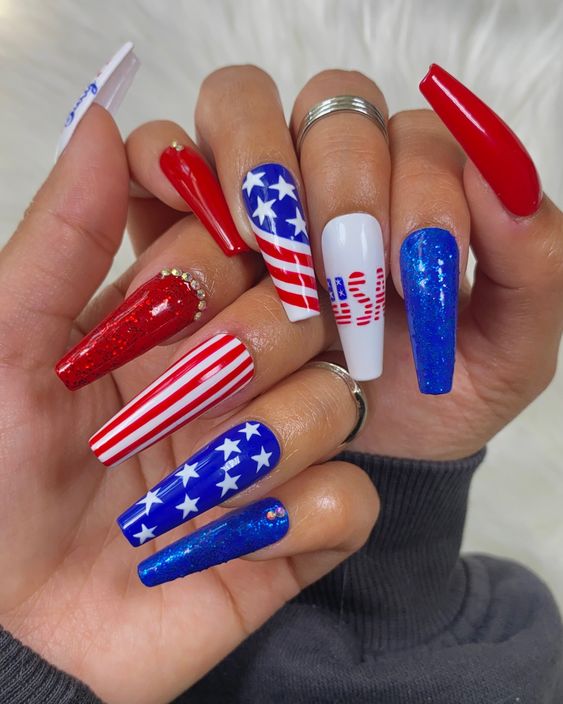
Vibrant Americana: powerful and beautiful
This design captures the essence of the 4th of July with its bold colors and varied designs on each nail, including stripes, stars and glitter. The blue nail with gold speckles adds a unique touch and is reminiscent of a starry sky.
- Materials required:
- Base Coats: Different shades for each nail, including OPI’s Alpine Snow and Essie’s Butler Please
- Glitter polish for accents
- Detailing tools for precision in stars and stripes
- Shiny top coat: Essie Gel Setter
Professional insight: This set is perfect for anyone who wants to make a statement during festive celebrations, using vibrant colors and diverse designs.
DIY Tips: Start by clearly planning the design of each nail. Use a small brush for detailed art and seal with a glossy top coat for longevity.
Playful pop art: clear and powerful
This design takes a playful approach with a vibrant red base, complemented by blue and white accents including cute polka dots and blue gingham patterns. The addition of simple and cute elements such as stars and soft floral motifs makes it exceptionally artistic.
- Materials required:
- Bright Red Polish: OPI’s Big Apple Red
- Blue and white polishes for details
- Point tools and small brushes
- Top layer: Sally Hansen Insta-Dri anti-chip top layer
Professional insight: The mix of gingham and floral patterns with traditional patriotic colors creates a cheerful and youthful atmosphere.
DIY tips: Use a dotting tool for precise dot patterns and a thin brush for the gingham and floral details. Apply layers carefully to prevent colors from bleeding.
Modern French: chic and stylish
This nail design reinterprets the classic French tip with an American twist, incorporating red, white and blue into the tips with extra playful dot accents. The result is both patriotic and chic, suitable for any party or for everyday elegance.
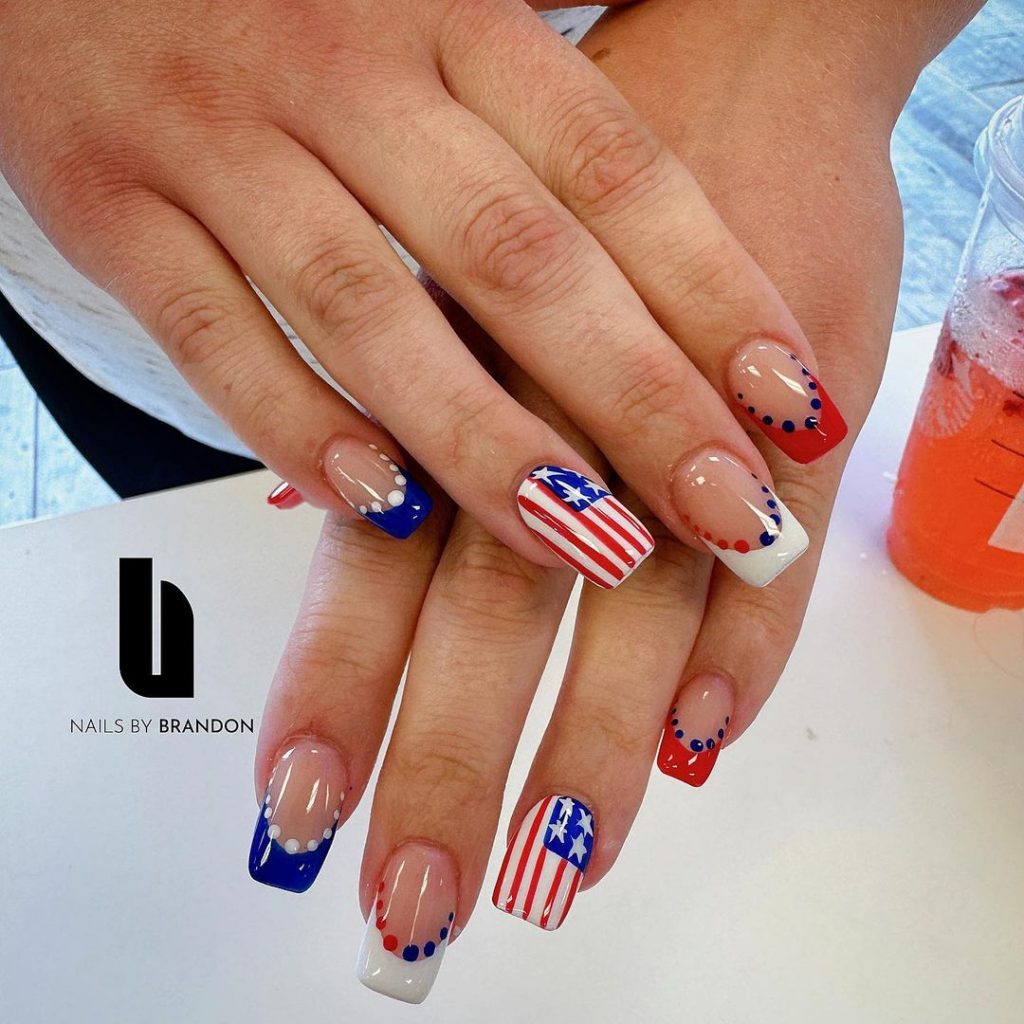
- Materials required:
- Nude Basics: Essie is naked with me
- Red, white and blue polishes for the tips
- Dotting Tool for precise placement of dots
- Protective top coat: CND Vinylux weekly top coat
Professional insight: The modern take on the French point is a stylish nod to Americana, combining classic elegance with festive fun.
DIY tips: Apply the nude base and let it dry completely. Tape can help achieve clean lines for the colored tips. Use a dotting tool for the dots to ensure uniformity and precision.
Save pin

Namie O, a talented writer at Willtiptop, conveys her passion for fashion and beauty in every word she writes. With a keen eye for detail and a deep insight into the latest trends, Namie’s articles and insights captivate readers and provide them with valuable knowledge and inspiration. Through her engaging and informative writing style, Namie aims to empower individuals to explore their style, experiment with beauty techniques, and embrace their unique sense of self.