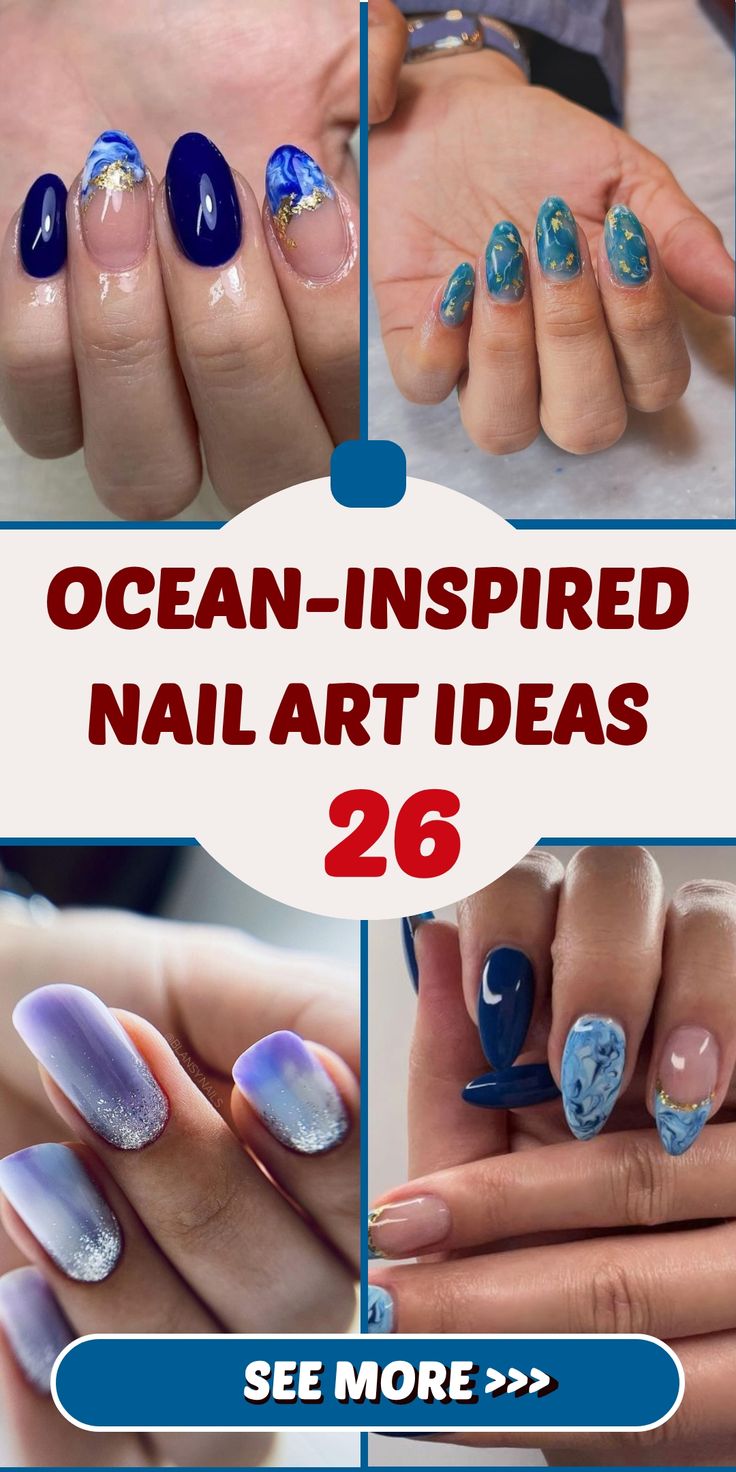
Fall Nails Square 2025 26 Ideas: Your Ultimate Guide
Are you ready to take your nail game to the next level this fall? With the perfect mix of elegance and trendy, Fall Nails Square 2025 will become your new favorite look. From chic, minimalist designs to vibrant, bold colors, we’ve put together a list of the most stunning square nail designs. What are the best nail shapes for different lengths? How do you achieve these looks at home? Keep reading to find out!
Cute pumpkin nails
These pumpkin themed nails are a cute and festive way to welcome fall. The base is a creamy nude color that serves as the perfect canvas for the vibrant orange pumpkins, delicately painted at the ends. Each pumpkin has a small green stem, which adds a touch of whimsy. This design is playful yet subtle, making it suitable for both everyday use and special occasions.

- Base coat: Sally Hansen Miracle Gel in “Birthday Suit”
- Orange nail polish: OPI nail polish in “A good man-darin is hard to find”
- Green nail polish: Essie nail polish in “Off Tropic”
- Top coat: Seche Vite Dry Fast Topcoat
- Nail Art Brushes: Winstonia Fine Detailing Brush Set
DIY instructions
- Prep your nails: Start with clean, filed square nails.
- Apply the base coat: Use a nude or light beige polish and let it dry completely.
- Paint the pumpkins: Using an orange nail polish, carefully paint semi-circles on the tips of your nails.
- Add the stems: Using a fine detail brush, draw small green stems on each pumpkin.
- Seal with a top coat: Finish with a glossy top coat to protect your design.
Elegant blue nails
For a sleek and sophisticated look, these elegant blue nails are a must-try. The plain blue paint is chic and timeless, perfect for any occasion. The glossy finish adds a layer of depth and makes the color pop. This design is all about simplicity and elegance, ideal for those who love a sleek and polished look.

- Base layer: CND Stickey base layer
- Blue Polish: Zoya nail polish in “Sailor”
- Top Coat: Essie Gel Couture Top Coat
- Nail file: OPI Crystal nail file
DIY instructions
- Prepare your nails: Clean your nails and shape them into a square shape.
- Apply the base coat: Use a base coat to protect your natural nails.
- Polish your nails: Apply two coats of blue nail polish and let each coat dry completely.
- Finish it off: Finish with a high-gloss top coat to seal the color and add shine.
Cheerful yellow nails
Brighten up your autumn with these cheerful yellow nails. The solid yellow shade is both fun and stylish and makes a strong statement. The glossy finish enhances the vibrant color, making it perfect for adding a pop of color to any outfit. This look is simple yet striking, perfect for those who like to stand out.

- Base layer: Orly Bonder rubber base layer
- Yellow Polish: China Glaze Nail Polish in “Happy Go Lucky”
- Top coat: Seche Vite Dry Fast Topcoat
- Nail Buffer: Revlon Shape-N-Buff
DIY instructions
- Prepare your nails: Clean your nails and shape them into a square.
- Apply base coat: Apply a base coat to make your nail polish last longer.
- Applying yellow polish: Use two coats of yellow polish for full coverage.
- Top Coat: Seal the design with a gloss top coat for a long-lasting finish.
Chic white and gold nails
These white and gold nails radiate elegance and sophistication. The white base provides a sleek, fresh look, while the gold accents add a touch of glamour. This combination is perfect for formal events or when you want a more refined manicure. The design is both minimalist and striking, making it a versatile choice for any occasion.

- Base layer: Deborah Lippmann Hard Rock base and top layer
- White nail polish: Essie nail polish in “Blanc”
- Gold polish: OPI nail polish in “GoldenEye”
- Nail Art Tape: Striping tape for precise lines
- Top coat: Sally Hansen Miracle Gel Topcoat
DIY instructions
- Prep your nails: Start with clean, shaped nails.
- Base Coat: Apply a base coat to protect your nails.
- Application of white polish: Paint your nails with two layers of white polish.
- Add gold accents: Use nail art tape to create straight lines and then paint them with gold polish.
- Top Coat Seal: Finish with a top coat to secure the design.
Autumn leaves nails
Celebrate the fall season with these fall leaves nails. The design features a mix of orange and red tones, capturing the essence of fall foliage. The intricate leaf patterns add a touch of artistry to the nails, making them perfect for fall festivals or for everyday wear. This look is both festive and stylish, ideal for embracing the autumn mood.

- Base Coat: OPI natural nail base coat
- Orange Polish: Essie nail polish in “Playing Koi”
- Red polish: OPI nail polish in “Big Apple Red”
- Leaf Stickers: Fall themed nail stickers
- Top Coat: Essie Gel Couture Top Coat
DIY instructions
- Prepare your nails: Clean your nails and shape them into a square.
- Base Coat Application: Apply a base coat to protect your natural nails.
- Applying basic colors: Use two coats of orange nail polish on some nails and red on others.
- Add leaf stickers: Apply fall leaf stickers to each nail for a detailed look.
- Top Coat: Seal the design with a top coat for durability and shine.
Beautiful lavender nails
Lavender nails bring a touch of tranquility and elegance. The solid lavender color is shiny and rich, giving your nails a refined yet playful look. This shade is perfect for nails of any length, from short to long, and complements both casual and formal outfits.

- Base layer: Essie all-in-one base layer
- Lavender Polish: OPI Nail Polish in “Do You Lilac It?”
- Top coat: Sally Hansen Insta-Dri top coat
- Nail file: OPI Crystal nail file
DIY instructions
- Prep your nails: Start with clean, filed square nails.
- Apply the base coat: Use a base coat to protect your natural nails.
- Polish your nails: Apply two coats of lavender polish and let each coat dry completely.
- Finish it off: Finish with a high-gloss top coat to seal the color and add shine.
Artistic blue nails
These artistic blue nails have a beautiful abstract design that combines blue with accents of black, gold and beige. The result is a modern and striking look that is perfect for autumn. The matte finish adds a touch of sophistication, making these nails ideal for fashion-conscious individuals.

- Base coat: OPI Matte Nail Envy
- Blue Polish: China Glaze Nail Polish in “Bahamian Escape”
- Black, gold, beige paints: various colors from the OPI Infinite Shine range
- Nail Art Brushes: Winstonia Fine Detailing Brush Set
- Top coat: Essie Matte About You
DIY instructions
- Prepare your nails: Clean your nails and shape them into a square shape.
- Basecoat application: Apply a matte basecoat.
- Applying blue polish: Use two coats of blue polish as the base color.
- Create the abstract design: Using fine detail brushes, add black, gold and beige accents in random patterns.
- Seal with a matte top coat: Finish with a matte top coat to protect the design.
Maroon and gold glamour
Maroon and gold nails are perfect for adding a touch of glamor to your fall look. The deep maroon shade exudes elegance, while the gold glitter accent nails add a festive and luxurious touch. This combination is great for special occasions or just to feel extra fabulous.

- Base layer: Orly Bonder rubber base layer
- Maroon Polish: Essie nail polish in “Bahama Mama”
- Gold glitter polish: China Glaze nail polish in “Golden Enchantment”
- Top coat: Seche Vite Dry Fast Topcoat
- Nail Art Brushes: Winstonia Fine Detailing Brush Set
DIY instructions
- Prep your nails: Start with clean, shaped nails.
- Apply the base coat: Use a base coat to make your nail polish last longer.
- Polish your nails: Apply two coats of maroon nail polish to most nails and gold glitter polish to accent nails.
- Add Gold Accents: If desired, use a fine detail brush to add small gold dots to the maroon nails.
- Finish it off: Finish with a high-gloss top coat to seal the color and add shine.
Bright yellow nails
Bright yellow nails are cheerful and vibrant, perfect for adding a pop of color to your fall wardrobe. The solid yellow shade is both fun and stylish and makes a strong statement. This look is simple yet striking, perfect for those who like to stand out.

- Base layer: Deborah Lippmann Hard Rock base and top layer
- Yellow Polish: China Glaze Nail Polish in “Happy Go Lucky”
- Top coat: Seche Vite Dry Fast Topcoat
- Nail Buffer: Revlon Shape-N-Buff
DIY instructions
- Prepare your nails: Clean your nails and shape them into a square.
- Apply base coat: Apply a base coat to make your nail polish last longer.
- Applying yellow polish: Use two coats of yellow polish for full coverage.
- Top Coat: Seal the design with a gloss top coat for a long-lasting finish.
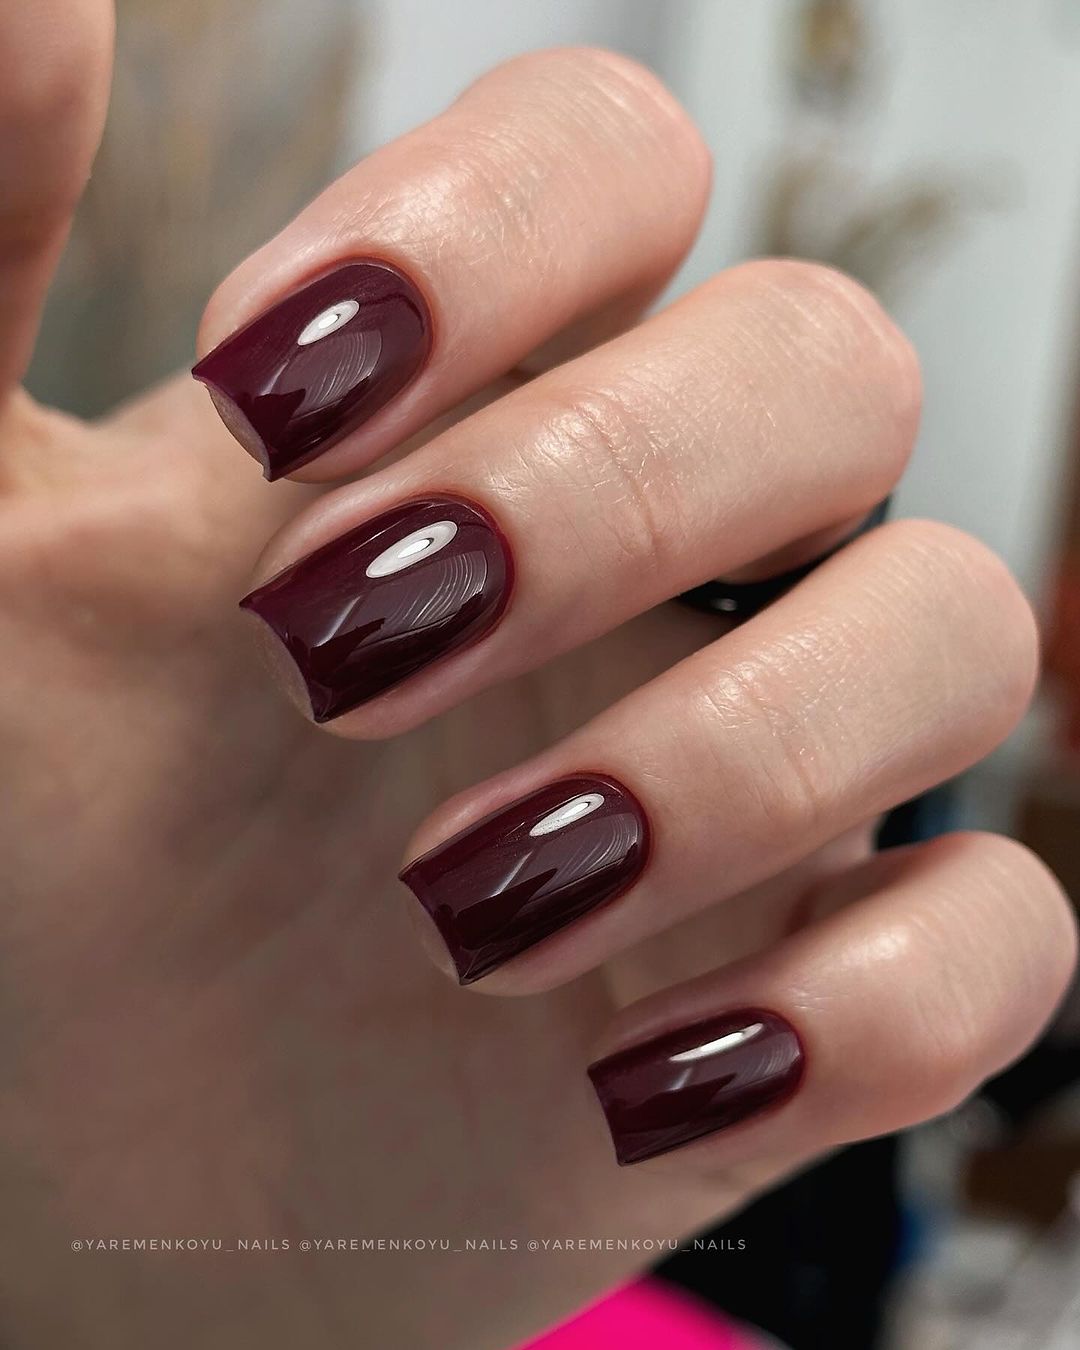
Classic maroon nails
Maroon nails are a classic choice for fall and offer a rich and sophisticated look. The deep maroon color is elegant and timeless, perfect for any occasion. The glossy finish adds a layer of depth, making the color pop even more.
- Base coat: Essie First Base Base Coat
- Maroon Polish: OPI nail polish in “Malaga Wine”
- Top Coat: Essie Gel Couture Top Coat
- Nail file: Tweezerman Neon Hot nail file
DIY instructions
- Prepare your nails: Clean your nails and shape them into a square shape.
- Apply the base coat: Use a base coat to protect your natural nails.
- Polish your nails: Apply two coats of maroon nail polish and let each coat dry completely.
- Finish it off: Finish with a high-gloss top coat to seal the color and add shine.
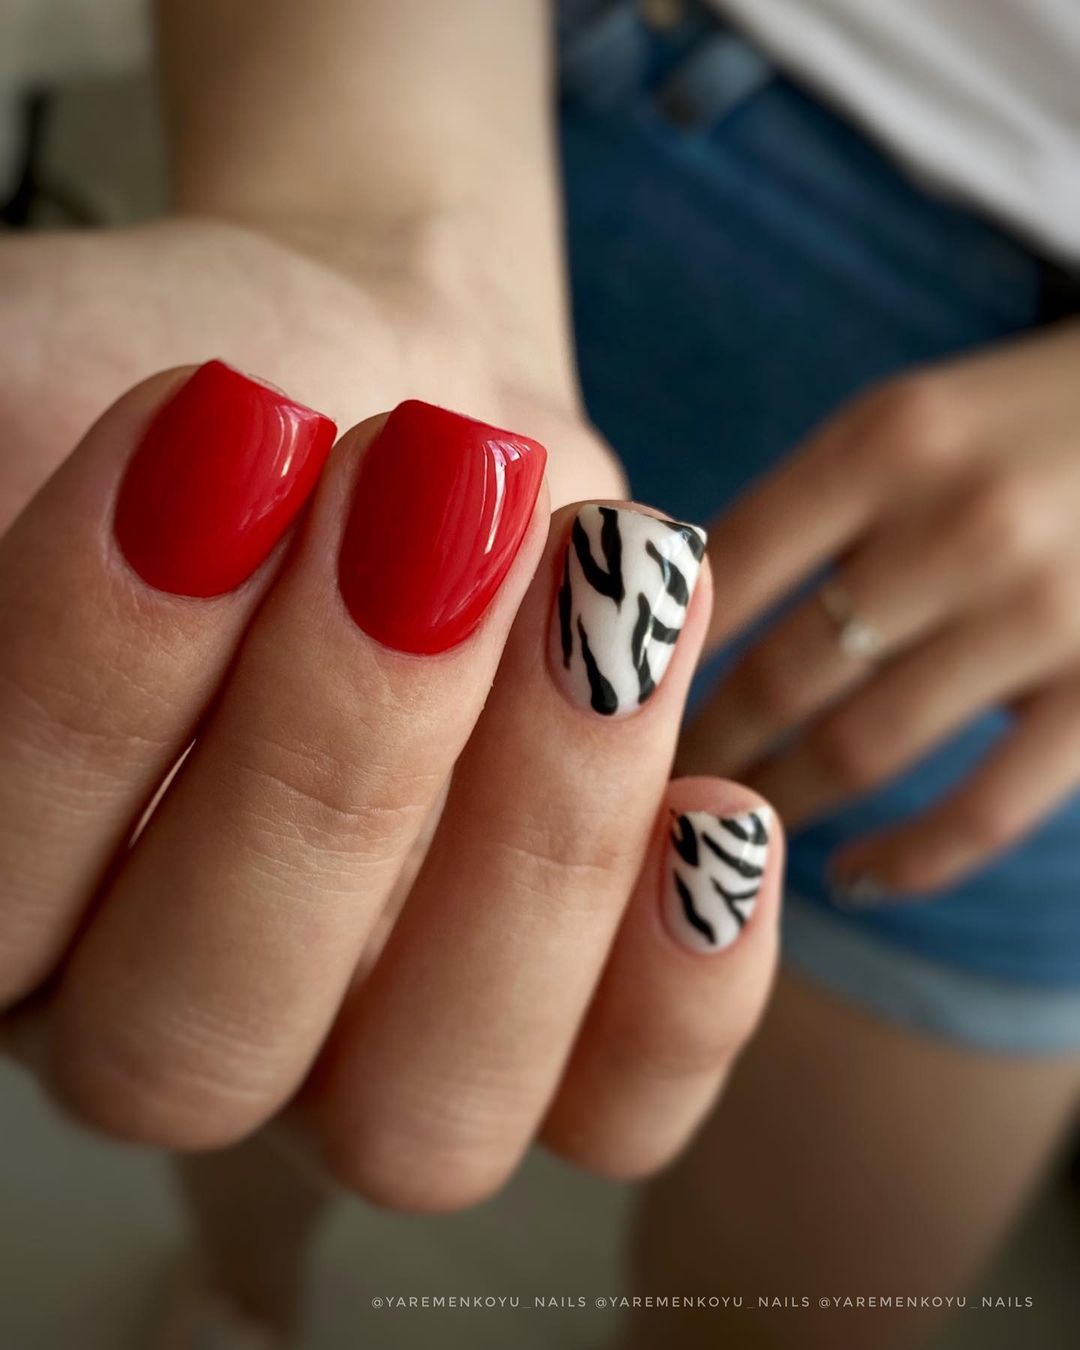
Striking red and zebra nails
Red nails are always a classic, but adding a zebra accent nail gives them a modern twist. The striking combination of vibrant red with black and white zebra stripes is both cool and chic. This design is perfect for those who want to make a statement and add some fun to their manicure.
- Base Coat: OPI natural nail base coat
- Red polish: Essie nail polish in “Really Red”
- White polish: OPI nail polish in “Alpine Snow”
- Black Polish: Sally Hansen Insta-Dri in “Black to Black”
- Top coat: Seche Vite Dry Fast Topcoat
- Nail Art Brushes: Winstonia Fine Detailing Brush Set
DIY instructions
- Prepare your nails: Clean your nails and shape them into a square shape.
- Apply the base coat: Use a base coat to protect your natural nails.
- Polish your nails: Apply two coats of red polish to most nails and white polish to the accent nails.
- Create zebra stripes: Using a fine detail brush, draw black stripes on the white nails to create the zebra pattern.
- Finish it off: Finish with a high-gloss top coat to seal in the color and design.
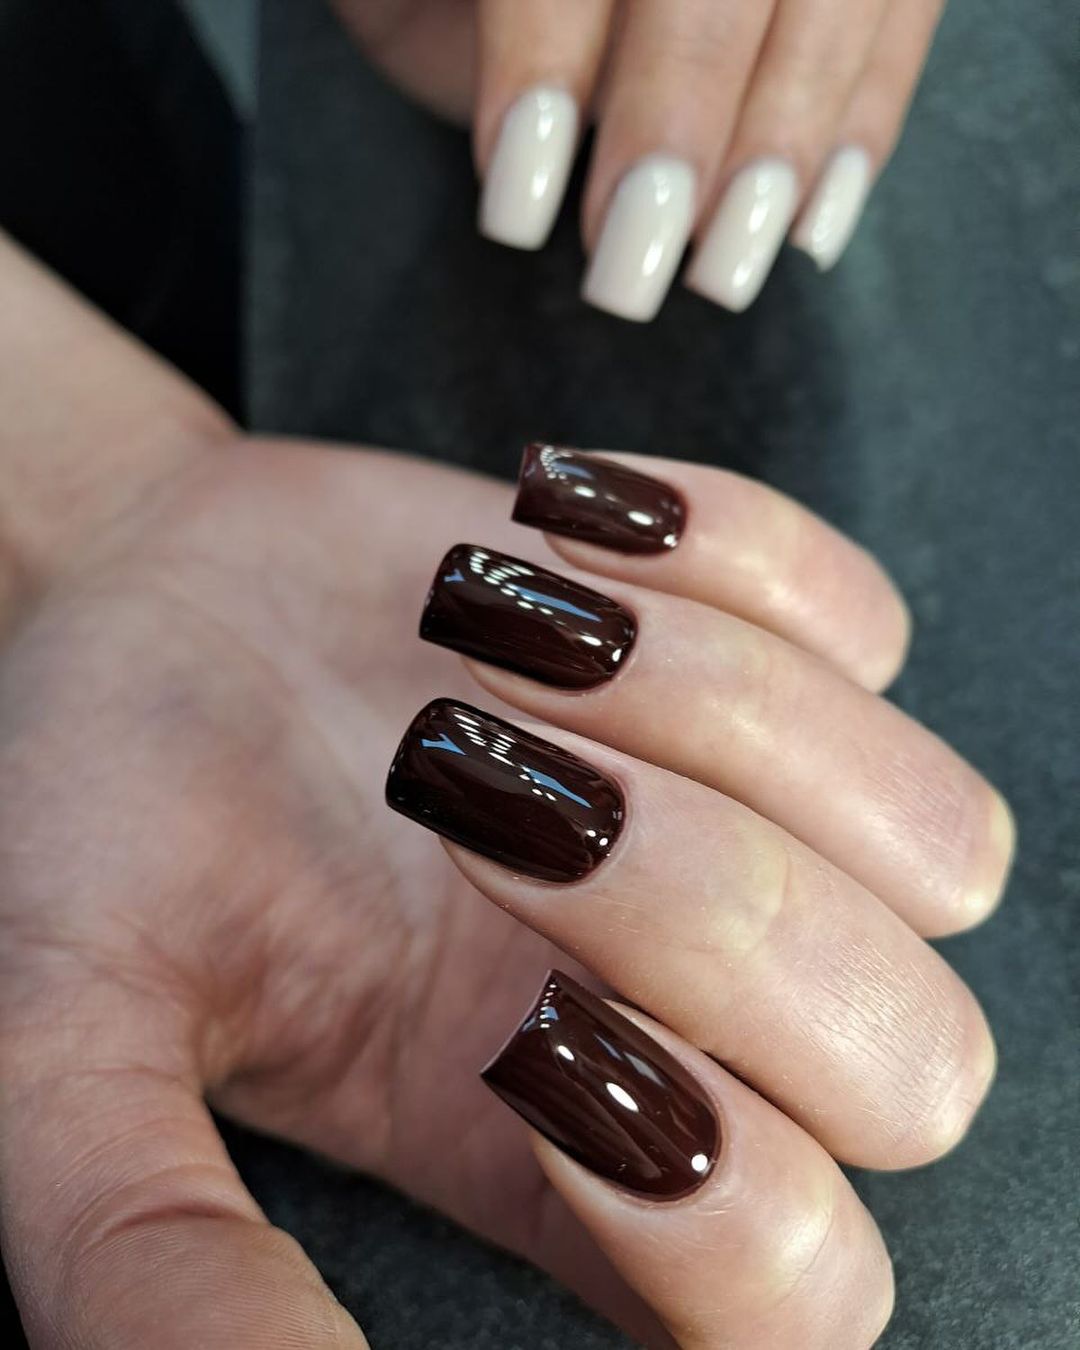
Classic brown nails
These classic brown nails are perfect for a sophisticated and understated look. The warm brown shade is ideal for autumn and creates a cozy and elegant atmosphere. The glossy finish adds a touch of sophistication, making these nails suitable for any occasion.

- Base coat: Essie First Base Base Coat
- Brown polish: OPI nail polish in “Chocolate Moose”
- Top Coat: Essie Gel Couture Top Coat
- Nail Buffer: Revlon Shape-N-Buff
DIY instructions
- Prep your nails: Start with clean, filed square nails.
- Apply the base coat: Use a base coat to protect your natural nails.
- Polish your nails: Apply two coats of brown nail polish and let each coat dry completely.
- Finish it off: Finish with a high-gloss top coat to seal the color and add shine.
Naked nails with glitter accents
Nude nails with glitter accents are perfect for a subtle but glamorous look. The nude base color is soft and elegant, while the glitter accents add a touch of sparkle. This design is versatile and can be worn for everyday as well as special occasions.

- Base layer: Orly Bonder rubber base layer
- Nude polish: Essie nail polish in “Ballet Slippers”
- Glitter Polish: China Glaze Nail Polish in “Fairy Dust”
- Top coat: Seche Vite Dry Fast Topcoat
- Nail Art Brushes: Winstonia Fine Detailing Brush Set
DIY instructions
- Prepare your nails: Clean your nails and shape them into a square shape.
- Apply base coat: Apply a base coat to make your nail polish last longer.
- Apply nude polish: Use two coats of nude polish for a soft, even base.
- Add glitter accents: Using a fine detailing brush, apply glitter polish to the tips or as accents on each nail.
- Top Coat: Seal the design with a gloss top coat for a long-lasting finish.
Autumn floral nails
These fall floral nails are a beautiful way to celebrate the season. The mix of red, orange and white creates a lively and festive look. The floral accents add a touch of nature and artistry, making these nails perfect for fall festivities.

- Base layer: Deborah Lippmann Hard Rock base and top layer
- Red polish: OPI nail polish in “Big Apple Red”
- Orange Polish: Essie nail polish in “Playing Koi”
- White polish: OPI nail polish in “Alpine Snow”
- Silver Polish: Sally Hansen Insta-Dri in “Silver Sweep”
- Flower stickers: fall themed nail stickers
- Top Coat: Essie Gel Couture Top Coat
DIY instructions
- Prepare your nails: Clean your nails and shape them into a square shape.
- Base Coat Application: Apply a base coat to protect your natural nails.
- Applying basic colors: Use red, orange and white nail polish on different nails.
- Add flower stickers: Apply autumn flower stickers to accentuate the nails.
- Top Coat: Seal the design with a gloss top coat for durability and shine.
Matte red nails
Matte red nails are a bold and sophisticated choice for fall. The rich red color combined with the matte finish provides a striking and modern look. These nails are perfect to make a statement and add a touch of elegance to your outfit.

- Base coat: OPI Matte Nail Envy
- Red polish: Essie nail polish in “Russian Roulette”
- Matte top coat: Essie Matte About You
- Nail file: OPI Crystal nail file
DIY instructions
- Prepare your nails: Clean your nails and shape them into a square shape.
- Apply the base coat: Use a matte base coat to protect your natural nails.
- Polish your nails: Apply two coats of red nail polish and let each coat dry completely.
- Finish it off: Finish with a matte top coat to seal in the color and add a chic matte finish.
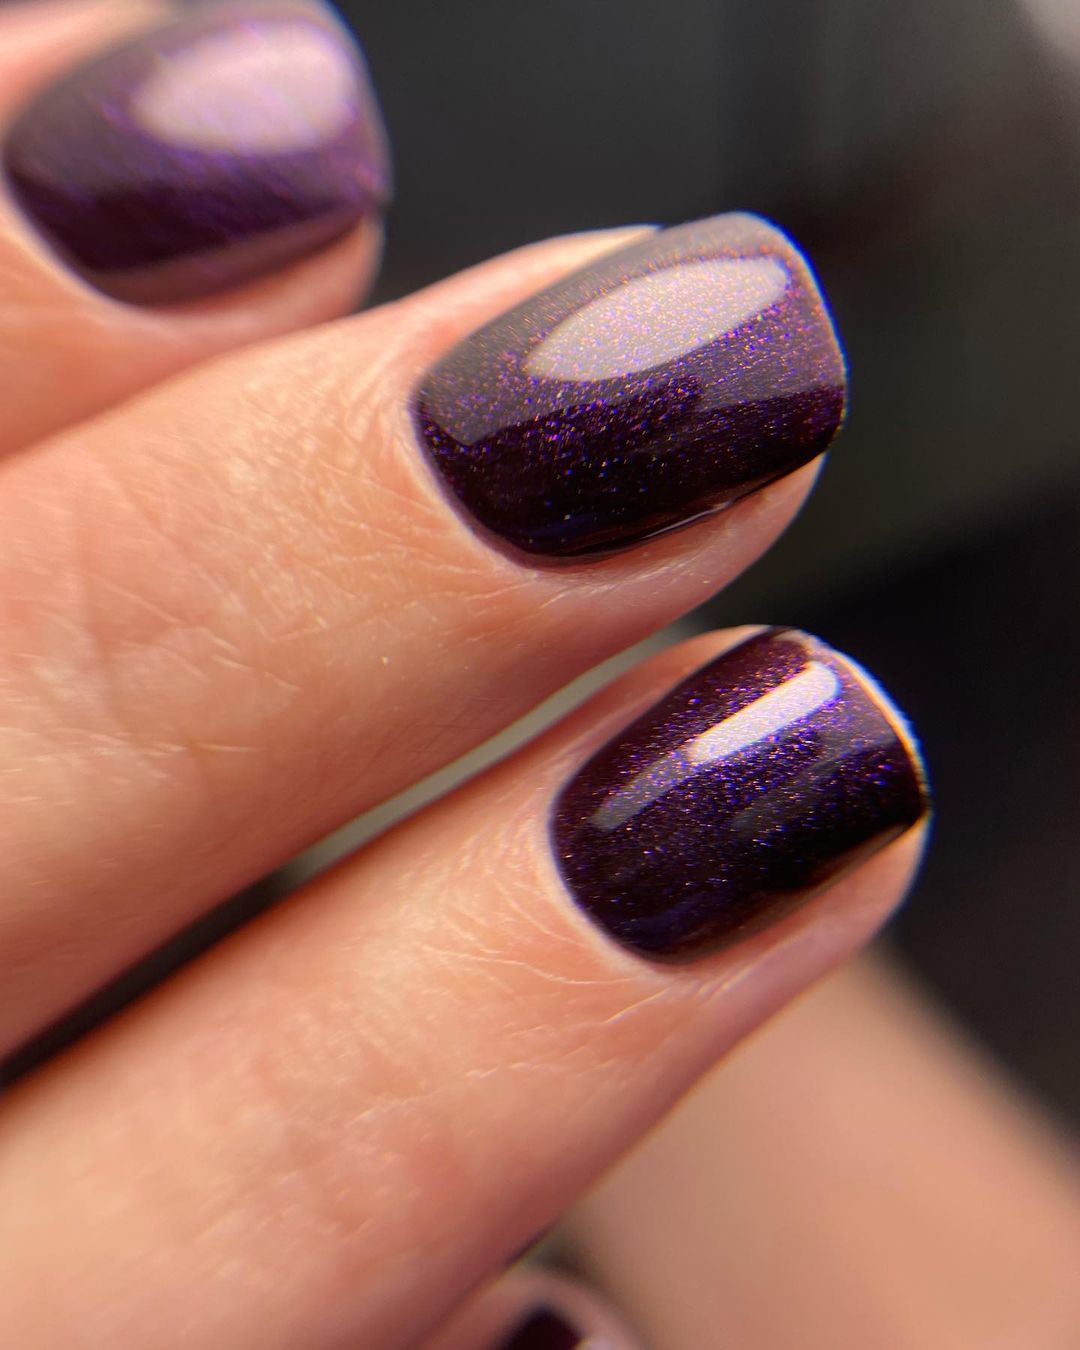
Shimmering dark purple nails
Dark purple nails with a hint of shine are a great way to add some mystery and elegance to your look. The deep color combined with a subtle glitter makes these nails perfect for both day and evening. This design is ideal for those who want a sophisticated yet eye-catching manicure.
- Base layer: Orly Bonder rubber base layer
- Purple Polish: Essie nail polish in “Dressed to the Nineties”
- Top coat: Seche Vite Dry Fast Topcoat
- Nail Buffer: Revlon Shape-N-Buff
DIY instructions
- Prepare your nails: Clean your nails and shape them into a square.
- Apply the base coat: Use a base coat to protect your natural nails.
- Polish your nails: Apply two coats of purple nail polish and let each coat dry completely.
- Add Shine: For extra shine, you can lightly sprinkle a shimmer powder over the nail polish before it dries.
- Top Coat: Seal the design with a gloss top coat for a long-lasting finish.
Leopard print nails
Leopard print nails add a wild and fun element to your fall look. The brown and nude tones make this design versatile and trendy. This manicure is perfect for those who want to embrace their adventurous side while staying stylish and trendy.

- Base Coat: OPI natural nail base coat
- Nude polish: Essie nail polish in “Sand Tropez”
- Brown polish: Sally Hansen Miracle Gel in “Tribal Sun”
- Top Coat: Essie Gel Couture Top Coat
- Nail Art Brushes: Winstonia Fine Detailing Brush Set
DIY instructions
- Prepare your nails: Clean your nails and shape them into a square shape.
- Base Coat Application: Apply a base coat to protect your nails.
- Applying nude polish: Use two layers of nude polish as a base.
- To create leopard spots: Using a detail brush, draw irregular brown spots on each nail.
- Top Coat: Seal the design with a top coat for durability and shine.
Shiny brown nails
Shiny brown nails are a sophisticated choice for fall. The deep brown color is rich and elegant, perfect for both casual and formal occasions. The glossy finish adds a layer of depth, making the color pop even more.
- Base coat: Essie First Base Base Coat
- Brown polish: OPI nail polish in “Espresso Your Style”
- Top Coat: Essie Gel Couture Top Coat
- Nail file: Tweezerman Neon Hot nail file
DIY instructions
- Prepare your nails: Clean your nails and shape them into a square shape.
- Apply the base coat: Use a base coat to protect your natural nails.
- Polish your nails: Apply two coats of brown nail polish and let each coat dry completely.
- Finish it off: Finish with a high-gloss top coat to seal the color and add shine.
Bright red nails
Bright red nails are a timeless classic. The vibrant color is bold and confident, perfect for making a statement. This glossy red manicure is ideal for any occasion, whether it’s a casual day out or a special event.

- Base layer: Orly Bonder rubber base layer
- Red polish: Essie nail polish in “Forever Yummy”
- Top coat: Seche Vite Dry Fast Topcoat
- Nail Buffer: Revlon Shape-N-Buff
DIY instructions
- Prepare your nails: Clean your nails and shape them into a square shape.
- Apply the base coat: Use a base coat to protect your natural nails.
- Polish your nails: Apply two coats of red nail polish and let each coat dry completely.
- Finish it off: Finish with a high-gloss top coat to seal the color and add shine.
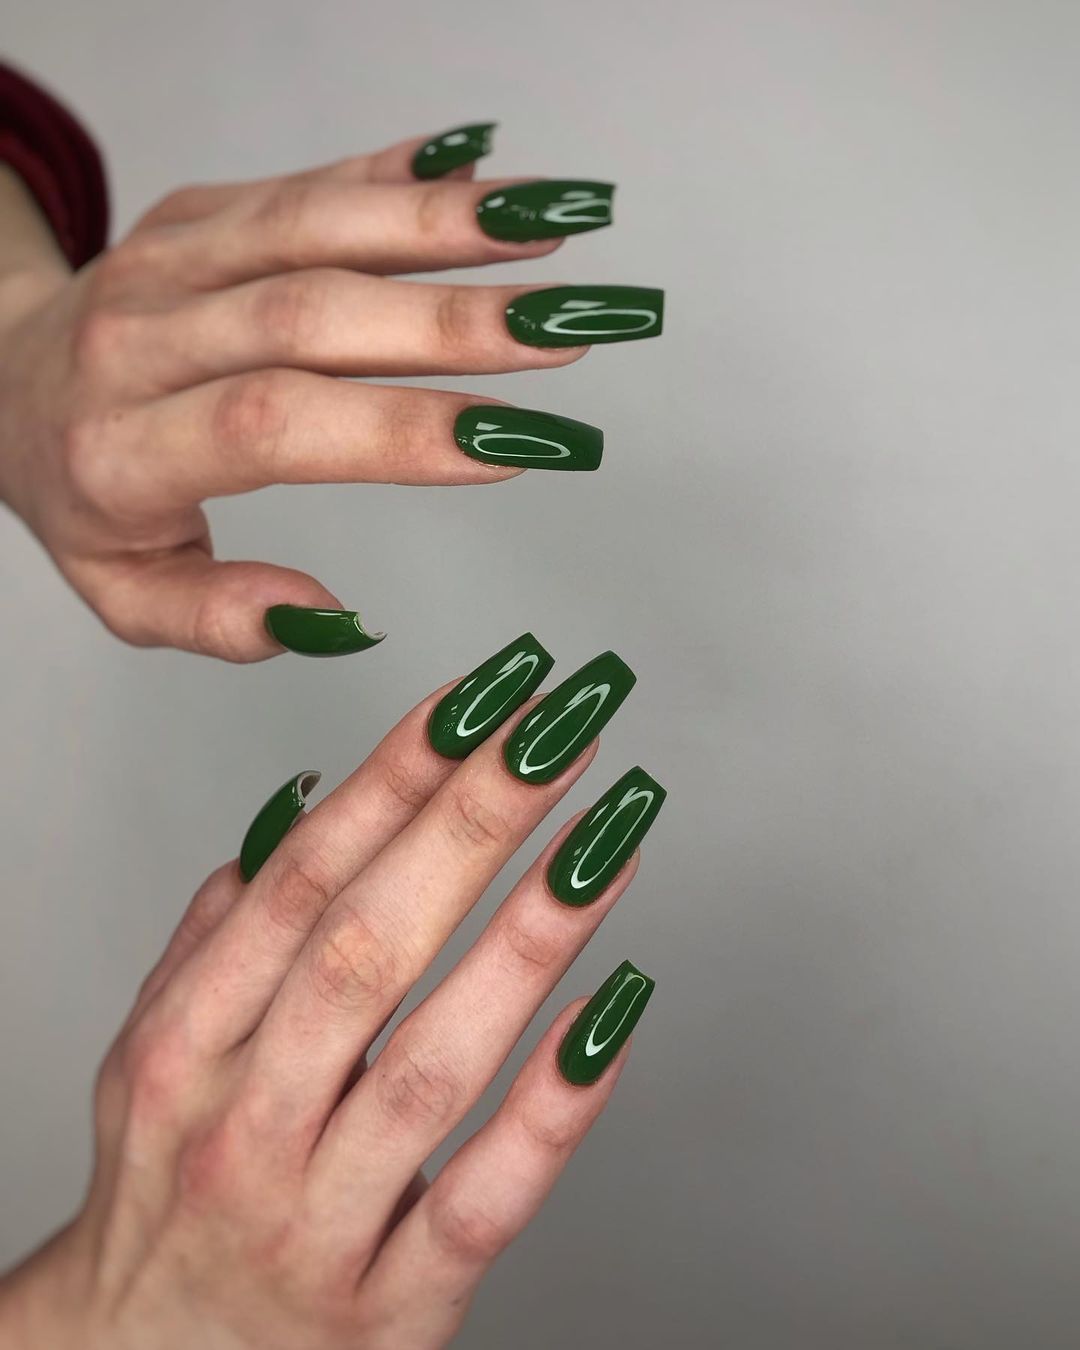
Deep green nails
Deep green nails are perfect to embrace the autumn atmosphere. The rich green hue is both unique and elegant and makes a powerful statement. This color is perfect for those who want to try something different and stand out.
- Base layer: Deborah Lippmann Hard Rock base and top layer
- Green nail polish: Essie nail polish in “Off Tropic”
- Top coat: Seche Vite Dry Fast Topcoat
- Nail file: OPI Crystal nail file
DIY instructions
- Prepare your nails: Clean your nails and shape them into a square shape.
- Apply the base coat: Use a base coat to protect your natural nails.
- Polish your nails: Apply two coats of green nail polish and let each coat dry completely.
- Finish it off: Finish with a high-gloss top coat to seal the color and add shine.
Green crocodile nails
These green crocodile nails are bright and fashionable. The mix of a plain green base with crocodile texture accents creates a bold and unique look. This design is perfect for those who want to make a statement and show their adventurous side.

- Base Coat: OPI natural nail base coat
- Green nail polish: Essie nail polish in “Off Tropic”
- Crocodile Texture Polish: Sally Hansen Insta-Dri in “Emerald Express”
- Top coat: Seche Vite Dry Fast Topcoat
- Nail Art Brushes: Winstonia Fine Detailing Brush Set
DIY instructions
- Prepare your nails: Clean your nails and shape them into a square shape.
- Apply the base coat: Use a base coat to protect your natural nails.
- Polish your nails: Apply two coats of green nail polish to most nails.
- Create crocodile texture: Using a detail brush, create the crocodile pattern with the textured paint.
- Top Coat: Seal the design with a top coat for durability and shine.
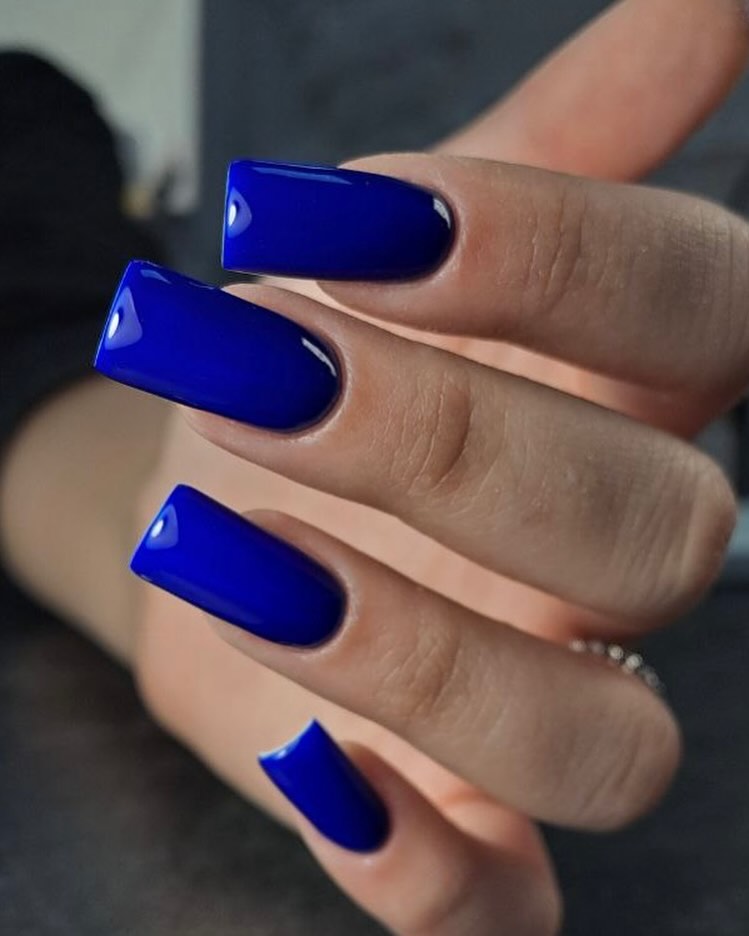
Royal blue nails
Royal blue nails are striking and sophisticated. The vibrant blue color is bold and striking, perfect for making a statement. This shiny blue manicure is ideal for any occasion and adds a touch of elegance to your look.
- Base layer: Orly Bonder rubber base layer
- Blue Polish: OPI nail polish in “My Car Has Navy-gation”
- Top coat: Seche Vite Dry Fast Topcoat
- Nail Buffer: Revlon Shape-N-Buff
DIY instructions
- Prepare your nails: Clean your nails and shape them into a square shape.
- Apply the base coat: Use a base coat to protect your natural nails.
- Polish your nails: Apply two coats of blue nail polish and let each coat dry completely.
- Finish it off: Finish with a high-gloss top coat to seal the color and add shine.
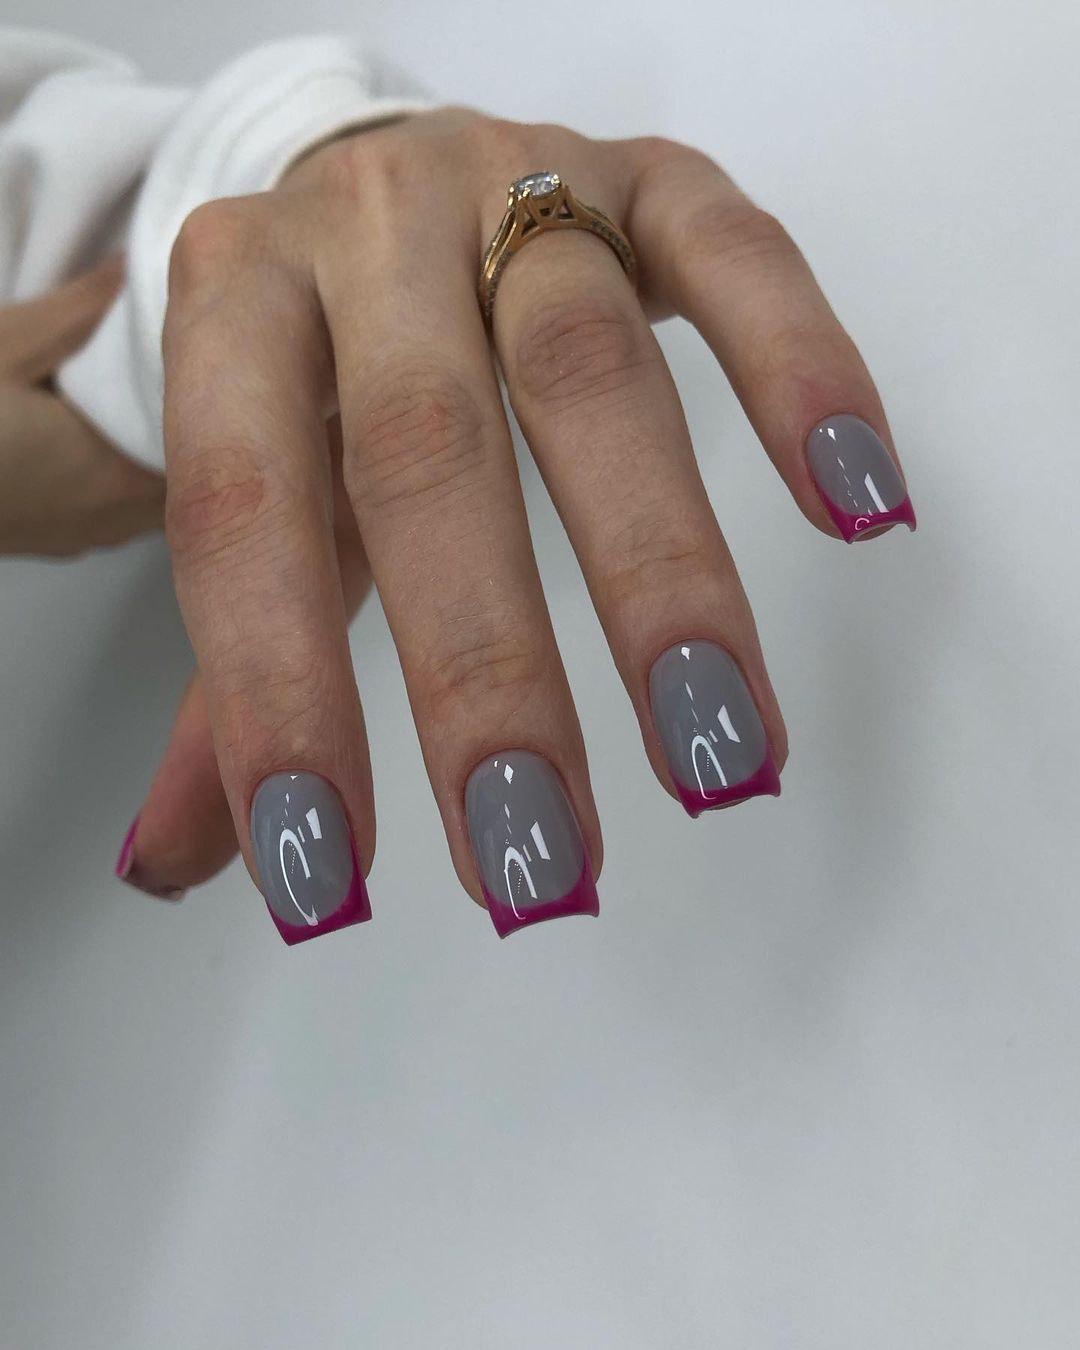
Gray nails with pink tips
These gray nails with pink tips are a chic and modern take on the classic French manicure. The soft gray base is complemented by vibrant pink tips, creating a stylish and striking look. This design is perfect for adding a pop of color to a subtle base.
- Base layer: Essie all-in-one base layer
- Gray nail polish: OPI nail polish in “I Cannoli Wear OPI”
- Pink nail polish: Essie nail polish in “Mod Square”
- Top Coat: Essie Gel Couture Top Coat
- Nail Art Tape: Striping tape for precise lines
DIY instructions
- Prep your nails: Start with clean, filed square nails.
- Apply the base coat: Use a base coat to protect your natural nails.
- Polish your nails: Apply two coats of gray nail polish as a base.
- Making pink dots: Use striping tape to mark the dots and then paint with pink lacquer.
- Top Coat: Finish with a gloss top coat to seal the design.
Matte brown French tips
Matte brown French tips are a sophisticated and understated choice. The nude base combined with matte brown points creates a classic and elegant look. Perfect for both everyday use and special occasions, this manicure offers a modern twist on a timeless style.
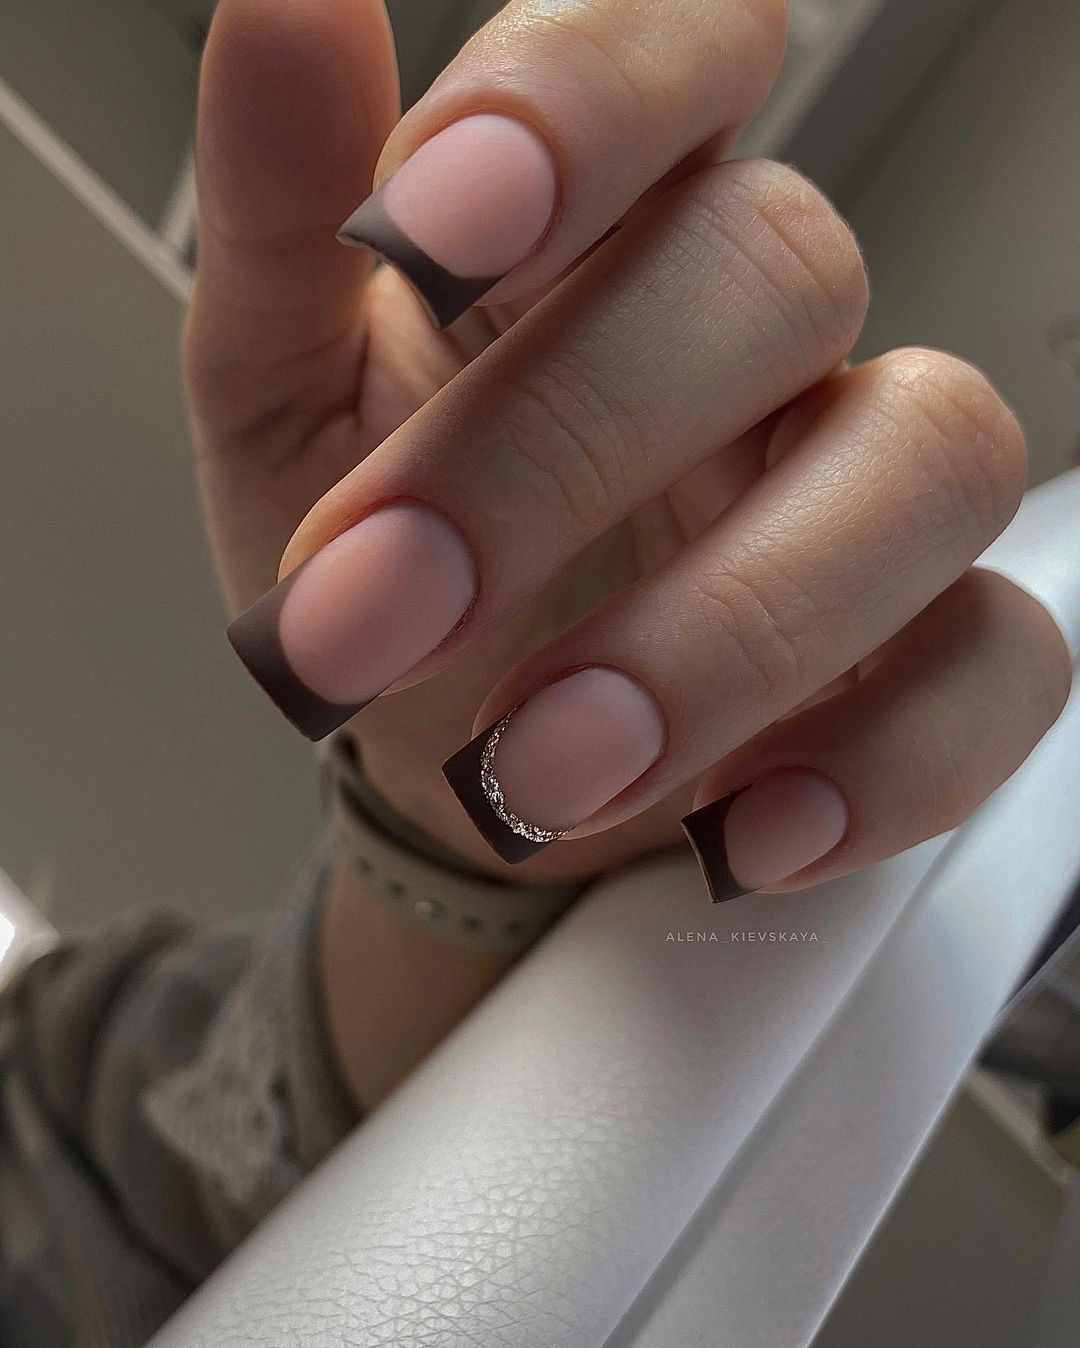
- Base layer: Deborah Lippmann Hard Rock base and top layer
- Nude Polish: OPI nail polish in “Samoan Sand”
- Brown Polish: Essie nail polish in “Partner In Crime”
- Matte top coat: Essie Matte About You
- Nail Art Tape: Striping tape for precise lines
DIY instructions
- Prepare your nails: Clean your nails and shape them into a square shape.
- Apply the base coat: Use a base coat to protect your natural nails.
- Polish your nails: Apply two coats of nude polish as a base.
- Create brown tips: Use striping tape to mark the tips, then paint them with brown polish.
- Finish it off: Finish with a matte top coat to seal the design.
Pink and glitter nails
These pink and glitter nails are fun and festive. The gradient from plain pink to glittering dots creates a playful and glamorous look. This design is perfect for adding some sparkle to your fall wardrobe, making it ideal for celebrations and celebrations.
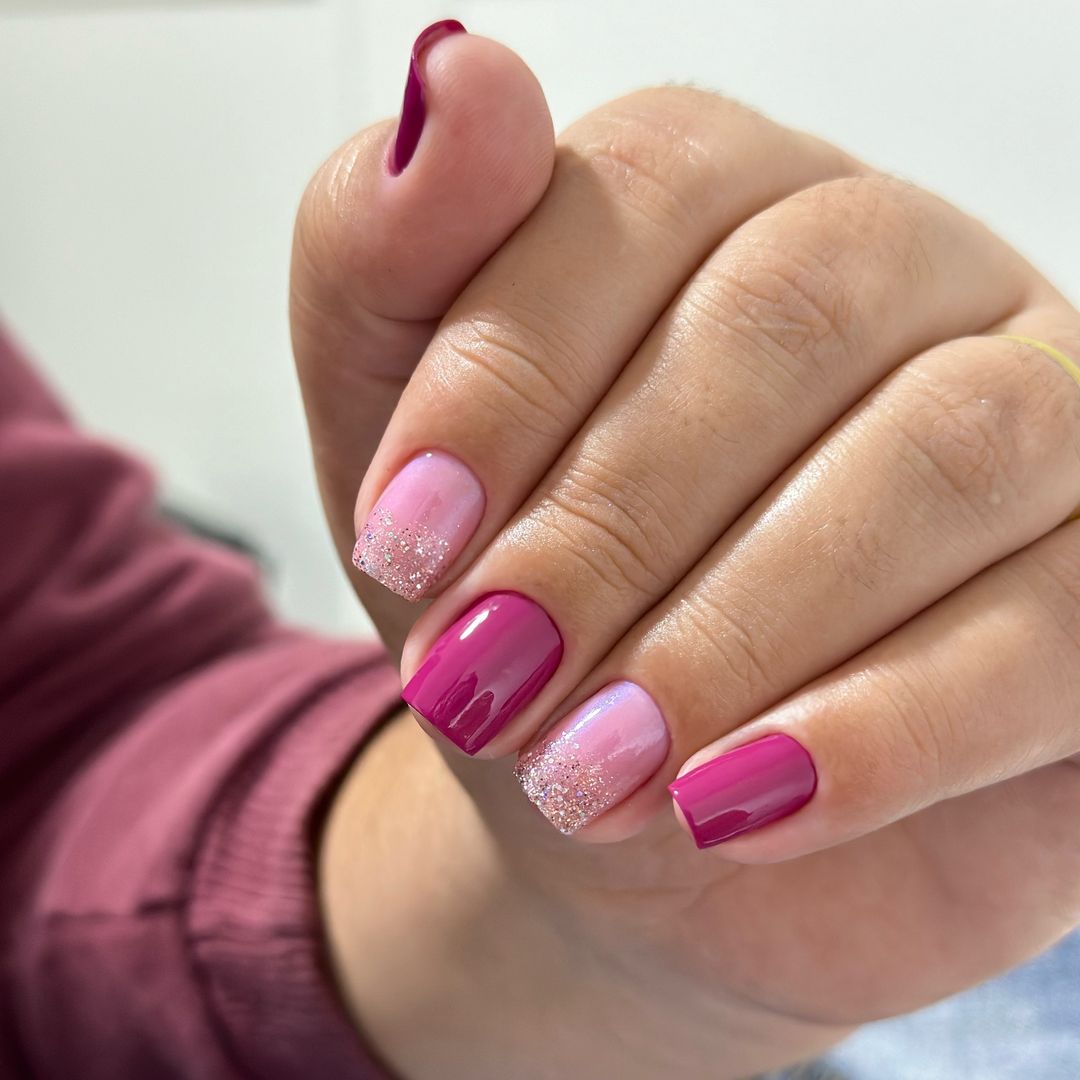
- Base layer: Orly Bonder rubber base layer
- Pink nail polish: Essie nail polish in “Cascade Cool”
- Glitter Polish: China Glaze Nail Polish in “Fairy Dust”
- Top coat: Seche Vite Dry Fast Topcoat
- Nail Buffer: Revlon Shape-N-Buff
DIY instructions
- Prepare your nails: Clean your nails and shape them into a square shape.
- Apply the base coat: Use a base coat to protect your natural nails.
- Polish your nails: Apply two coats of pink nail polish.
- Add glitter: Apply glitter polish to the ends for a gradient effect.
- Finish it off: Finish with a high-gloss top coat to seal the design.
Brown and glitter nails
Brown and glitter nails are perfect for a sophisticated and festive look. The mix of brown tones with a glitter accent nail creates a warm and elegant design. This manicure is ideal for autumn and will add a touch of glamor to your everyday style.

- Base coat: Essie First Base Base Coat
- Brown polish: OPI nail polish in “Espresso Your Style”
- Nude polish: Essie nail polish in “Sand Tropez”
- Glitter polish: China Glaze nail polish in “Golden Enchantment”
- Top Coat: Essie Gel Couture Top Coat
- Nail Art Brushes: Winstonia Fine Detailing Brush Set
DIY instructions
- Prep your nails: Start with clean, filed square nails.
- Apply the base coat: Use a base coat to protect your natural nails.
- Polish your nails: Apply two coats of brown nail polish to most nails and nude nail polish to accent nails.
- Add glitter: Apply glitter polish to one accent nail for a touch of sparkle.
- Finish it off: Finish with a high-gloss top coat to seal the color and add shine.
Save pin


Namie O, a talented writer at Willtiptop, conveys her passion for fashion and beauty in every word she writes. With a keen eye for detail and a deep insight into the latest trends, Namie’s articles and insights captivate readers and provide them with valuable knowledge and inspiration. Through her engaging and informative writing style, Namie aims to empower individuals to explore their style, experiment with beauty techniques, and embrace their unique sense of self.