Blue Fall Nails 26 Ideas: Stunning Ideas for the Season
When fall arrives, blue nails can be the perfect addition to the season’s deep, moody color palette. From classic navy blue to striking royal blue, the possibilities are both stylish and endless. In this article, we explore a range of chic blue fall nail designs that combine trendy and versatility. Whether you’re looking for something bold or beautifully understated, these ideas provide just the right touch of seasonal flair. Let’s dive into the inspiration and discover some effortlessly artistic styles to try this fall.
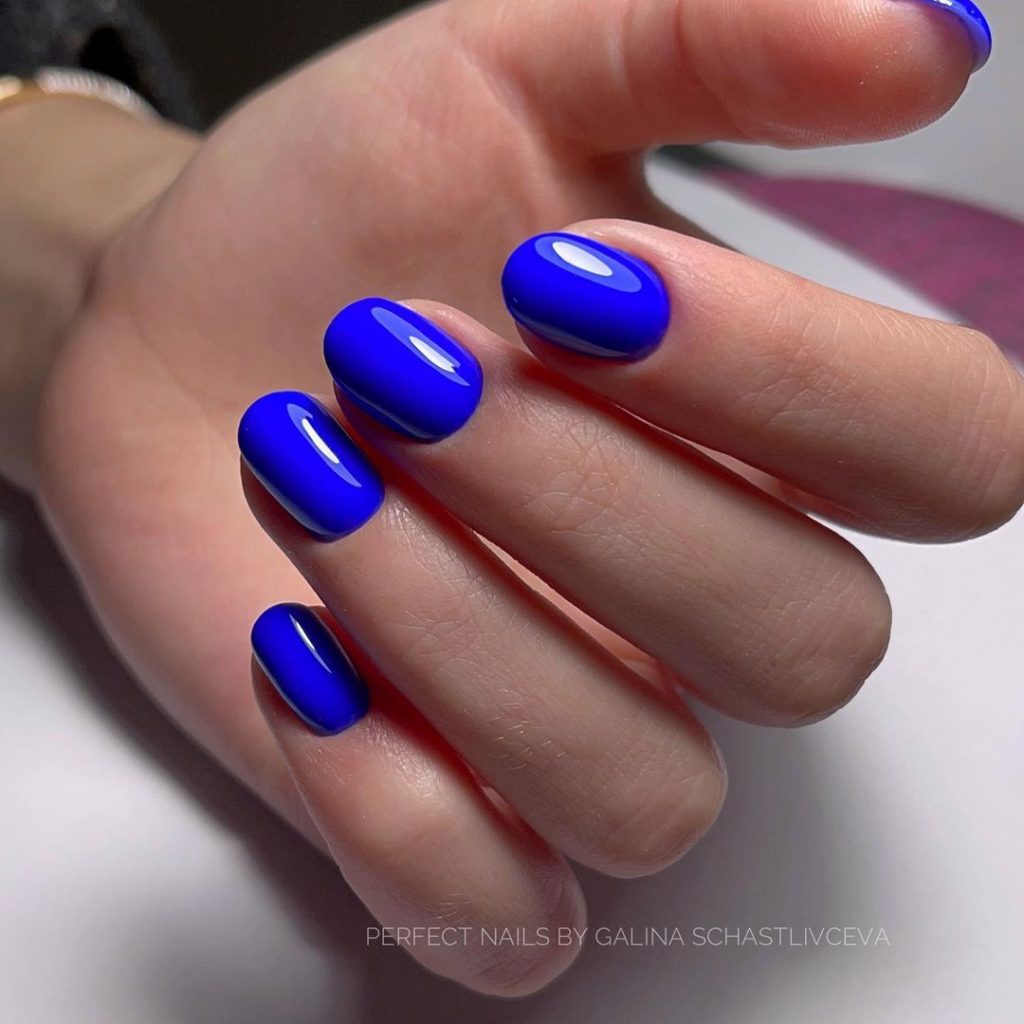
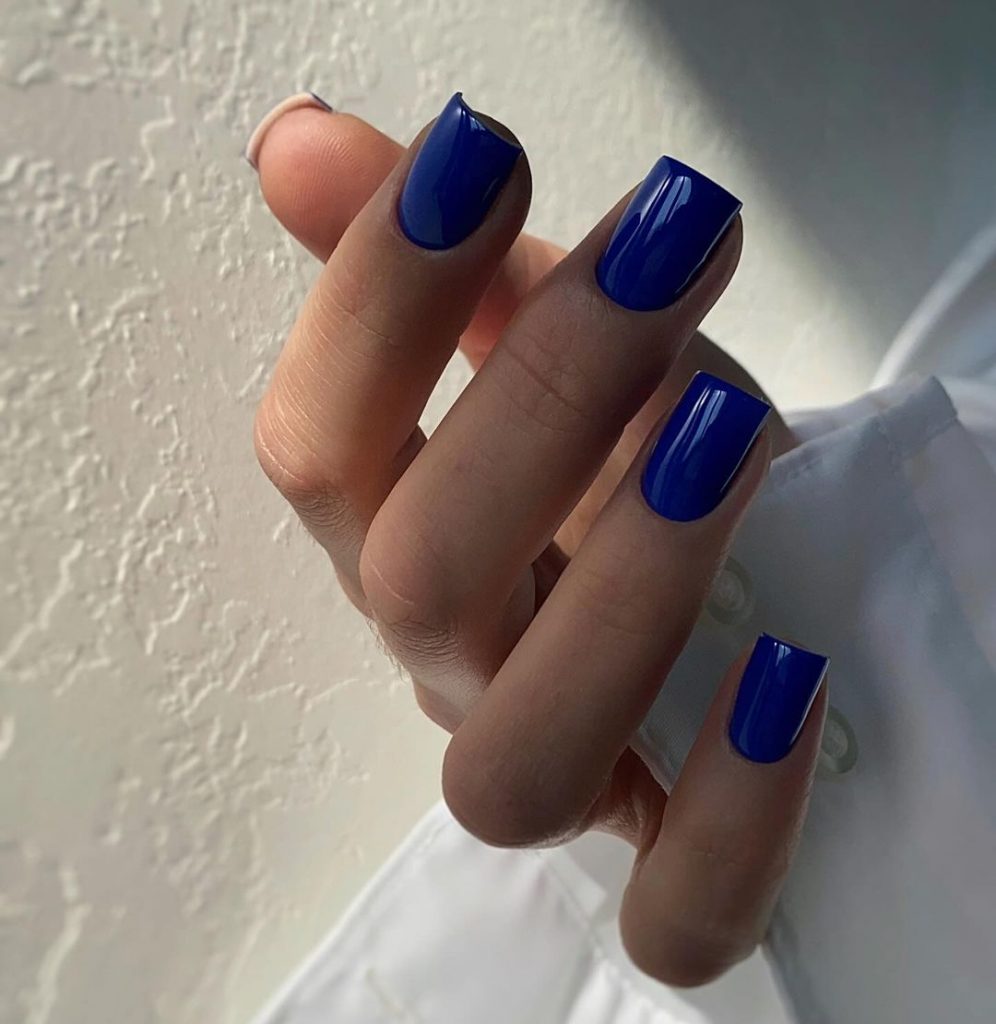
Royal blue nails
This royal blue manicure is absolutely captivating. The vibrant shade of blue is both bold and elegant, making it perfect for any occasion. The nails are short and rounded, which adds a cute and simple appeal to the overall look. The glossy finish enhances the depth of the color, giving it a rich and luxurious look.
Consumables
- Nail polish: Royal Blue by Essie
- Top coat: Gel Couture Top Coat from Essie
- Base coat: Strong Start Base Coat from Essie
- Nail file: OPI Crystal nail file
- Cuticle oil: CND SolarOil
DIY instructions
- Start by applying a base coat to protect your natural nails.
- Apply two coats of the royal blue nail polish, making sure each coat dries completely before applying the next.
- Finish with a top coat to seal the color and add a glossy finish.
- Use cuticle oil to keep your cuticles hydrated and healthy.
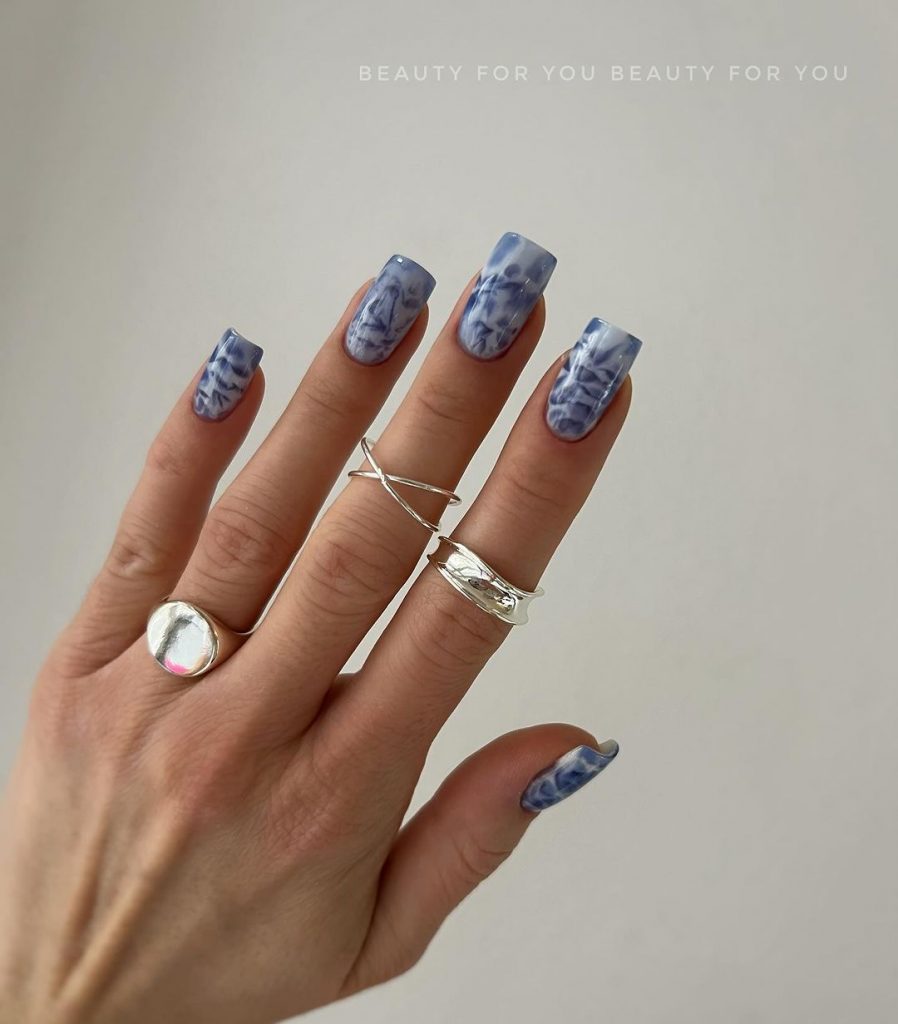
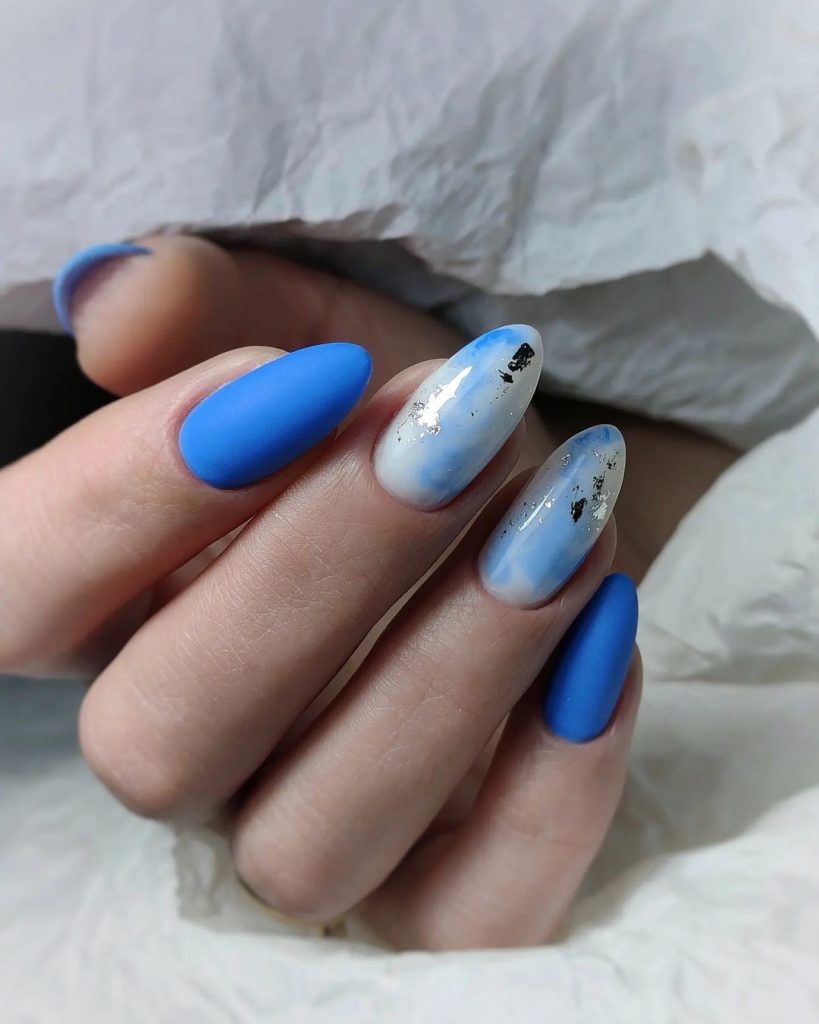
Marble effect nails
This design has a light blue base with a beautiful marble effect on the accent nails. The combination of light blue, white and navy blue creates an enchanting and unique look. This design is perfect for lovers of intricate and artistic nail art. The marble effect adds depth and texture, making the nails look both sophisticated and trendy.

Consumables
- Nail polish: Light blue from OPI
- Nail polish: Navy blue from OPI
- Nail polish: White from OPI
- Marble tool: Dotting Tool from Beetles
- Top coat: Seche Vite Dry Fast Topcoat
- Base coat: OPI Nail Envy
DIY instructions
- Apply a base coat to your nails.
- Paint your nails with two coats of light blue nail polish.
- Create marble effects on the accent nails with white and navy blue polish using a dotting tool. Gently swirl the colors to create the marble look.
- Apply a top coat to seal the design and add shine.
- Allow nails to dry completely before using your hands.
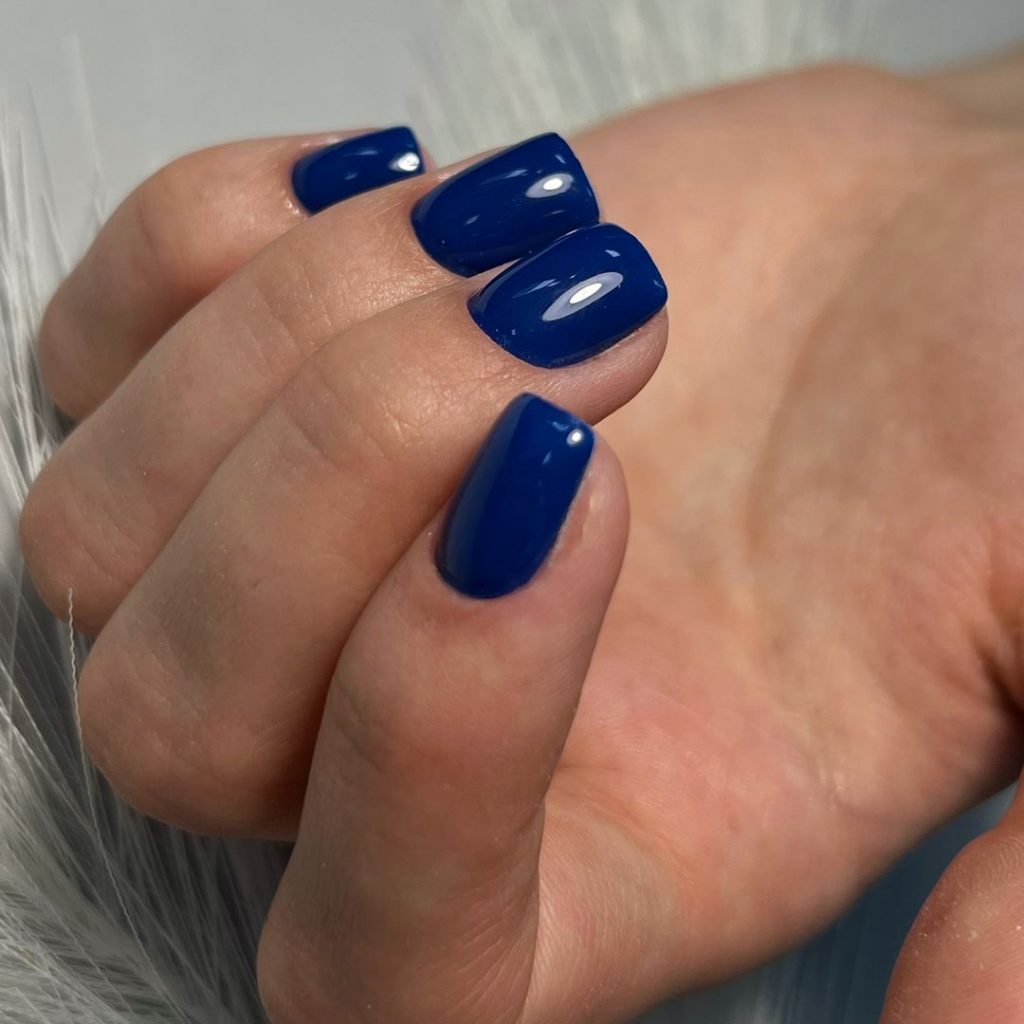
Dark blue nails
The dark blue shade in this manicure exudes sophistication and elegance. This deep shade is perfect for autumn and matches the seasonal colors beautifully. The nails are kept short, which makes this design both practical and chic. The glossy finish gives the nails a polished and professional look, ideal for any occasion.
Consumables
- Nail polish: Dark blue by Sally Hansen
- Top coat: Sally Hansen Miracle Gel
- Base layer: Orly Bonder
- Nail file: Revlon Shape ‘N’ Buff
- Cuticle oil: Burt’s Bees Lemon Butter cuticle cream
DIY instructions
- Start with a base coat to protect your nails.
- Apply two coats of the dark blue polish and allow each coat to dry thoroughly.
- Finish with a top coat to improve shine and durability.
- Apply cuticle oil around the nail edges to keep your cuticles nourished.
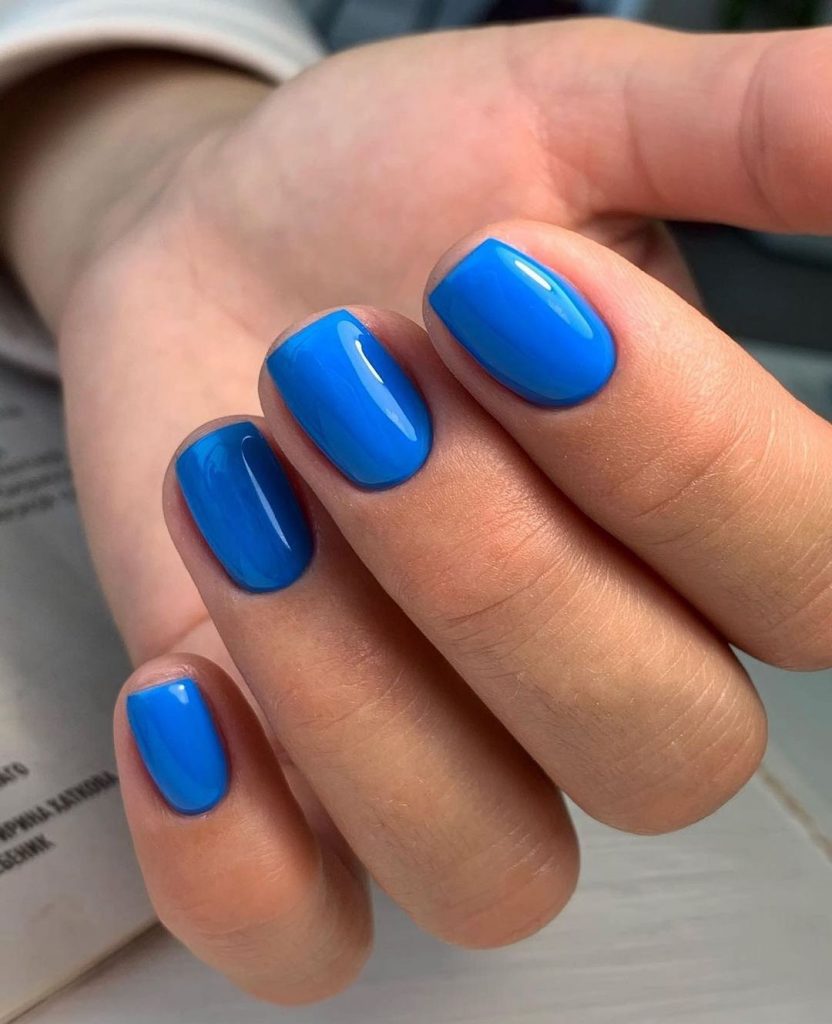
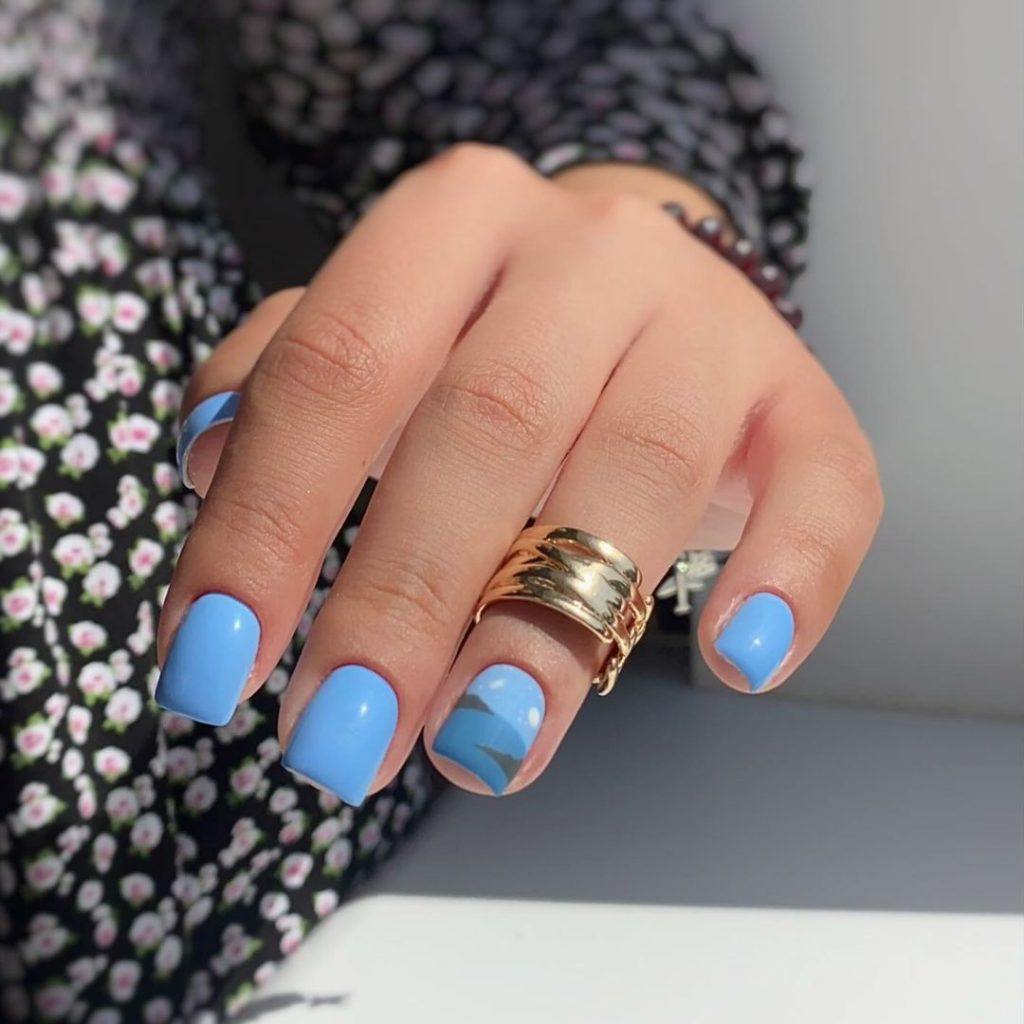
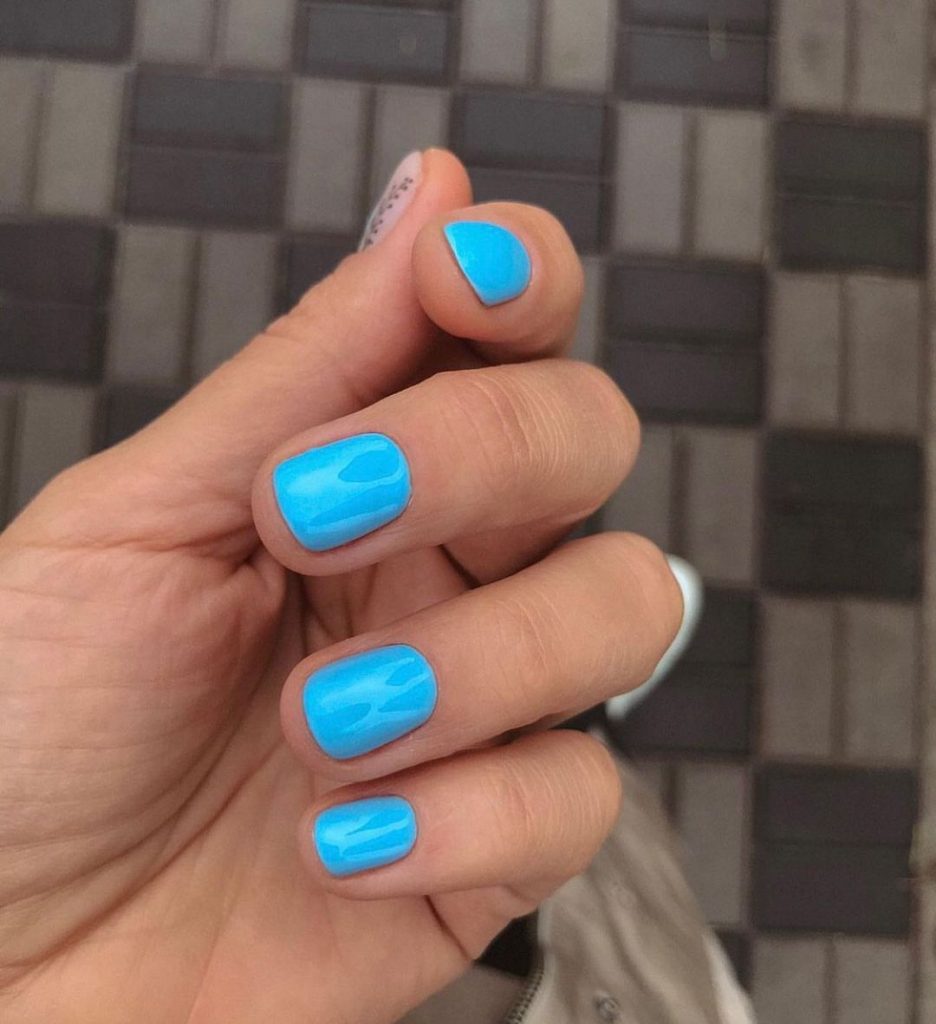
Sky blue nails
These sky blue nails are perfect for a fresh and vibrant fall look. The bright blue color is both striking and cheerful. The nails are short and neatly filed, which adds to the overall cute and simple look. The glossy top layer adds a brilliant shine, making the color stand out even more.
Consumables
- Nail polish: Sky Blue from Zoya
- Top coat: Zoya Armor Topcoat
- Base layer: Zoya Anchor base layer
- Nail file: Deborah Lippmann Smooth Operator
- Cuticle oil: Essie Apricot cuticle oil
DIY instructions
- Apply a base coat to your nails to ensure smooth application.
- Paint your nails with two coats of sky blue nail polish.
- Finish with a top coat to add shine and durability.
- Hydrate your cuticles with cuticle oil for a neat and healthy finish.
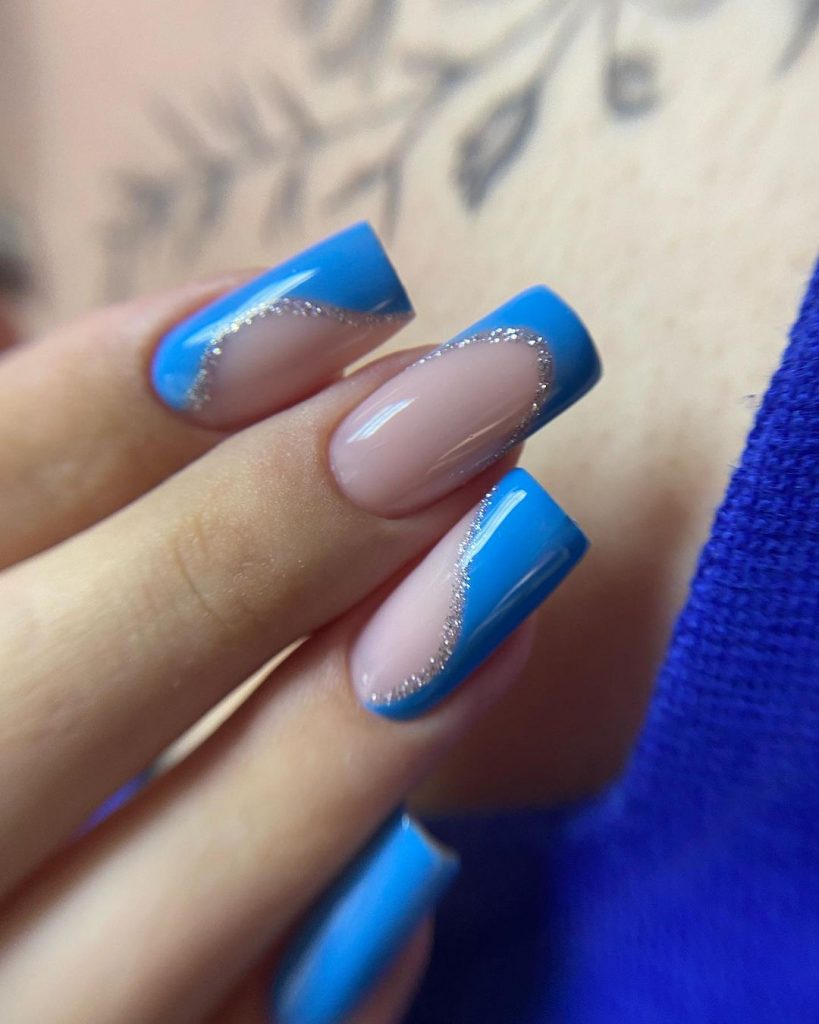
French tip with blue accents
This design has a modern twist on the classic French point with striking blue accents. The combination of light blue and nude creates a refined and trendy look. The nails are medium length and square in shape, which adds elegance to the overall design. The glitter accents on the blue tips add a touch of glamour, making this manicure perfect for special occasions.
Consumables
- Nail polish: Light blue from China Glaze
- Nail polish: Nude from OPI
- Glitter: Silver glitter from Ciaté
- Top coat: Essie Gel Setter
- Base layer: Essie Here to Stay
- Nail file: Tweezerman Neon Filemates
DIY instructions
- Start with a base coat to protect your nails.
- Apply the nude polish as a base color.
- Make the French tips with light blue polish. If necessary, use nail tape for clean lines.
- Add glitter accents on the blue tips for a sparkling effect.
- Finish with a top coat to seal the design and add shine.
- Moisturize your cuticles with cuticle oil for a polished look.
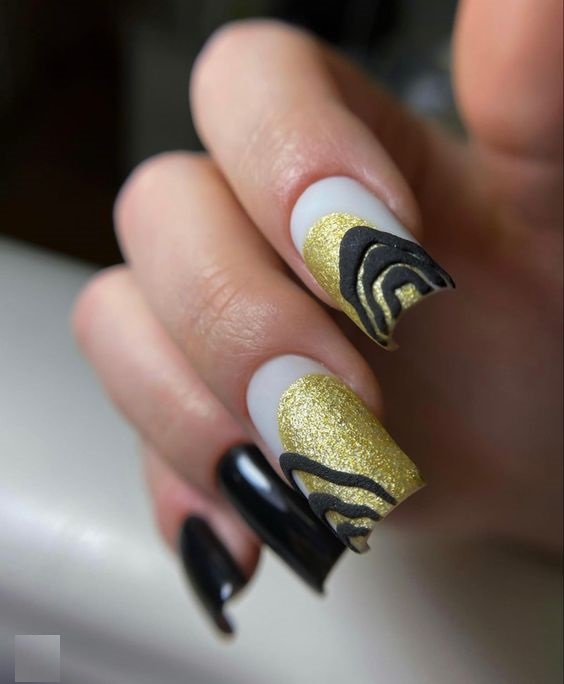
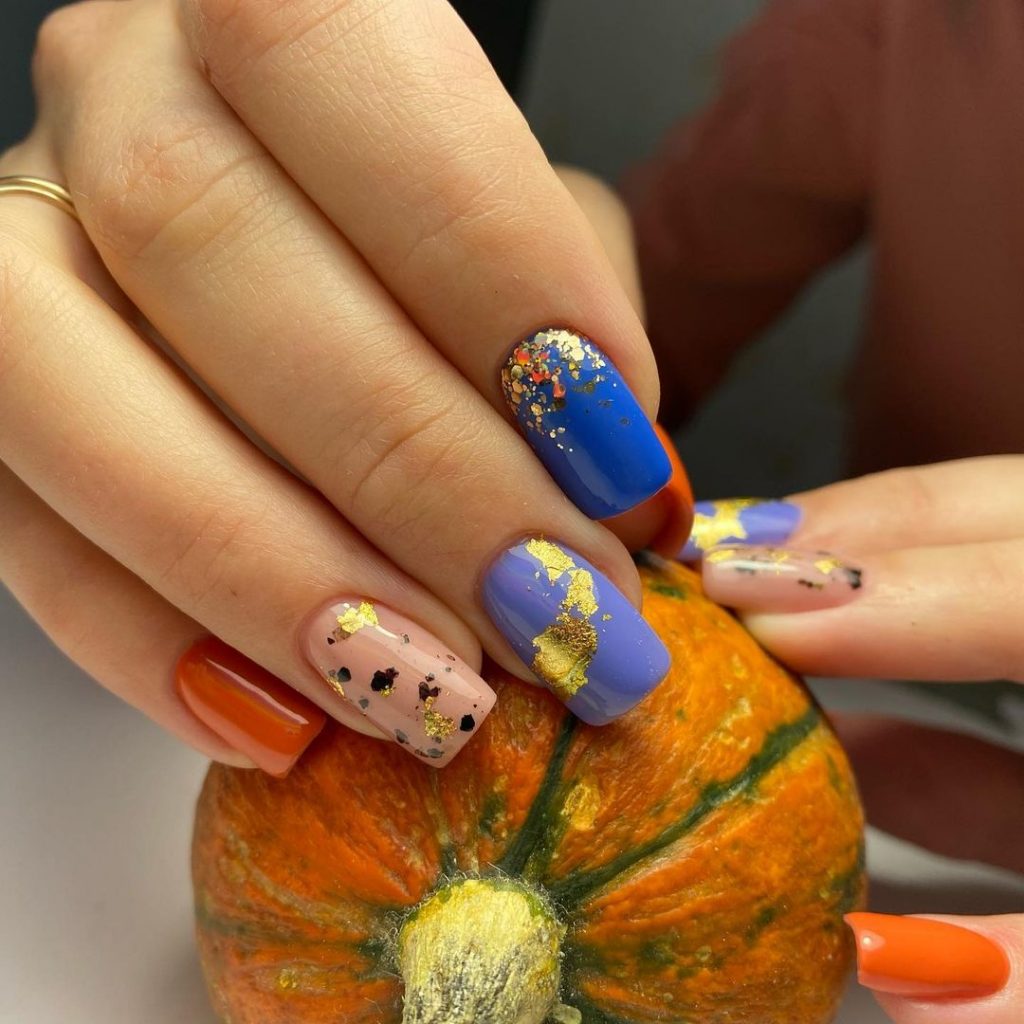
Mixed colors and gold foil nails
This manicure features a beautiful mix of blue, orange and purple nails with gold foil accents. The combination of colors is perfect for fall and captures the vibrant hues of the season. The gold foil adds a touch of luxury and elegance, making the nails stand out. The designs vary from nail to nail, with some featuring solid colors and others showing creative patterns and textures.
Consumables
- Nail polish: Blue from Essie, Orange from OPI, Purple from Zoya
- Gold foil: Nail Art Foil from Born Pretty
- Top coat: Seche Vite Dry Fast Topcoat
- Base layer: Orly Bonder
- Nail file: Revlon Shape ‘N’ Buff
- Cuticle oil: Burt’s Bees Lemon Butter cuticle cream
DIY instructions
- Start with a base coat to protect your nails.
- Apply two coats of blue, orange and purple nail polish to different nails.
- Use tweezers to apply gold foil to desired areas of the nails while the nail polish is still tacky.
- Finish with a top coat to ensure the foil stays in place and adds shine.
- Moisturize your cuticles with cuticle oil for a polished finish.
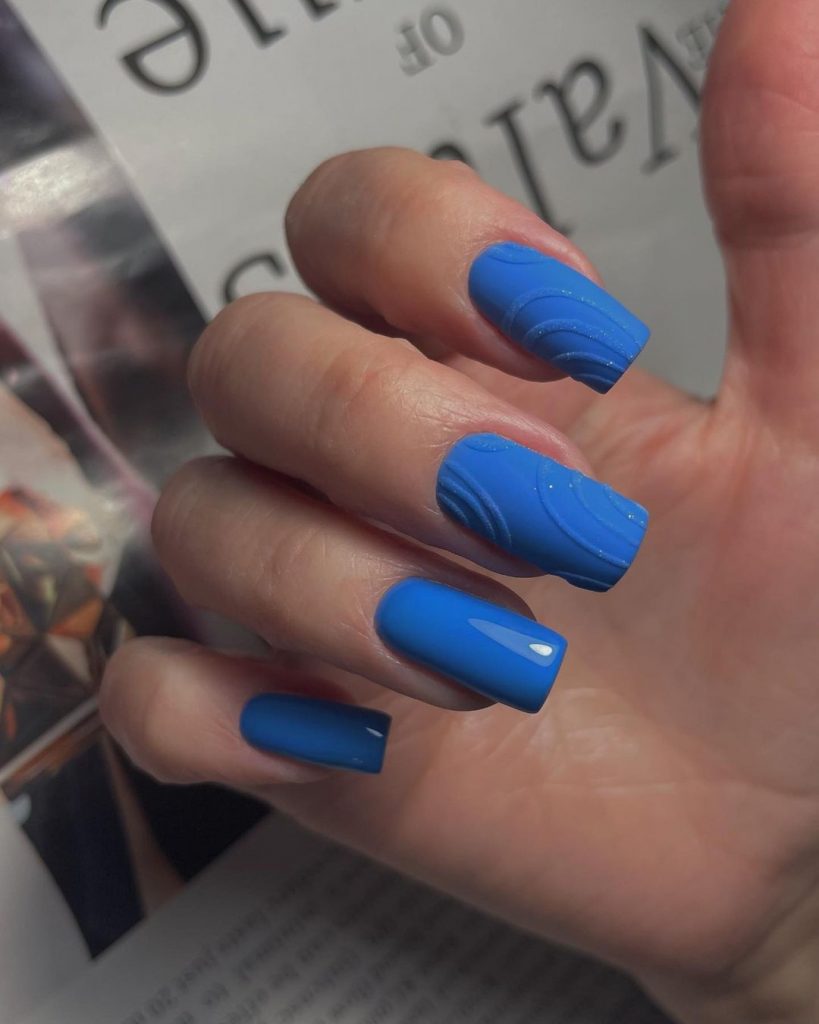
Blue relief nails
These blue nails feature an embossed design that adds texture and dimension. The intricate patterns are created using a matte top coat over a glossy blue base, resulting in stunning contrast. The medium-length, square nails look both modern and sophisticated, making them perfect for fall.
Consumables
- Nail polish: Blue from OPI
- Embossing tool: Nail Art Embossing Pen from Modelones
- Matte top coat: Matte About You from Essie
- Shiny top coat: Gel Couture Top Coat from Essie
- Base coat: OPI Nail Envy
- Nail file: Tweezerman Neon Filemates
DIY instructions
- Apply a base coat to protect your nails.
- Paint your nails with two coats of blue polish.
- Use the embossing tool to create patterns on the nails before the polish is completely dry.
- Apply a matte top coat over the relief areas to improve the texture.
- Finish with a glossy top coat on the rest of the nail to create contrast.
- Hydrate your cuticles with cuticle oil for a neat finish.
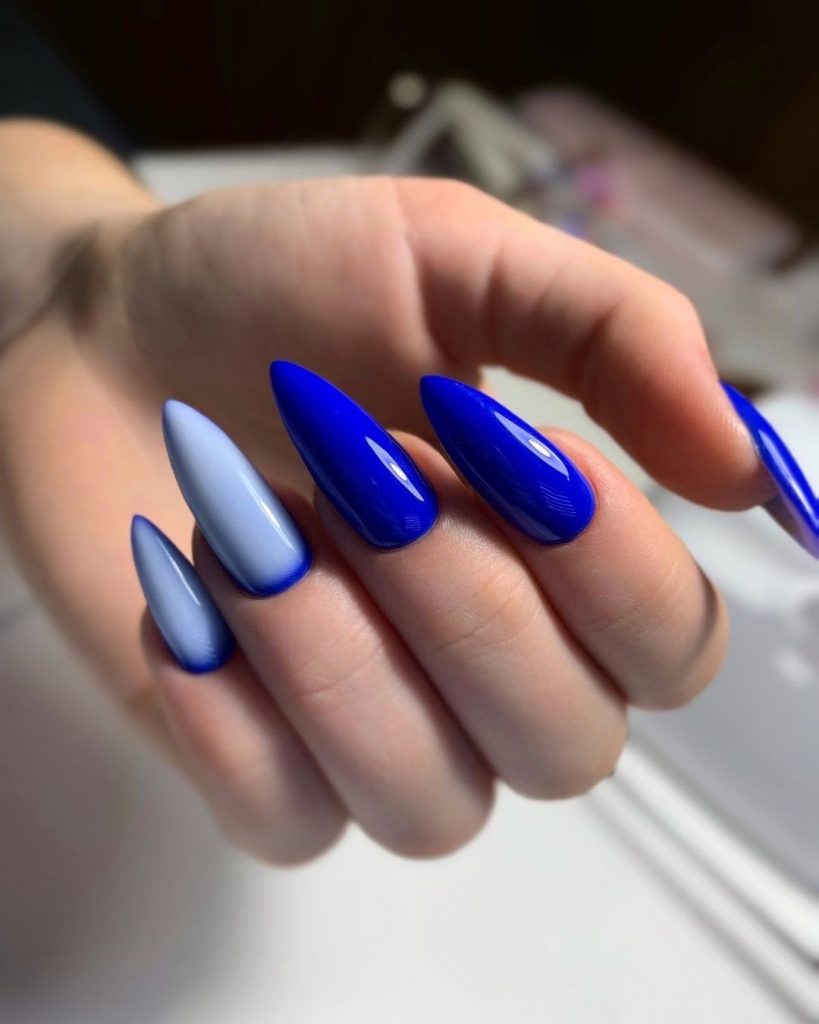
Stiletto blue nails
These striking stiletto nails have a gradient from light blue to royal blue, creating a beautiful ombre effect. The sharp, elongated shape adds drama and sophistication, making this design perfect for anyone who likes bold and sharp looks. The glossy finish enhances the vibrant colors, making the nails pop.
Consumables
- Nail polish: Light Blue by Sally Hansen, Royal Blue by Essie
- Gradient sponge: Nail Art Sponge from Beetles
- Top coat: Seche Vite Dry Fast Topcoat
- Base coat: OPI Nail Envy
- Nail file: OPI Crystal nail file
- Cuticle oil: CND SolarOil
DIY instructions
- Apply a base coat to your nails.
- Use the gradient sponge to apply the light blue polish at the base and royal blue at the ends, blending the colors for a smooth transition.
- Apply two coats of the gradient polish and allow each coat to dry.
- Finish with a top coat to seal the design and add shine.
- Use cuticle oil to keep your cuticles healthy and hydrated.
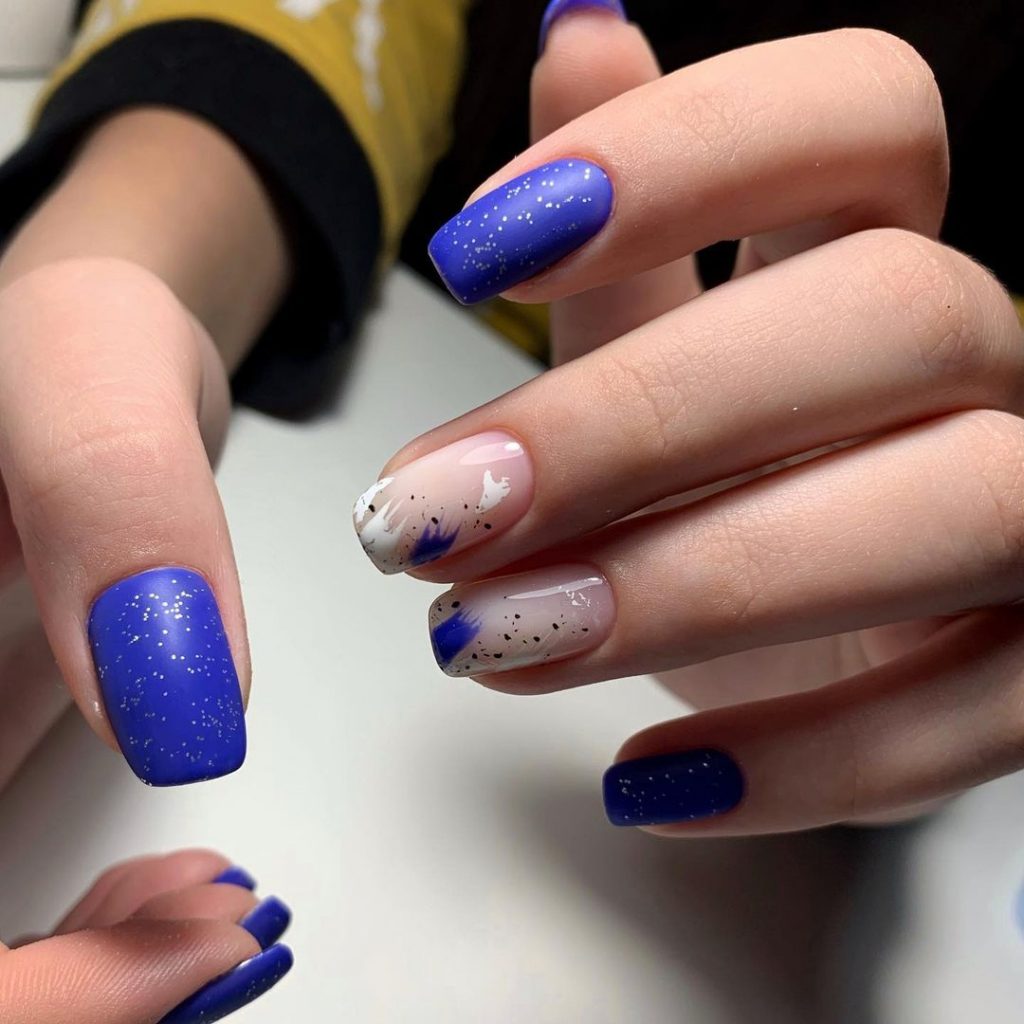
Blue and white splatter nails
This design combines blue and white with a splash effect, creating a playful and artistic look. The short, square nails are perfect for this design as they make the colors and patterns stand out. The addition of subtle glitter adds a touch of sparkle, making the nails look festive and fun.
Consumables
- Nail polish: Blue from Zoya, White from OPI
- Glitter: Silver glitter from Ciaté
- Splatter tool: Nail Art Splatter Tool from PUEEN
- Top coat: Essie Gel Setter
- Base layer: Essie Here to Stay
- Nail file: Deborah Lippmann Smooth Operator
DIY instructions
- Apply a base coat to your nails.
- Paint your nails with two coats of blue polish.
- Use the splatter tool to create white splatters on the nails.
- Add subtle glitter for a sparkling effect.
- Finish with a top coat to seal the design and add shine.
- Hydrate your cuticles with cuticle oil for a neat finish.
Abstract blue nails
These nails have an abstract design with a mix of blue and white colors, creating a modern and unique look. The almond-shaped nails are painted with a glossy finish, which enhances the vibrant colors. The abstract patterns add a touch of creativity and make the nails look like mini works of art.
Consumables
- Nail polish: Blue from Essie, White from OPI
- Nail art brush: Nail Art Brush Set from Beetles
- Top coat: Seche Vite Dry Fast Topcoat
- Base layer: Orly Bonder
- Nail file: Revlon Shape ‘N’ Buff
- Cuticle oil: Burt’s Bees Lemon Butter cuticle cream
DIY instructions
- Apply a base coat to protect your nails.
- Paint your nails with two coats of blue polish.
- Use the nail art brush to create abstract patterns with white polish.
- Finish with a top coat to seal the design and add shine.
- Apply cuticle oil around the nail edges to keep your cuticles nourished.
Shiny dark blue nails
These dark blue nails are a classic choice for fall. The glossy finish adds depth and richness to the color, making nails look sleek and polished. The square shape is both practical and stylish, perfect for everyday use and yet a statement.
Consumables
- Nail polish: Dark blue by Sally Hansen
- Top coat: Sally Hansen Miracle Gel
- Base layer: Orly Bonder
- Nail file: Revlon Shape ‘N’ Buff
- Cuticle oil: Burt’s Bees Lemon Butter cuticle cream
DIY instructions
- Start with a base coat to protect your nails.
- Apply two coats of the dark blue polish and allow each coat to dry thoroughly.
- Finish with a top coat to improve shine and durability.
- Apply cuticle oil around the nail edges to keep your cuticles nourished.
Light blue nails with abstract lines
These nails have a light blue base with abstract dark blue lines, creating a striking contrast. The short, square shape is modern and practical. The abstract lines add a touch of creativity, making these nails a perfect mix of simple and artistic.
Consumables
- Nail polish: Light blue from Essie, Dark blue from OPI
- Nail art brush: Nail Art Brush Set from Beetles
- Top coat: Seche Vite Dry Fast Topcoat
- Base layer: Orly Bonder
- Nail file: Tweezerman Neon Filemates
DIY instructions
- Apply a base coat to your nails.
- Paint your nails with two coats of light blue nail polish.
- Use the nail art brush to create abstract lines with dark blue polish.
- Finish with a top coat to seal the design and add shine.
- Hydrate your cuticles with cuticle oil for a neat finish.
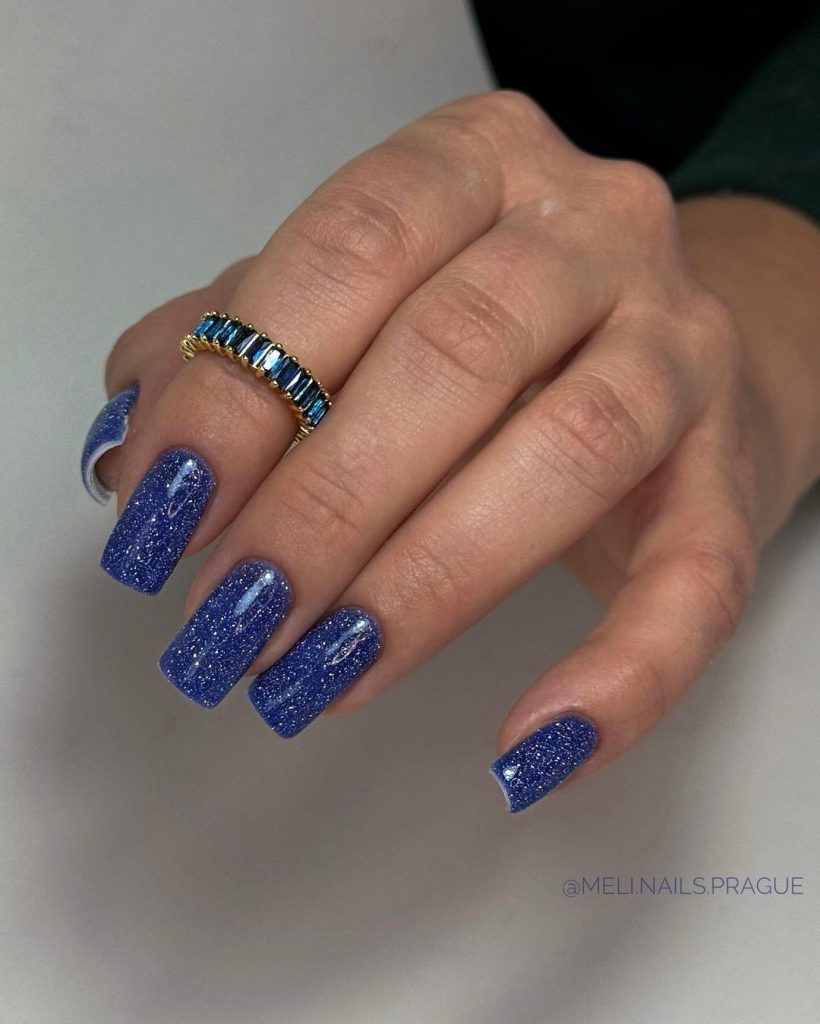
Glitter blue nails
These glitter blue nails are perfect for adding a touch of sparkle to your fall look. The medium-length, square nails are covered with a blue polish with glitter, creating a dazzling effect. This design is great for special occasions or just to add some glamor to your everyday style.
Consumables
- Nail polish: Glitter Blue from China Glaze
- Top coat: Essie Gel Setter
- Base layer: Essie Here to Stay
- Nail file: Deborah Lippmann Smooth Operator
- Cuticle oil: Essie Apricot cuticle oil
DIY instructions
- Apply a base coat to ensure a smooth application.
- Paint your nails with two layers of glitter blue nail polish.
- Finish with a top coat to add shine and durability.
- Hydrate your cuticles with cuticle oil for a polished finish.
Marble blue nails
These nails have a beautiful marble effect in shades of blue, creating a refined and artistic look. The medium-length, square nails show off the intricate patterns beautifully. This design is perfect for lovers of a chic and unique manicure.
Consumables
- Nail polish: Light blue from Zoya, Dark blue from Essie
- Marble tool: Nail Art Marbleizing Tool from Beetles
- Top coat: Seche Vite Dry Fast Topcoat
- Base coat: OPI Nail Envy
- Nail file: OPI Crystal nail file
- Cuticle oil: CND SolarOil
DIY instructions
- Apply a base coat to your nails.
- Use the Marble Tool to create the marble effect with light blue and dark blue polishes.
- Paint your nails with the marble design, allowing each layer to dry.
- Finish with a top coat to seal the design and add shine.
- Use cuticle oil to keep your cuticles healthy and hydrated.
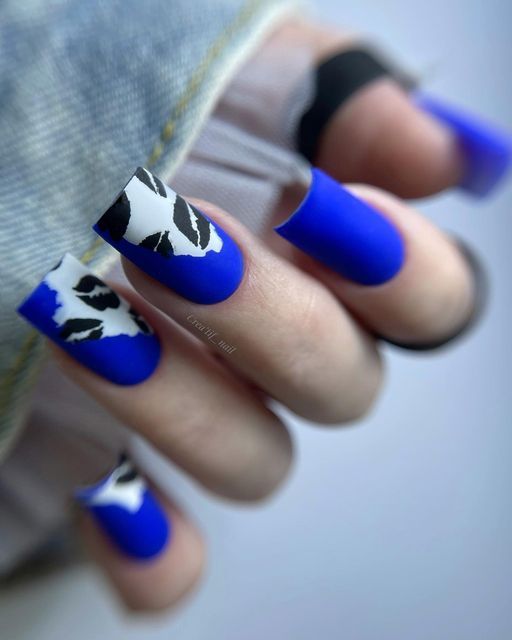
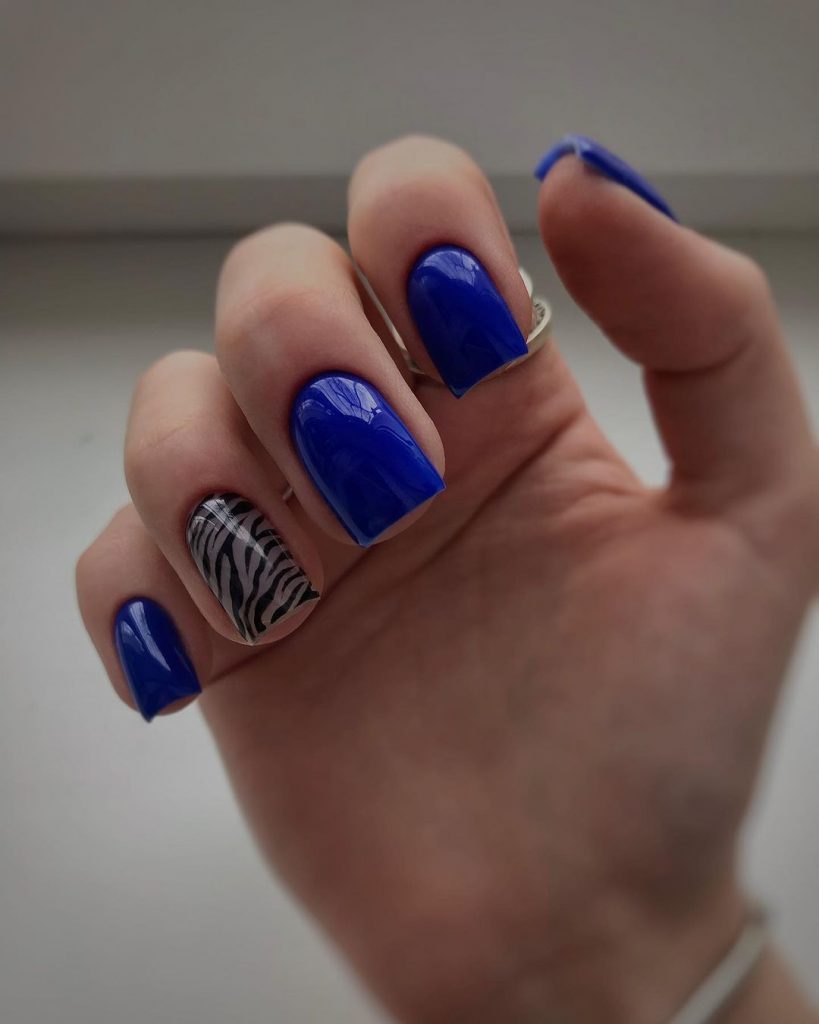
Blue and zebra accent nails
These nails combine a striking blue polish with a zebra accent nail for a striking and trendy look. The short, square shape is modern and practical, while the zebra design adds a fun twist. This manicure is perfect for making a statement without going overboard.
Consumables
- Nail polish: Blue by Essie, White by OPI, Black by Sally Hansen
- Nail art brush: Nail Art Brush Set from Beetles
- Top coat: Seche Vite Dry Fast Topcoat
- Base layer: Orly Bonder
- Nail file: Revlon Shape ‘N’ Buff
- Cuticle oil: Burt’s Bees Lemon Butter cuticle cream
DIY instructions
- Apply a base coat to your nails.
- Paint your nails with two coats of blue polish.
- Use the nail art brush to create the zebra design on the accent nail with white and black polish.
- Finish with a top coat to seal the design and add shine.
- Apply cuticle oil around the nail edges to keep your cuticles nourished.
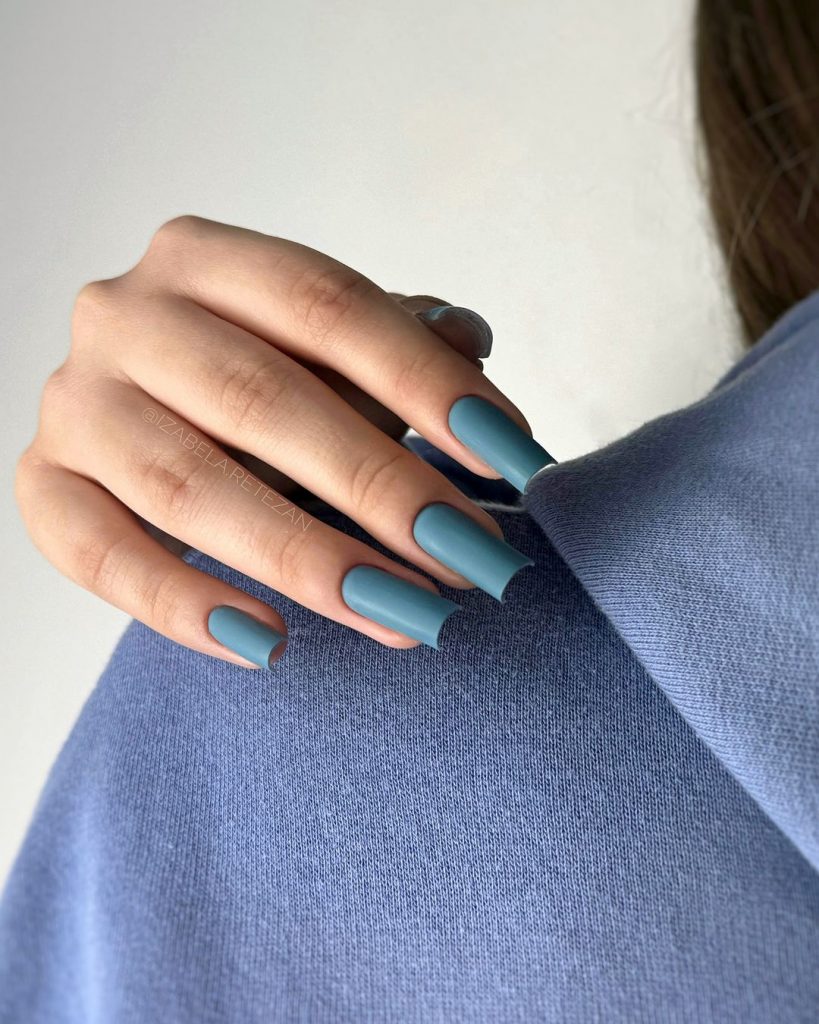
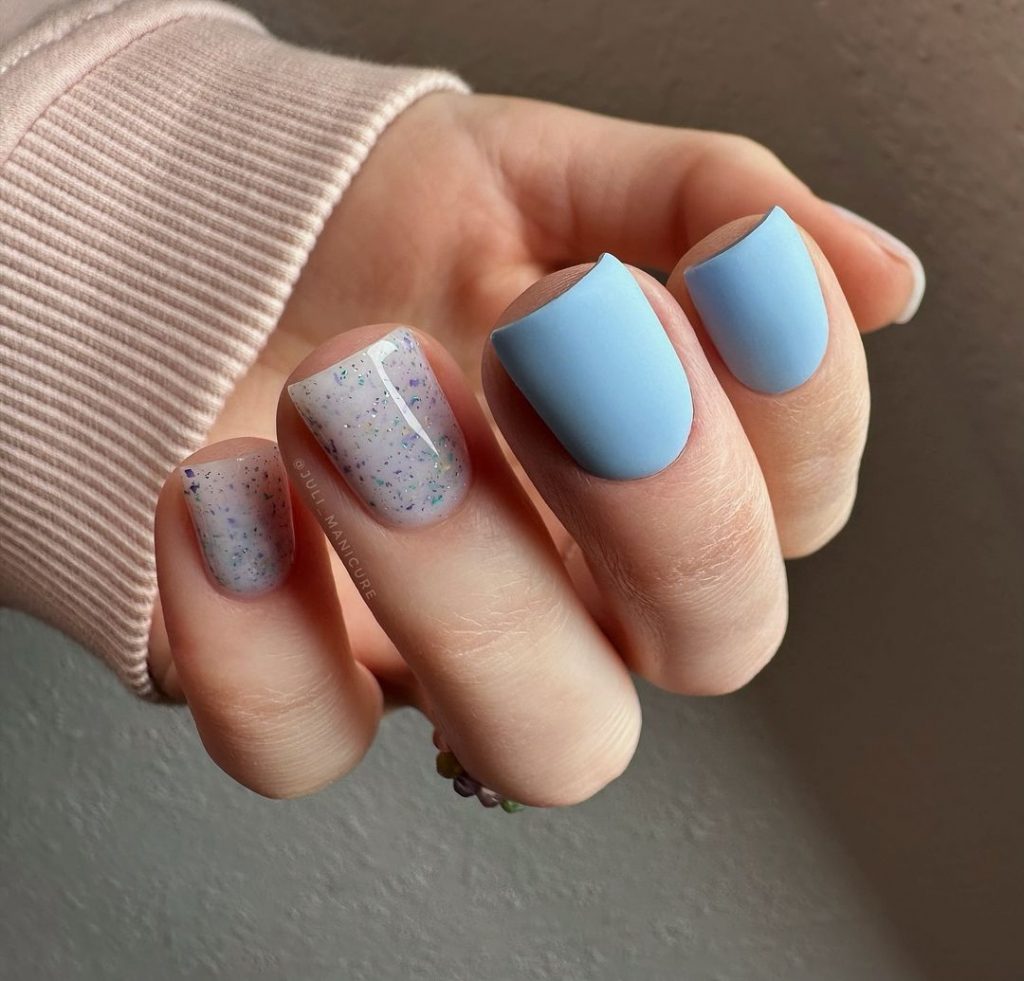
Matte dusty blue nails
These matte dusty blue nails are elegant and sophisticated. The matte finish gives nails a smooth, velvety texture, while the dusty blue color is perfect for fall. The medium-length, square shape adds to the overall chic and modern look.
Consumables
- Nail polish: Dusty Blue from Zoya
- Matte top coat: Matte About You from Essie
- Base coat: OPI Nail Envy
- Nail file: OPI Crystal nail file
- Cuticle oil: CND SolarOil
DIY instructions
- Apply a base coat to your nails.
- Paint your nails with two coats of dusty blue nail polish.
- Apply a matte top coat to achieve the velvety finish.
- Hydrate your cuticles with cuticle oil for a neat finish.
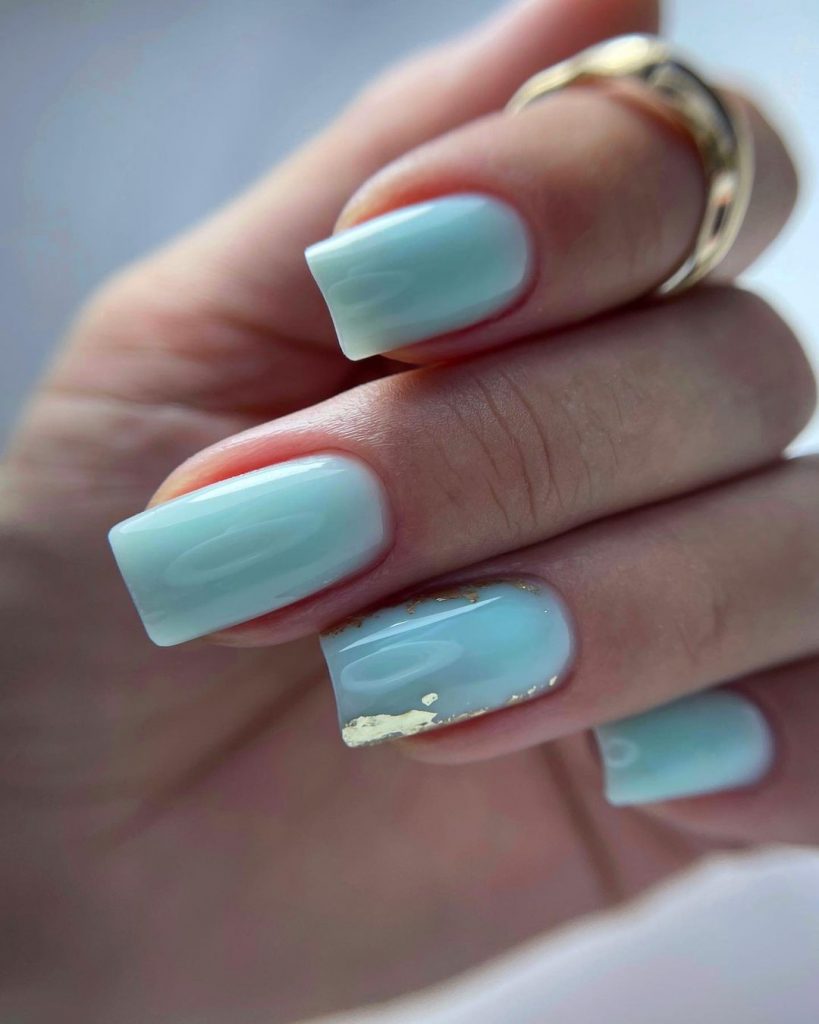
Light blue nails with gold foil accent
These light blue nails feature a delicate gold foil accent, adding a touch of elegance and luxury. The short, square shape makes this design practical and stylish. The gold foil detail on one nail creates a subtle yet sophisticated look.
Consumables
- Nail polish: Light blue from Essie
- Gold foil: Nail Art Foil from Born Pretty
- Top coat: Seche Vite Dry Fast Topcoat
- Base layer: Orly Bonder
- Nail file: Revlon Shape ‘N’ Buff
- Cuticle oil: Burt’s Bees Lemon Butter cuticle cream
DIY instructions
- Apply a base coat to protect your nails.
- Paint your nails with two coats of light blue nail polish.
- Apply gold foil to the accent nail while the polish is still tacky.
- Finish with a top coat to seal the design and add shine.
- Use cuticle oil to keep your cuticles hydrated.
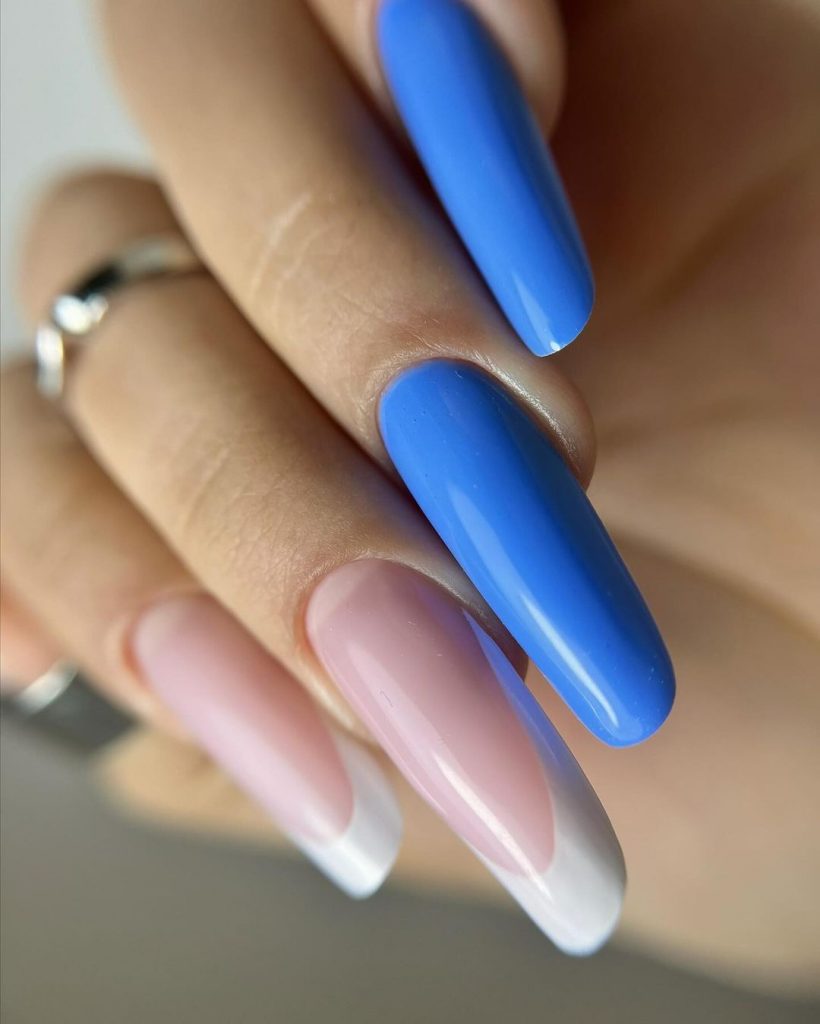
Blue and pink French tips
These nails have a modern take on the French tip, combining blue and pink for a fresh and trendy look. The medium, almond shape adds elegance, while the glossy finish enhances the vibrant colors. This design is perfect for those who love a twist on the classic French manicure.
Consumables
- Nail polish: Blue from Essie, Pink from OPI
- Top coat: Seche Vite Dry Fast Topcoat
- Base layer: Orly Bonder
- Nail file: Tweezerman Neon Filemates
DIY instructions
- Apply a base coat to your nails.
- Paint your nails with a neutral base color.
- Use blue and pink polish to make the French tips. Nail tape can help achieve clean lines.
- Finish with a top coat to seal the design and add shine.
- Hydrate your cuticles with cuticle oil for a neat finish.
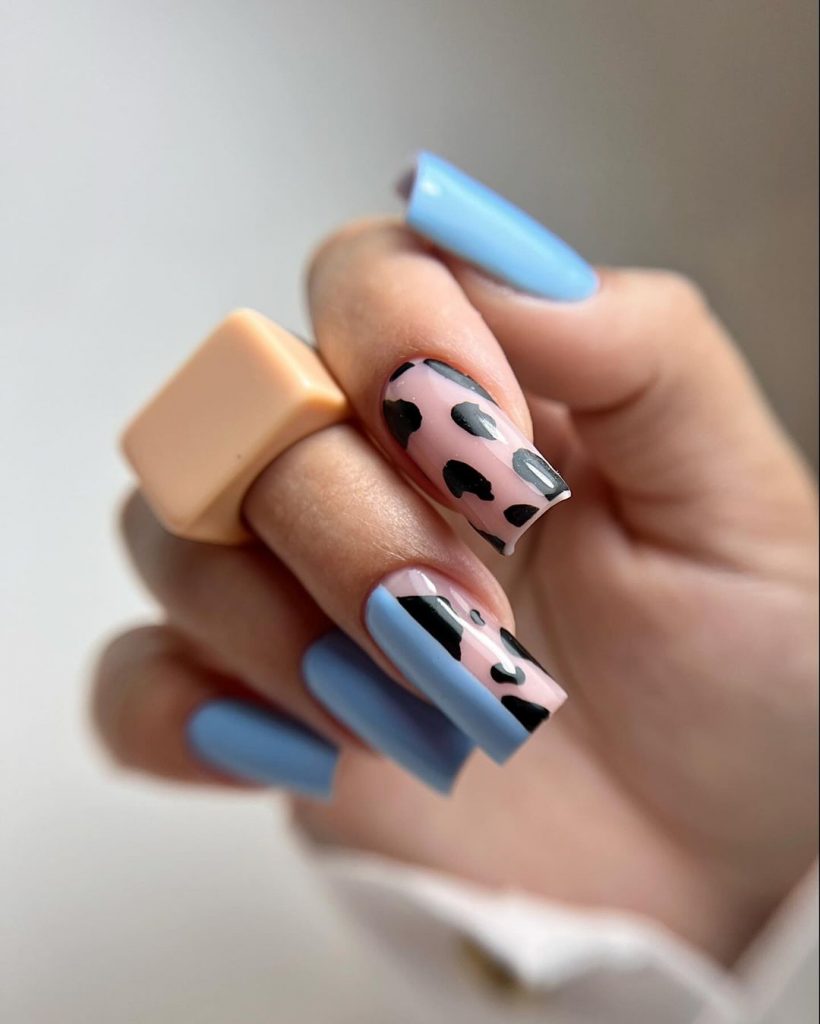
Blue and leopard print nails
These nails combine a chic blue polish with a fun leopard print accent. The square nails are medium length, making the design both stylish and practical. The leopard print provides a playful twist, perfect for those who want to make a statement with their manicure.
Consumables
- Nail polish: Blue by Sally Hansen, Nude by OPI, Black by Sally Hansen
- Nail art brush: Nail Art Brush Set from Beetles
- Top coat: Seche Vite Dry Fast Topcoat
- Base layer: Orly Bonder
- Nail file: Revlon Shape ‘N’ Buff
- Cuticle oil: Burt’s Bees Lemon Butter cuticle cream
DIY instructions
- Apply a base coat to your nails.
- Paint your nails with two coats of blue polish.
- Use the nail art brush to create the leopard print design on the accent nail with nude and black polishes.
- Finish with a top coat to seal the design and add shine.
- Apply cuticle oil around the nail edges to keep your cuticles nourished.
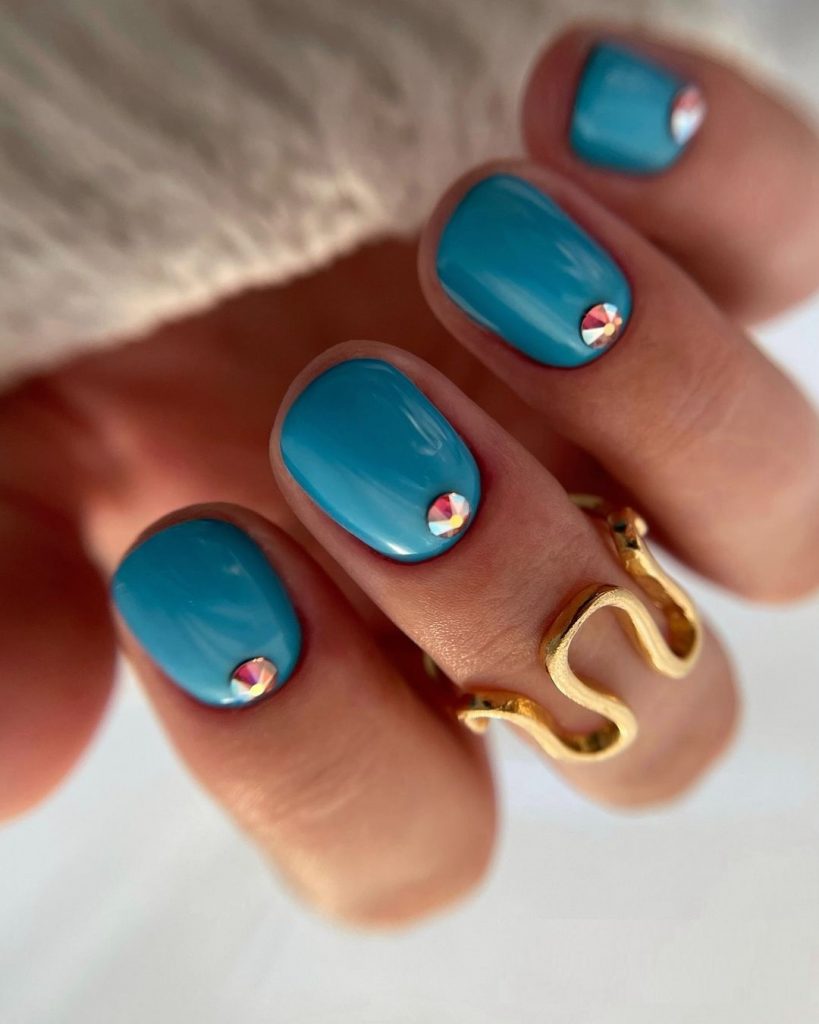
Teal blue nails with rhinestones
These teal nails are decorated with rhinestones, adding a touch of sparkle and glamour. The short, round shape is practical and cute, while the rhinestones take the design to the next level, making it perfect for special occasions or just to add some bling to your everyday look.
Consumables
- Nail polish: Teal Blue by Essie
- Rhinestones: Nail Art Rhinestones from Born Pretty
- Top coat: Essie Gel Setter
- Base layer: Essie Here to Stay
- Nail file: Deborah Lippmann Smooth Operator
- Cuticle oil: Essie Apricot cuticle oil
DIY instructions
- Apply a base coat to your nails.
- Paint your nails with two coats of teal nail polish.
- Apply rhinestones to desired areas while the polish is still tacky.
- Finish with a top coat to ensure the rhinestones stay in place and add shine.
- Hydrate your cuticles with cuticle oil for a polished finish.
Matte blue and marble nails
These nails have a combination of matte blue and marble effects, creating a striking and artistic design. The matte blue paint contrasts beautifully with the shiny marble accents, which gives a refined yet trendy look. The almond shape adds elegance, making these nails perfect for any occasion.
Consumables
- Nail polish: Matte Blue from Essie
- Marble polish: White from OPI, Blue from Sally Hansen
- Top coat: Seche Vite Dry Fast Topcoat
- Base coat: OPI Nail Envy
- Marble tool: Nail Art Marbleizing Tool from Beetles
- Nail file: OPI Crystal nail file
- Cuticle oil: CND SolarOil
DIY instructions
- Apply a base coat to your nails.
- Paint your nails with two coats of matte blue nail polish.
- Use the marble tool to create marble effects on the accent nails with white and blue polishes.
- Seal the marble design with a glossy top coat, while leaving the blue nails matte.
- Hydrate your cuticles with cuticle oil for a polished finish.
Blue with glitter accent
These nails have a light blue base with a glitter accent. The combination of a shiny light blue polish and speckled glitter creates a fun and playful look. The short, square shape is practical and cute, making this design perfect for everyday use.
Consumables
- Nail polish: Light blue from Essie
- Glitter top coat: Fairy Dust from China Glaze
- Base layer: Orly Bonder
- Nail file: Revlon Shape ‘N’ Buff
- Cuticle oil: Burt’s Bees Lemon Butter cuticle cream
DIY instructions
- Apply a base coat to protect your nails.
- Paint your nails with two coats of light blue nail polish.
- Apply a glitter top coat to the accent nails.
- Finish with a gloss top coat to seal the design and add shine.
- Use cuticle oil to keep your cuticles hydrated.
Bright blue short nails
These bright blue short nails are vibrant and eye-catching. The glossy finish enhances the brightness of the color, making the nails pop. The short length is practical and easy to maintain, making this design ideal for those who prefer a low-maintenance manicure.
Consumables
- Nail polish: Bright Blue by Sally Hansen
- Top coat: Sally Hansen Miracle Gel
- Base layer: Orly Bonder
- Nail file: Tweezerman Neon Filemates
- Cuticle oil: Burt’s Bees Lemon Butter cuticle cream
DIY instructions
- Apply a base coat to your nails.
- Paint your nails with two coats of bright blue nail polish.
- Finish with a top coat to improve shine and durability.
- Apply cuticle oil around the nail edges to keep your cuticles nourished.
Royal blue short nails
These royal blue nails are perfect for a bold and sophisticated look. The glossy finish adds depth to the rich color, making nails look sleek and polished. The short length is both practical and stylish, suitable for any occasion.

Consumables
- Nail polish: Royal Blue by Essie
- Top coat: Gel Couture Top Coat from Essie
- Base coat: Strong Start Base Coat from Essie
- Nail file: OPI Crystal nail file
- Cuticle oil: CND SolarOil
DIY instructions
- Apply a base coat to protect your nails.
- Paint your nails with two coats of royal blue nail polish.
- Finish with a top coat to seal the color and add a glossy finish.
- Use cuticle oil to keep your cuticles hydrated and healthy.
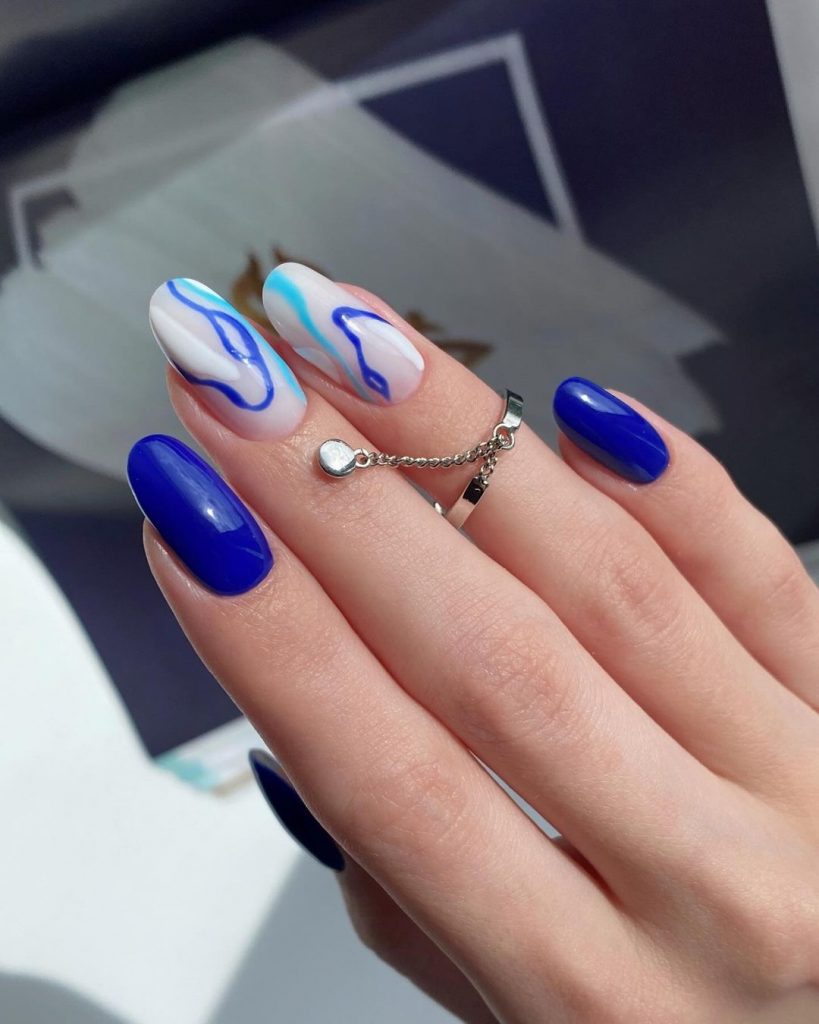
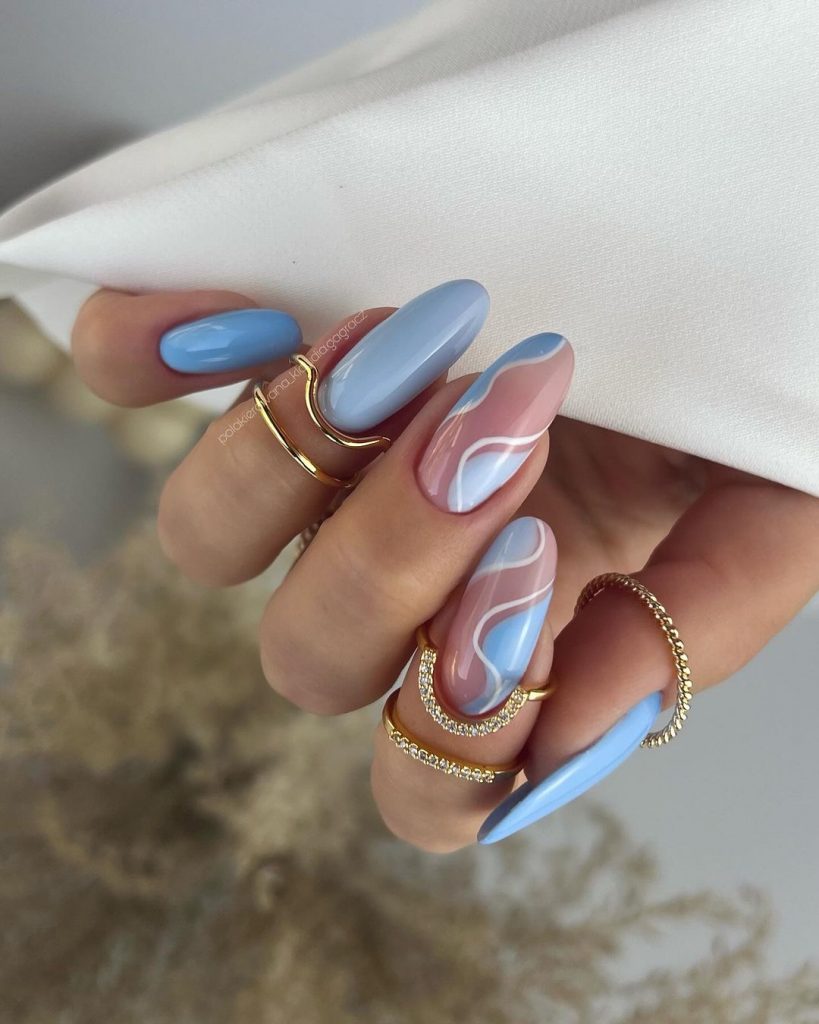
Blue and Nude Swirl Nails
These nails have a beautiful swirl design with blue and nude colors. The combination of glossy finishes and intricate patterns creates a modern and chic look. The almond shape adds elegance, making these nails perfect for special occasions or everyday use.
Consumables
- Nail polish: Blue by OPI, Nude by Essie
- Top coat: Seche Vite Dry Fast Topcoat
- Base coat: OPI Nail Envy
- Nail art brush: Nail Art Brush Set from Beetles
- Nail file: OPI Crystal nail file
- Cuticle oil: CND SolarOil
DIY instructions
- Apply a base coat to your nails.
- Paint your nails with a neutral base color.
- Use the nail art brush to create swirl patterns with blue and nude polishes.
- Finish with a top coat to seal the design and add shine.
- Hydrate your cuticles with cuticle oil for a polished look.
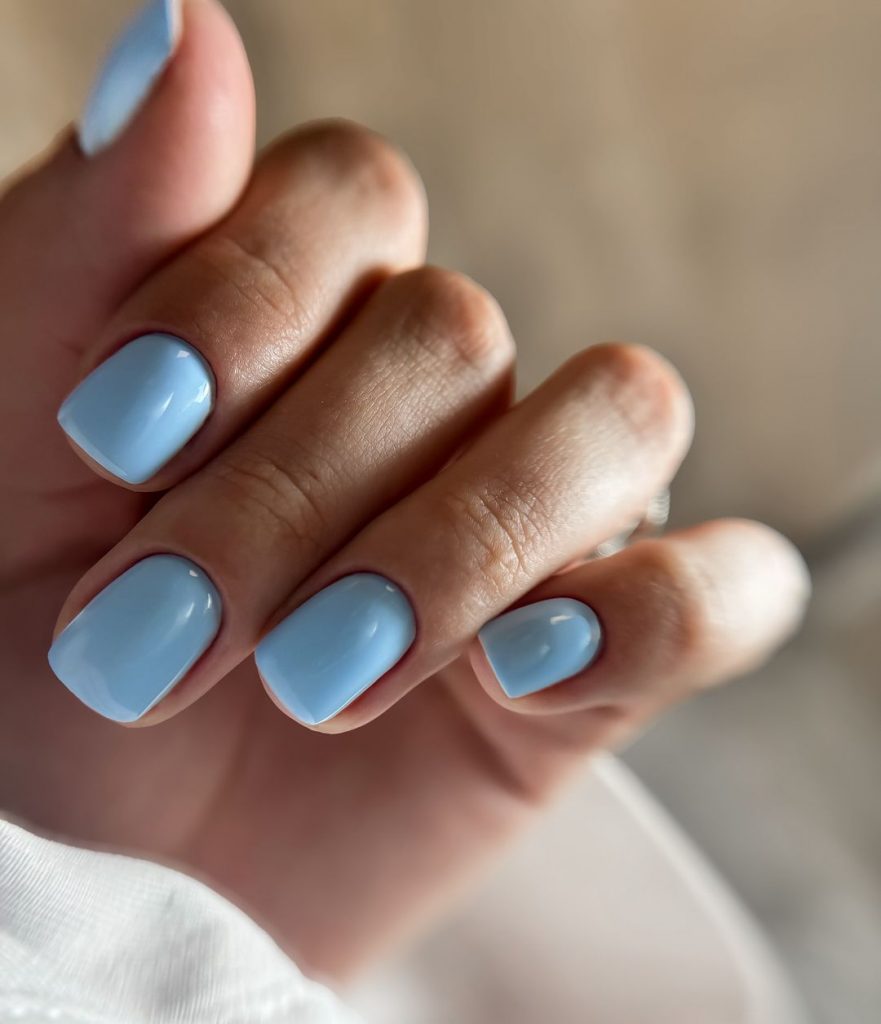
Soft blue short nails
These soft blue short nails are delicate and elegant. The glossy finish gives the nails a polished look, while the soft blue color adds a touch of tranquility. The short, square shape is practical and chic, making this design suitable for any occasion.
Consumables
- Nail polish: Soft Blue by Essie
- Top coat: Essie Gel Setter
- Base layer: Essie Here to Stay
- Nail file: Deborah Lippmann Smooth Operator
- Cuticle oil: Essie Apricot cuticle oil
DIY instructions
- Apply a base coat to ensure a smooth application.
- Paint your nails with two coats of soft blue nail polish.
- Finish with a top coat to add shine and durability.
- Hydrate your cuticles with cuticle oil for a neat and healthy finish.

Namie O, a talented writer at Willtiptop, conveys her passion for fashion and beauty in every word she writes. With a keen eye for detail and a deep insight into the latest trends, Namie’s articles and insights captivate readers and provide them with valuable knowledge and inspiration. Through her engaging and informative writing style, Namie aims to empower individuals to explore their style, experiment with beauty techniques, and embrace their unique sense of self.