Fall Green Nails 25 Ideas: Your Ultimate Guide to Stunning Autumn Manicures
As the leaves change and the air gets crisper, there’s no better time to freshen up your nail game with some fabulous fall green nails. Whether you’re a fan of simple and clean designs or like to experiment with intricate art, there’s something for everyone here. Let’s dive into some beautiful green nail inspirations that will make your fall season even more stylish.
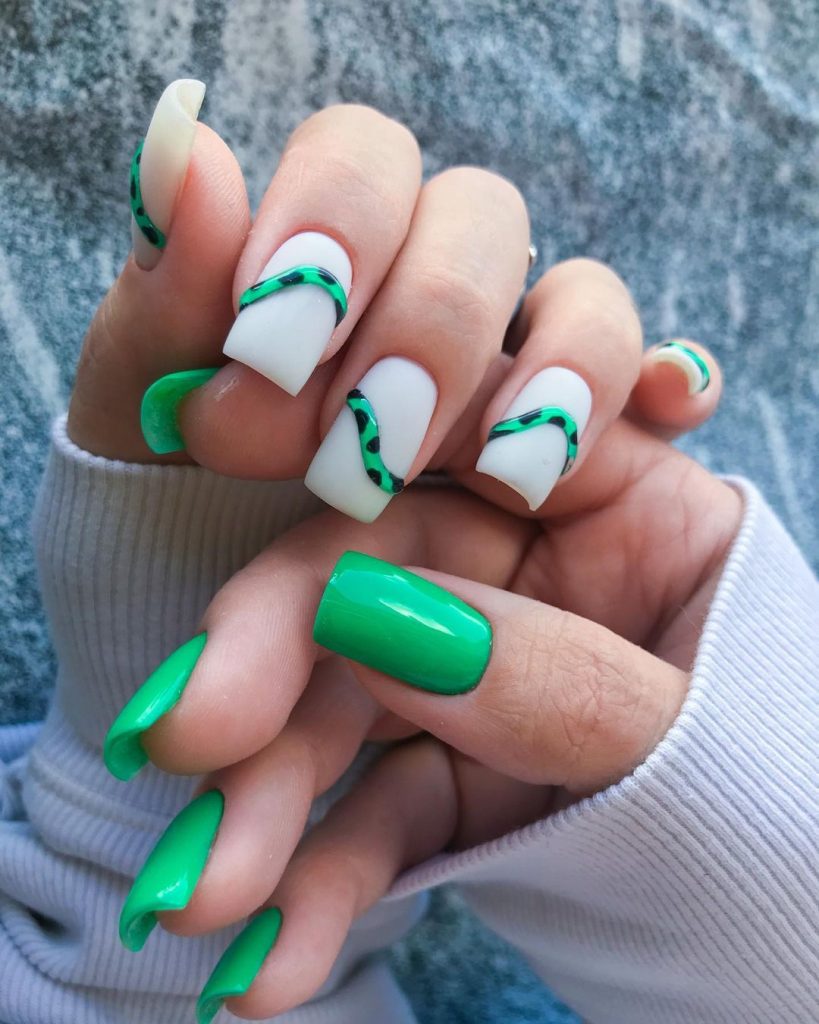
Green and zebra stripes
Nothing is as bold and chic as this vibrant combination of deep green and striking zebra stripes. This design features a perfect mix of solid green nails and a playful zebra pattern that puts a unique twist on your typical fall manicure.

Consumables:
-
- OPI Nail Polish in “Stay off the lawn!”
- White and black zebra stripe nail polish (try OPI Nail Lacquer in “Alpine Snow” and “Black Onyx”)
- A thin nail art brush for precision
- Base and top coat (Seche Vite Dry Fast Top Coat)
- Acrylic powder for durability
Recommendations:
-
- Make sure your base coat is thoroughly dry before applying the green polish to avoid staining.
- When creating zebra stripes, use a steady hand and a thin brush to achieve clean, sharp lines.
DIY instructions:
-
- Start with a clean, polished nail.
- Apply a base coat and let it dry completely.
- Paint two nails in the solid green color and let them dry.
- For the zebra nails, paint a base coat of white nail polish and let it dry.
- Using the thin brush, draw random, curved black stripes to mimic zebra patterns.
- Seal with a top coat for a glossy finish.
Bold green nails
For those who like to keep it cool and stylish, this vibrant green manicure is the right choice. The solid color is both striking and elegant, perfect for any occasion.
Consumables:
-
- OPI Nail Polish in “Jade Is the New Black”
- Base and top coat (Essie Gel Setter Top Coat)
- Nail file and buffer
Recommendations:
-
- Always start with a base coat to protect your nails and help the nail polish adhere better.
- For a smooth finish, apply thin, even coats of nail polish, allowing each coat to dry before applying the next.
DIY instructions:
-
- Prepare your nails by filing and polishing them into the desired shape.
- Apply a base coat and let it dry.
- Apply two coats of green polish, making sure each coat is completely dry before applying the next.
- Finish with a top coat to seal the color and add shine.
Green and geometric patterns
This sophisticated manicure combines deep green with intricate geometric patterns, creating a perfect blend of elegance and modernity. The gold accents add a touch of luxury to the overall look.
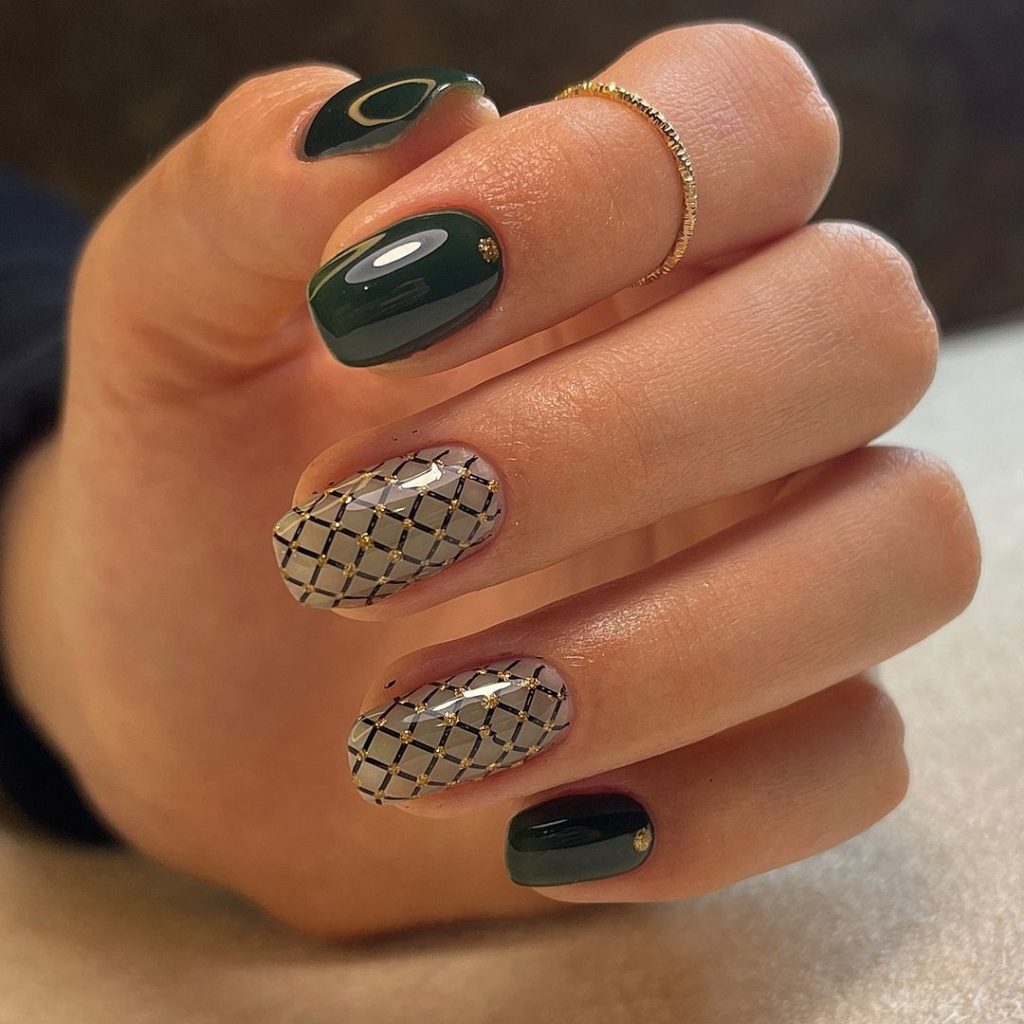
Consumables:
-
- Essie nail polish in “Off Tropic”
- Gold nail tape or a thin gold nail polish (Sally Hansen Insta-Dri in “Go for Gold”)
- Base and top coat (OPI Top Coat)
- Fine nail art brush
Recommendations:
-
- Use nail tape for precise lines in geometric designs.
- Apply a top coat to prevent the gold accents from chipping.
DIY instructions:
-
- Start with a clean base coat.
- Paint your nails with the green polish and let it dry.
- Create geometric patterns on accent nails using the gold nail tape or fine brush.
- Seal the design with a top coat to protect your art and add a glossy finish.
Minimalist green waves
If you prefer a minimalist look, these green waves are subtle yet striking. The design is perfect for anyone who likes simplicity with a twist.
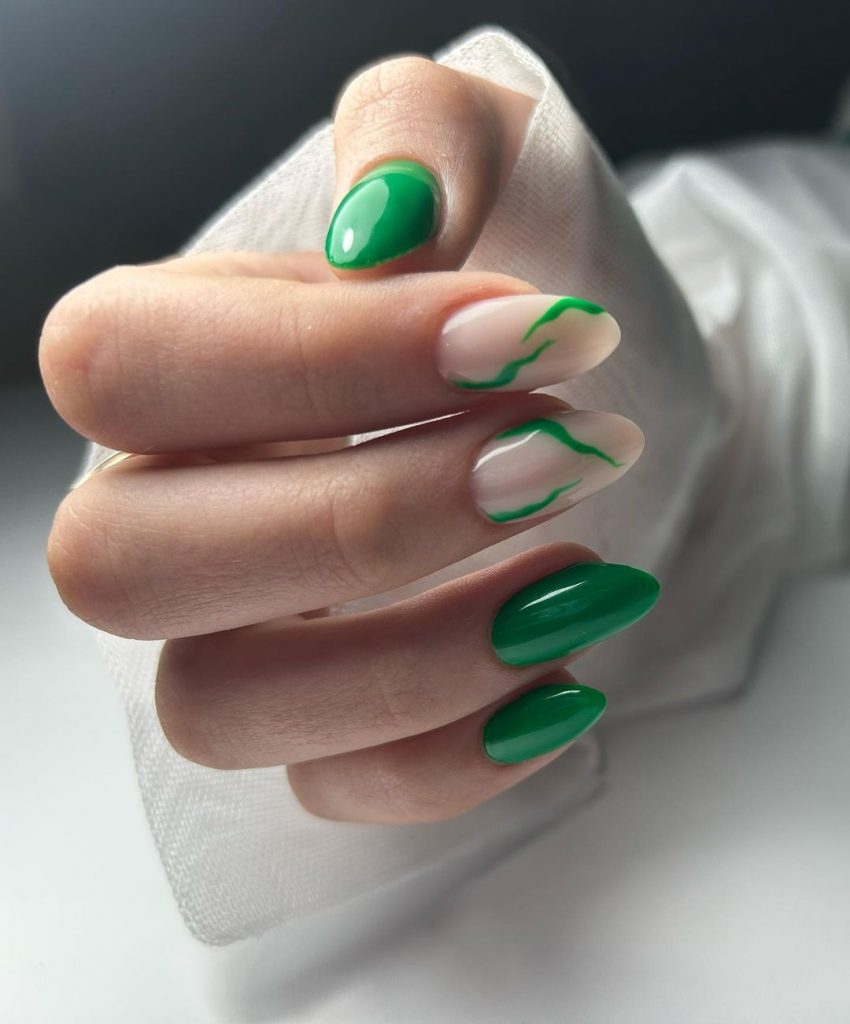
Consumables:
-
- OPI Nail Polish in “Don’t Tell a Sol”
- White nail polish (Essie Nail Polish in “Blanc”)
- Thin nail art brush
- Base and top coat (Revlon Quick Dry Top Coat)
Recommendations:
-
- Practice drawing the wave pattern on a piece of paper before applying it to your nails.
- Keep the wave design delicate for a more elegant look.
DIY instructions:
-
- Apply a base coat and let it dry.
- Paint your nails with the green nail polish.
- Use the thin brush to draw soft wave patterns with the white paint.
- Finish the design with a top coat.
Olive green perfection
Olive green nails are perfect for a muted yet stylish fall look. This color is versatile and goes beautifully with any outfit, making it a must-have for this season.
Consumables:
-
- Essie nail polish in “Bon Voyage”
- Base and top coat (Sally Hansen Miracle Gel Top Coat)
- Nail file and buffer
Recommendations:
-
- Choose an olive green polish with a high-quality formula to ensure smooth application.
- A top coat extends the life of your manicure.
DIY instructions:
-
- File and polish your nails into the desired shape.
- Apply a base coat and let it dry.
- Paint two coats of olive green varnish, allowing each coat to dry completely.
- Finish with a top coat for extra shine and protection.
Green and Zebra Glam
This design combines the boldness of neon green with the elegance of glittery zebra stripes. The contrast between the vibrant green and the shimmering silver-black pattern creates a stunning effect that is sure to turn heads.
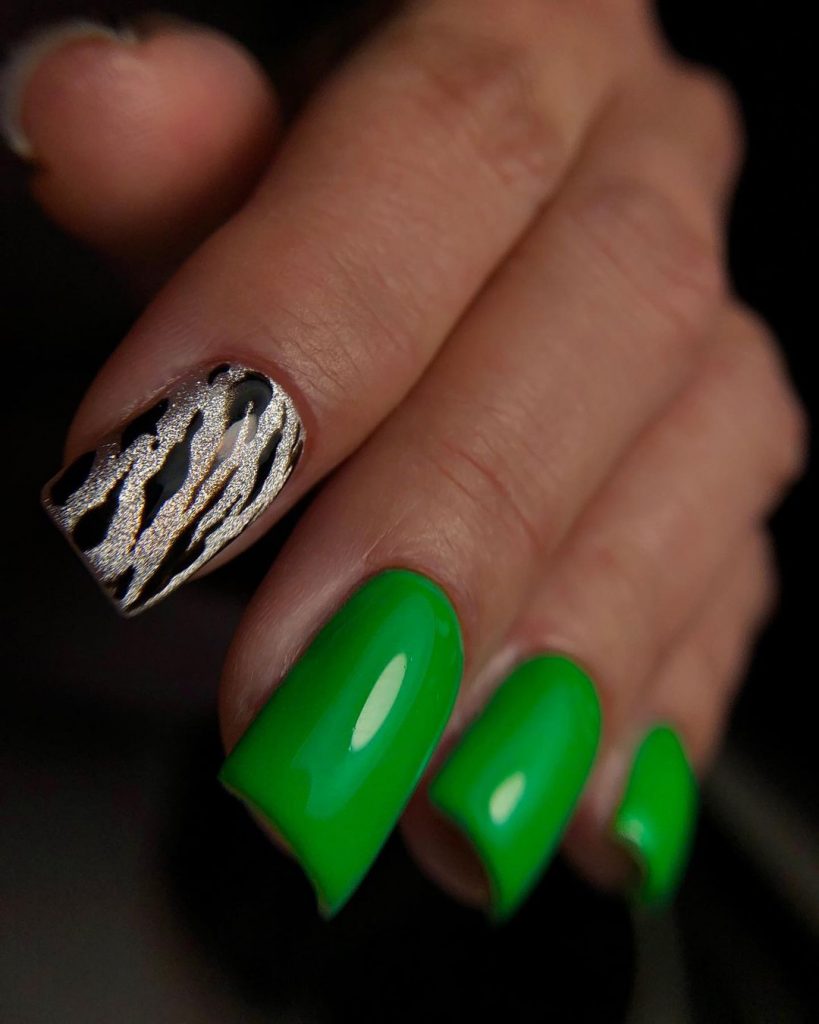
Consumables:
-
- OPI Nail Polish in “Neon Green”
- Black nail polish for zebra stripes (Sally Hansen Insta-Dri in “Black to Black”)
- Silver Glitter Lacquer (China Glaze in “Glistening Snow”)
- Thin nail art brush
- Base and top coat (CND Vinylux Top Coat)
Recommendations:
-
- Make sure the neon green base coat is completely dry before applying the zebra stripes.
- Use a fine glitter polish to ensure the stripes are clean and defined.
DIY instructions:
-
- Start with a base coat and let it dry.
- Apply two coats of neon green polish and let them dry.
- Use the thin brush to create zebra stripes with the black polish.
- Apply a coat of silver glitter polish over the black stripes.
- Finish with a top coat to seal the design.
Botanical matte nails
This elegant manicure features a sophisticated matte green combined with delicate fern leaf designs. The earth tones and intricate patterns make it a perfect choice for fall.
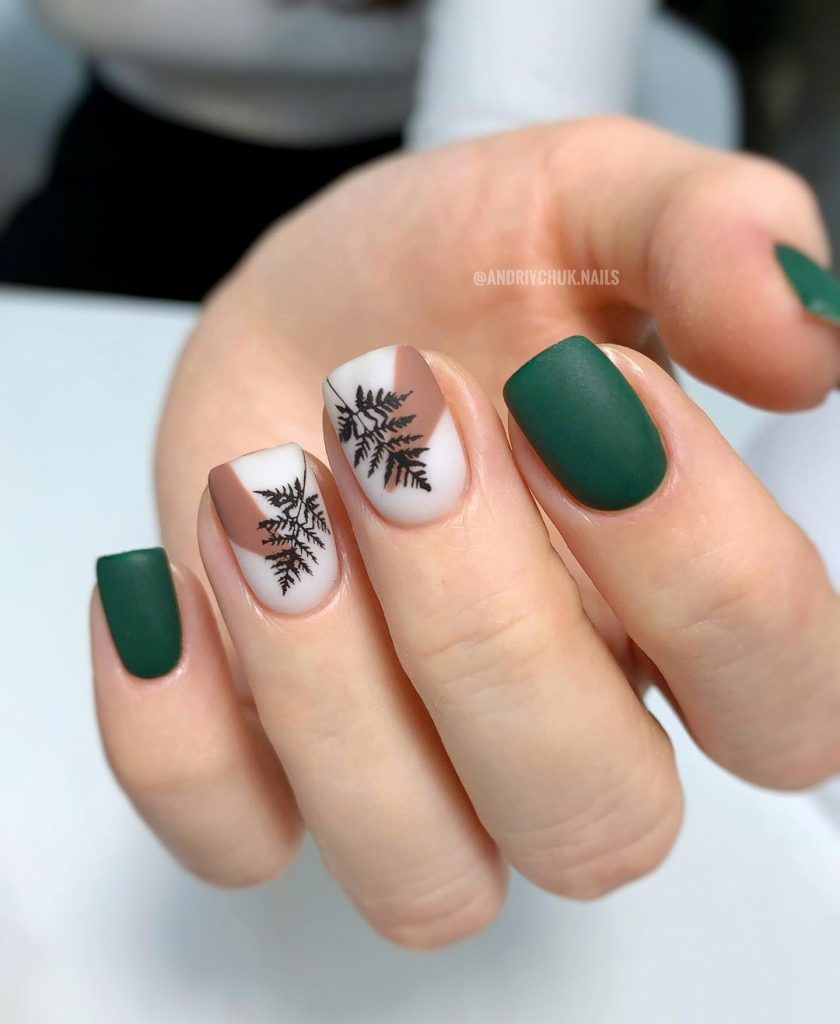
Consumables:
-
- Essie matte nail polish in “Spiked With Style”
- Black nail polish for leaf patterns (OPI Nail Lacquer in “Black Onyx”)
- Matte top coat (Revlon Matte Top Coat)
- Thin nail art brush
Recommendations:
-
- Use a matte top coat to give the green polish a velvety finish.
- Practice drawing leaf patterns on paper before applying them to your nails.
DIY instructions:
-
- Apply a base coat and let it dry.
- Paint your nails with the matte green polish and let it dry.
- Use the thin brush to draw frond patterns with the black paint.
- Finish with a matte top coat to protect the design.
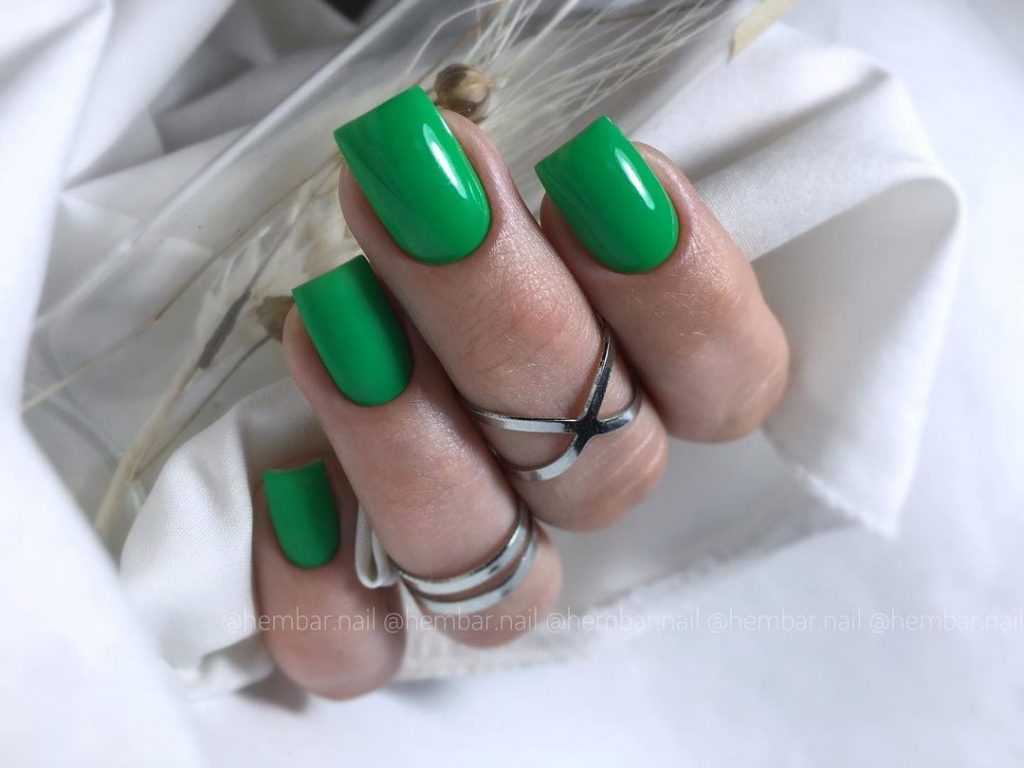
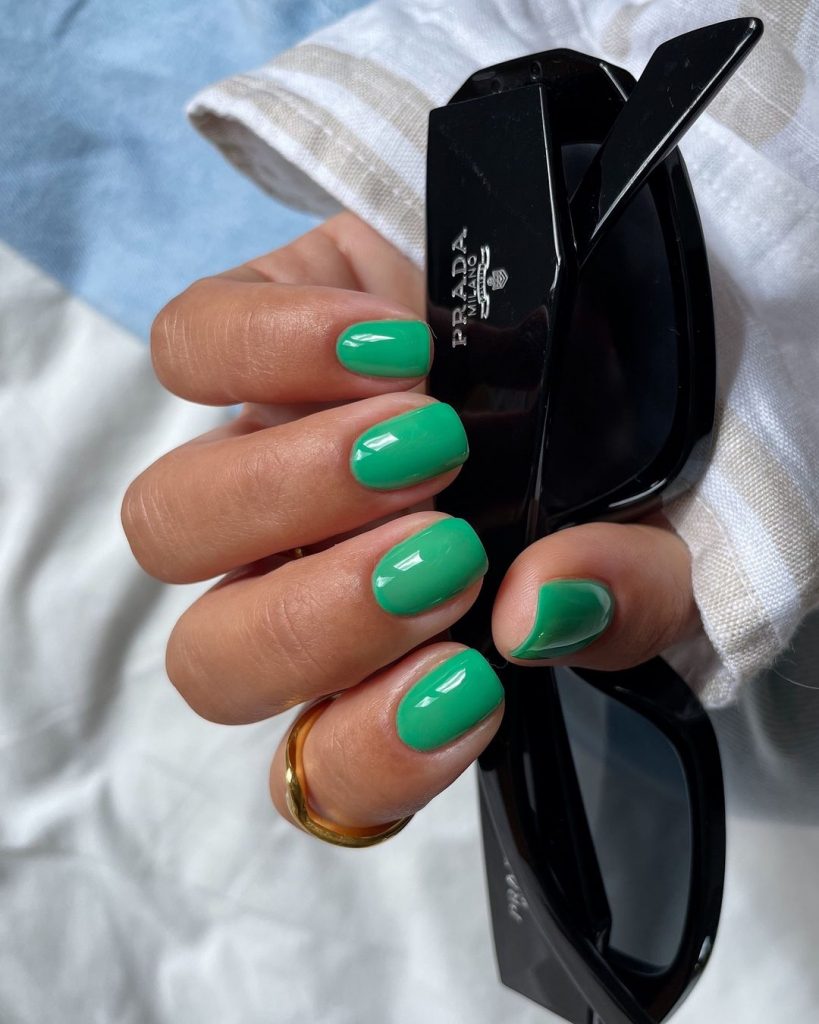
Shiny green elegance
For a classic and timeless look, these shiny green nails are the perfect choice. The high-shine finish makes the color pop, creating a simple yet sophisticated manicure.

Consumables:
-
- OPI Nail Polish in “Stay off the lawn!”
- Base and top coat (Essie Gel Setter Top Coat)
- Nail file and buffer
Recommendations:
-
- Make sure each coat of nail polish is completely dry before applying the next to avoid smudging.
- Use a high-gloss top coat to enhance the shine.
DIY instructions:
-
- File and polish your nails into the desired shape.
- Apply a base coat and let it dry.
- Paint two coats of green lacquer and let each coat dry completely.
- Finish with a glossy top coat.
Olive green with gold accents
This manicure combines the warmth of olive green with the luxury of gold accents. The subtle gold stripes add a touch of elegance, making it perfect for any fall event.
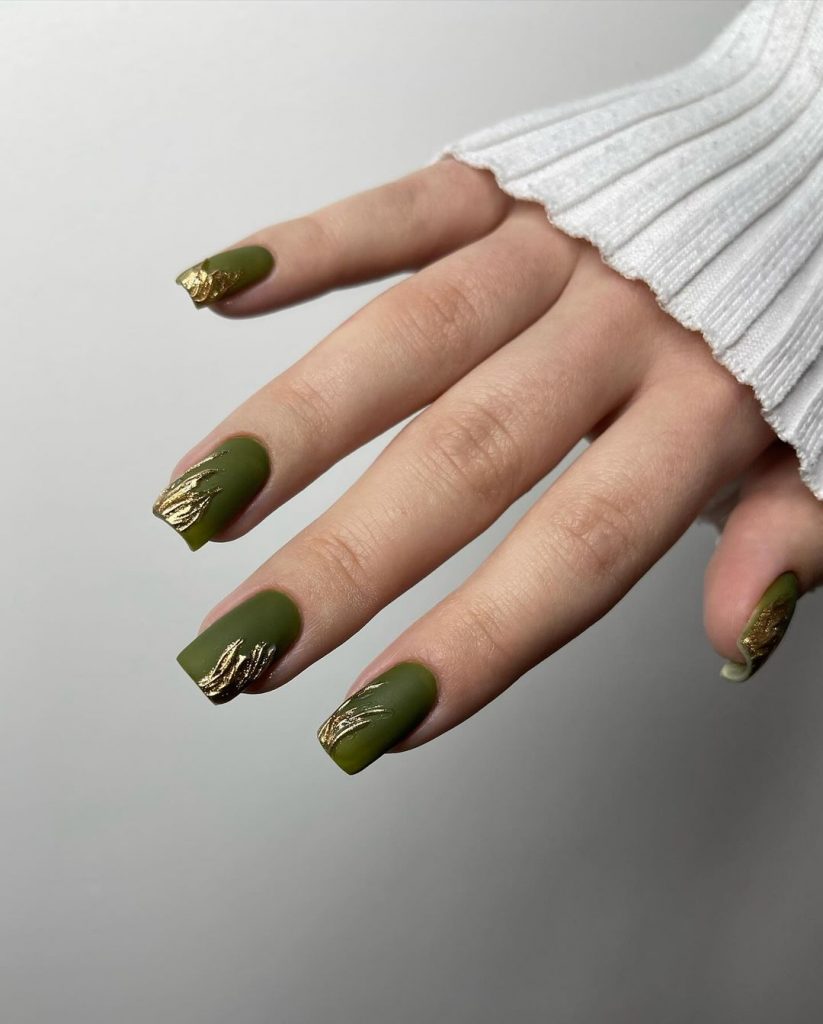
Consumables:
-
- Essie nail polish in “Sew Psyched”
- Gold Nail Polish (Sally Hansen Miracle Gel in “Game of Chromes”)
- Base and top coat (Sally Hansen Double Duty Base & Top Coat)
- Thin nail art brush
Recommendations:
-
- Apply the gold accents sparingly to keep the design elegant and understated.
- Use a top coat to prevent the gold polish from flaking off.
DIY instructions:
-
- Start with a base coat and let it dry.
- Paint your nails with the olive green nail polish.
- Use the thin brush to add gold stripes to your accent nails.
- Seal with a top coat to protect the design.
Green and white swirl
This playful design features a combination of bright green and bright white, with swirling patterns that add a fun twist. The contrast between the colors makes this manicure stand out.
Consumables:
-
- OPI Nail Polish in “Green Come True”
- White nail polish (Essie Nail Polish in “Blanc”)
- Thin nail art brush
- Base and top coat (Seche Vite Dry Fast Top Coat)
Recommendations:
-
- Create swirls with a fine brush for a more controlled and precise design.
- Make sure each coat of nail polish is dry before applying the next color to avoid staining.
DIY instructions:
-
- Apply a base coat and let it dry.
- Paint your nails with the green nail polish.
- Use the thin brush to create swirling patterns with the white polish.
- Finish the design with a top coat.
Matte green elegance
For a sleek and sophisticated look, these matte green nails are perfect for fall. The deep green color combined with a matte finish creates a chic and understated design that exudes elegance.
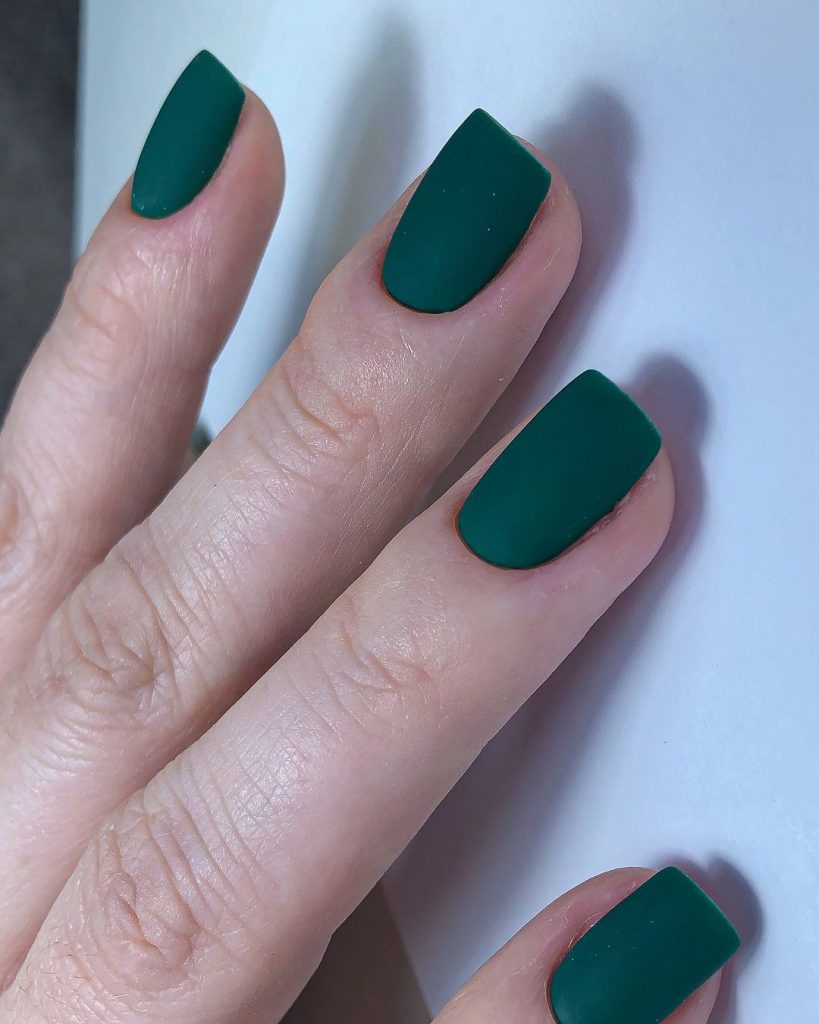
Consumables:
-
- Essie Matte Nail Polish in “Matte About You”
- Base Coat (OPI Natural Nail Base Coat)
- Matte top coat (Revlon Matte Top Coat)
Recommendations:
-
- Make sure each coat of nail polish is completely dry before applying the next to maintain the matte finish.
- Use a high-quality matte top coat to prevent nails from looking dull over time.
DIY instructions:
-
- Start with a base coat and let it dry.
- Apply two coats of matte green nail polish, allowing each coat to dry completely.
- Finish with a matte top coat to seal the look.
Glistening green
These shimmering green nails are perfect for adding a touch of glamor to your fall look. The glitter polish adds dimension and shine, making this design ideal for special occasions.
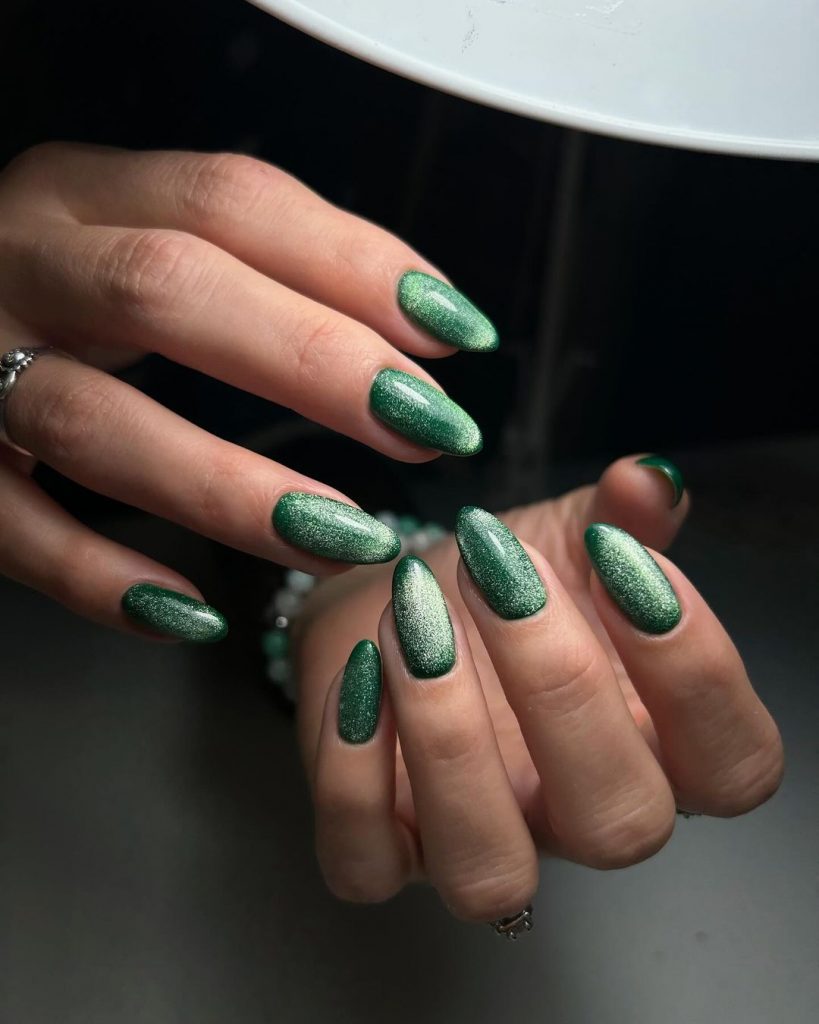
Consumables:
-
- China Glaze Nail Polish in “Emerald Sparkle”
- Base and top coat (Sally Hansen Miracle Gel Top Coat)
- Nail file and buffer
Recommendations:
-
- Apply the glitter polish in thin layers to build up the shine without creating a thick, uneven surface.
- Use a top coat to improve the shine and extend the life of your manicure.
DIY instructions:
-
- Prepare your nails by filing and polishing them into the desired shape.
- Apply a base coat and let it dry.
- Apply two to three coats of the glitter green polish, allowing each coat to dry completely.
- Finish with a top coat to protect the paint and add extra shine.
Marbled green nails
Marble nails are a trendy choice, and this green version is no exception. The swirling patterns create an enchanting effect that is both unique and stylish, perfect for making a statement this fall.
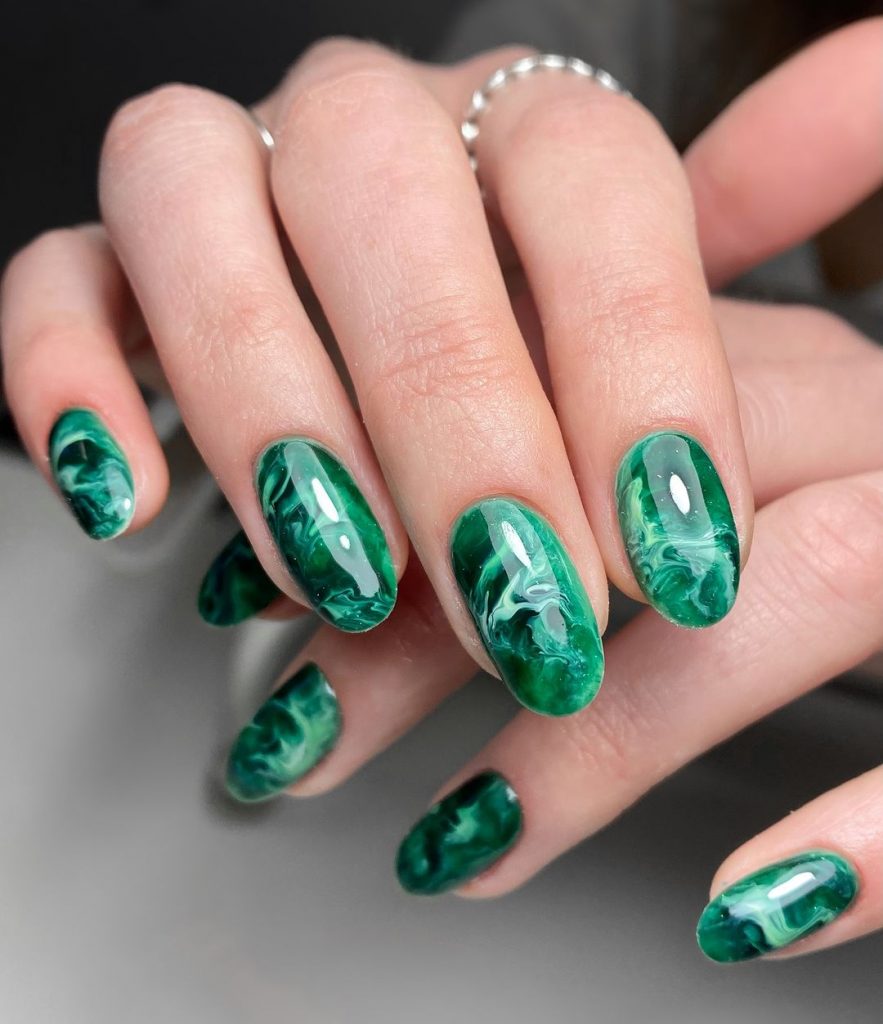
Consumables:
-
- OPI Nail Polish in “Jade Is the New Black”
- White nail polish (Essie Nail Polish in “Blanc”)
- Thin nail art brush or toothpick
- Base and top coat (Seche Vite Dry Fast Top Coat)
Recommendations:
-
- Use a toothpick or thin brush to create the marble effect by swirling the green and white polish together.
- Work quickly to prevent the polish from drying out before you achieve the desired effect.
DIY instructions:
-
- Apply a base coat and let it dry.
- Paint your nails with the green nail polish.
- While the polish is still wet, add drops of white polish and use a toothpick to create swirls.
- Finish with a top coat to protect the design.
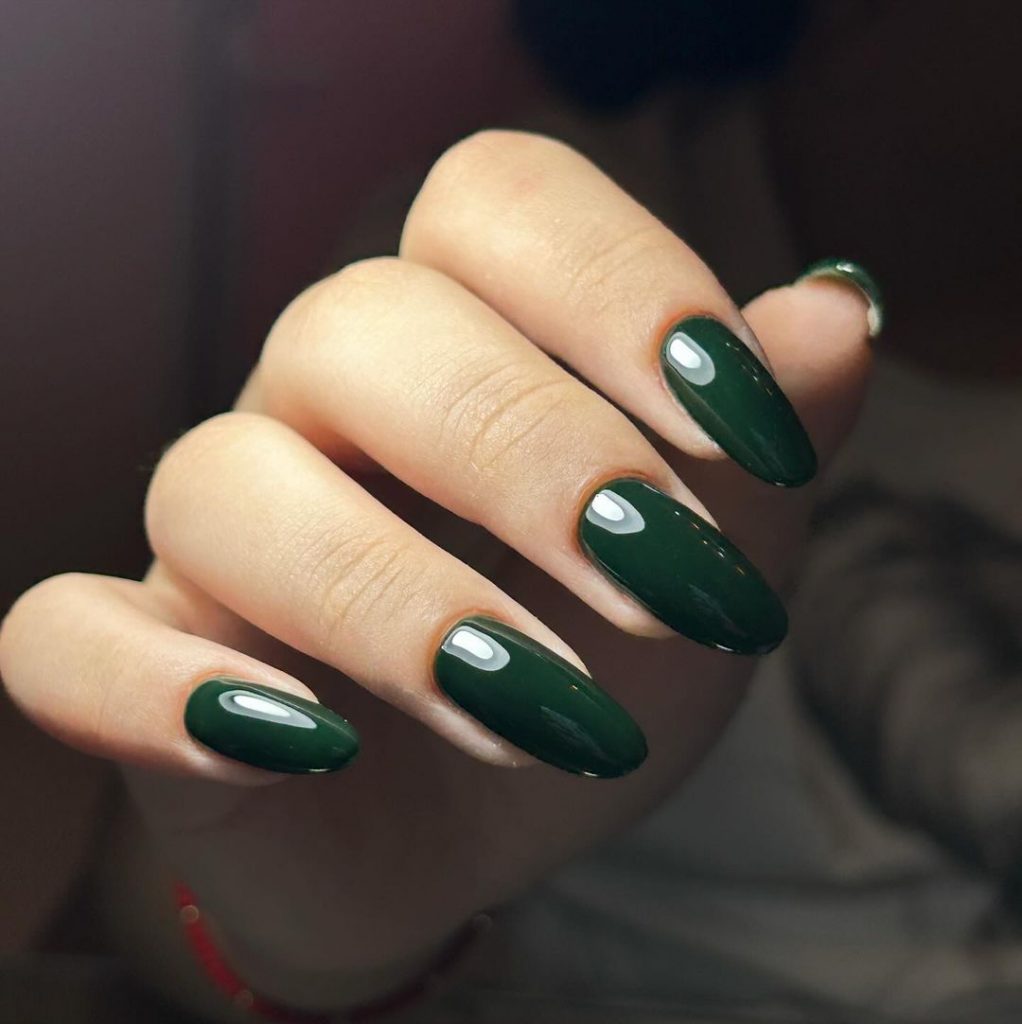
Dark green almond nails
For a bold and dramatic look, these dark green almond shaped nails are a perfect choice. The deep color and sleek shape create a refined manicure that is ideal for autumn.
Consumables:
-
- OPI Nail Polish in “Lincoln Park After Dark”
- Base and top coat (Essie Gel Setter Top Coat)
- Nail file and buffer
Recommendations:
-
- Shape your nails into a smooth almond shape with a nail file.
- Apply thin, even coats of nail polish for a smooth finish.
DIY instructions:
-
- File and polish your nails into an almond shape.
- Apply a base coat and let it dry.
- Apply two coats of dark green nail polish and allow each coat to dry completely.
- Finish with a top coat to seal the color and add shine.
Bright green short nails
If you prefer shorter nails, this bright green manicure is perfect for you. The vibrant color is eye-catching and fun, making it an excellent choice for everyday wear.
Consumables:
-
- Essie nail polish in “Mojito Madness”
- Base and top coat (Sally Hansen Hard As Nails Top Coat)
- Nail file and buffer
Recommendations:
-
- Apply a base coat to protect your nails and help the nail polish adhere better.
- Use a high-shine top coat to improve the shine and longevity of your manicure.
DIY instructions:
-
- Prepare your nails by filing and polishing them into the desired shape.
- Apply a base coat and let it dry.
- Apply two coats of bright green nail polish, allowing each coat to dry completely.
- Finish with a top coat to protect the paint and add shine.
Multicolored green nails
This beautiful, multi-colored green manicure is perfect for those who like variety. The different shades of green create a gradient effect that is both trendy and sophisticated.
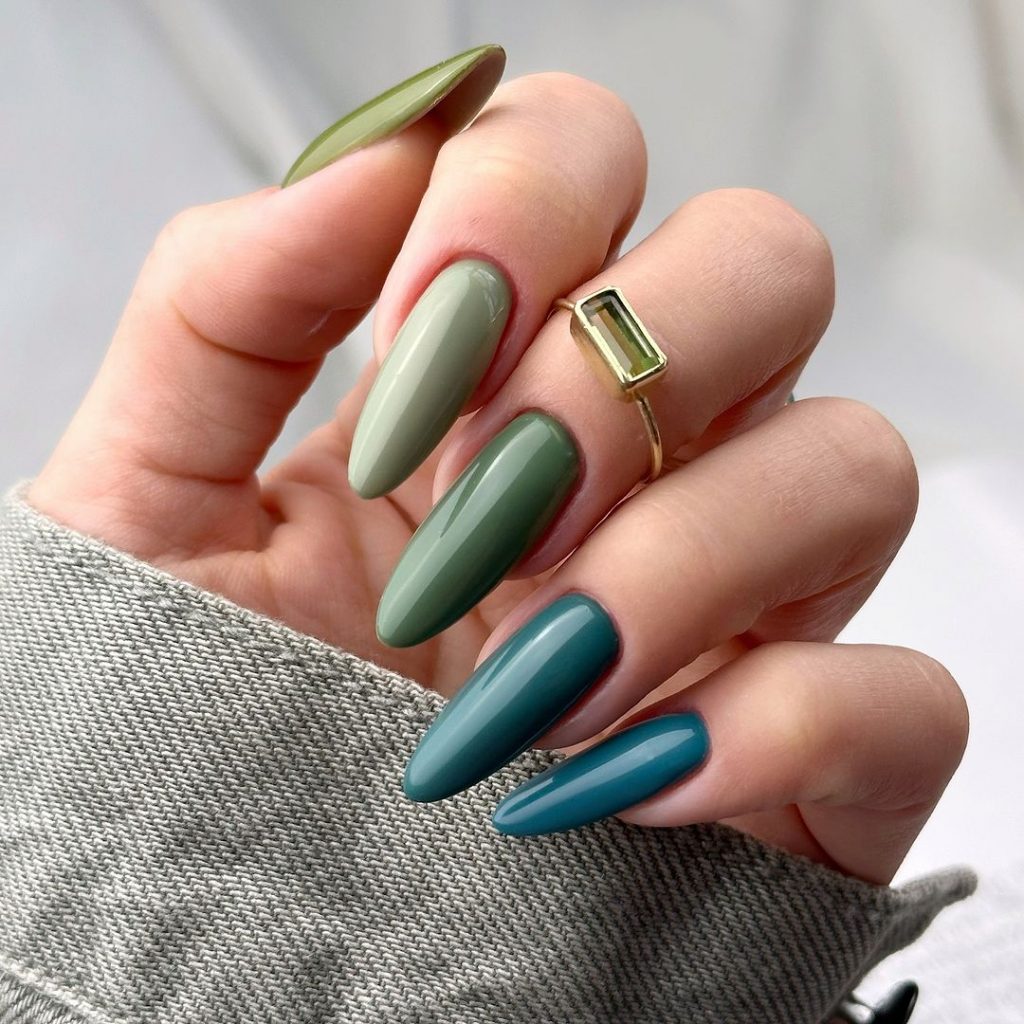
Consumables:
-
- Essie nail polish in “Mint Candy Apple”
- OPI Nail Polish in “Jade Is the New Black”
- Zoya nail polish in “Hunter”
- Base and top coat (Seche Vite Dry Fast Top Coat)
Recommendations:
-
- Make sure to distribute each shade evenly across the nails to achieve a smooth gradient effect.
- Use a glossy top coat to accentuate the different shades.
DIY instructions:
-
- Apply a base coat and let it dry.
- Paint each nail with a different shade of green, starting from light to dark.
- Finish with a top coat to protect the paint and add shine.
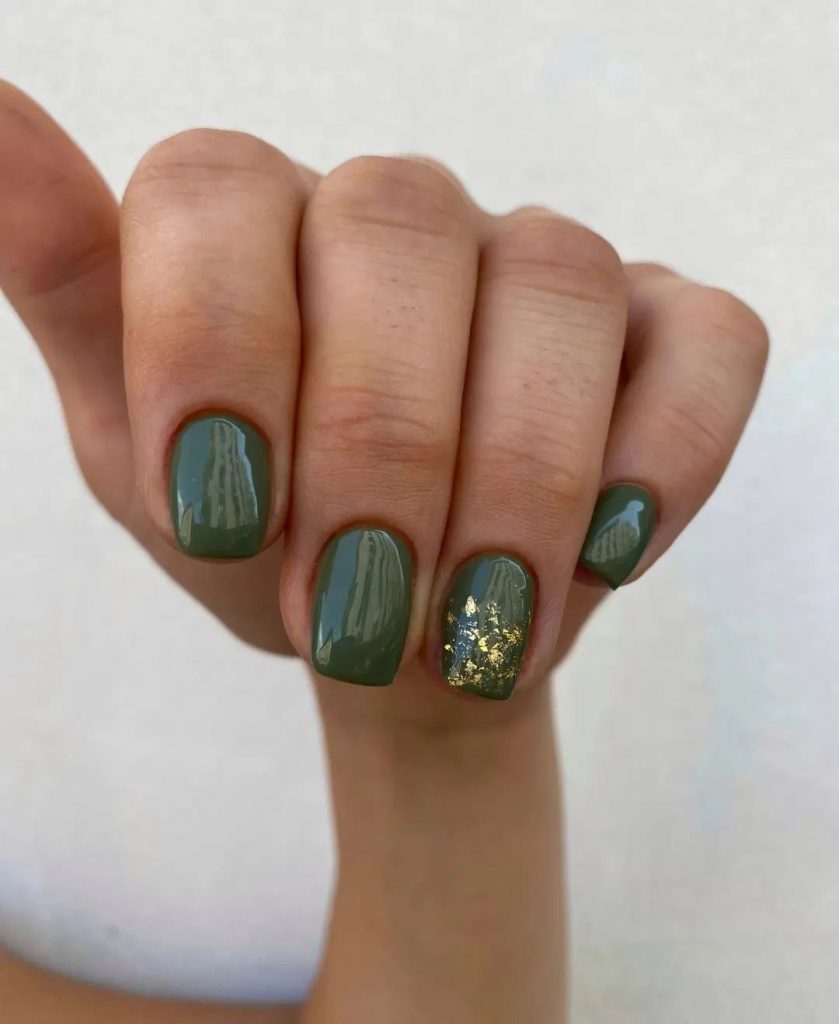
Green with gold flakes
For a touch of elegance, these green nails with gold flakes are perfect. The gold accents add a luxurious look to the simple green base, making this design suitable for both casual and formal occasions.
Consumables:
-
- OPI Nail Polish in “Suzi – The First Lady of Nails”
- Gold foil flakes (available at beauty supply stores)
- Base and top coat (Essie Gel Setter Top Coat)
Recommendations:
-
- Apply the gold flakes while the polish is still wet for better adhesion.
- Use tweezers for precise placement of the flakes.
DIY instructions:
-
- Start with a base coat and let it dry.
- Paint your nails with the green nail polish.
- Apply the gold flakes to the accent nails with tweezers.
- Seal the design with a top coat to secure the flakes.
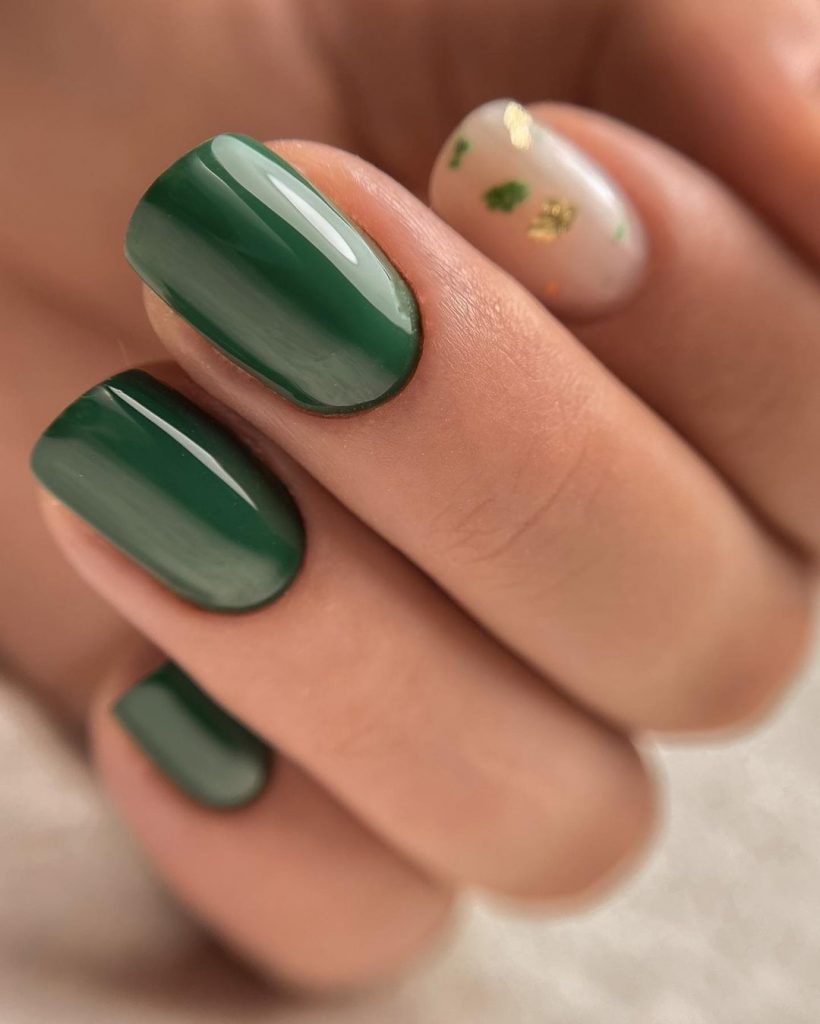
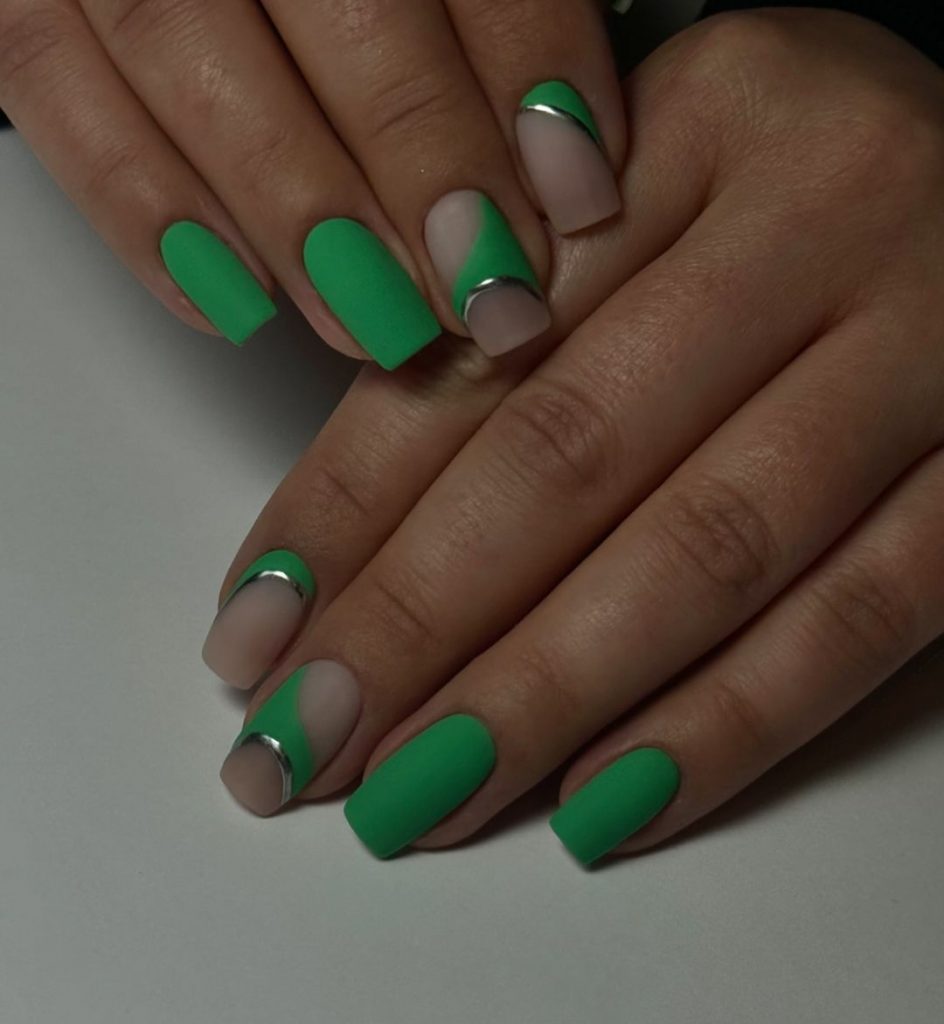
Simple green nails with accent
This manicure features a simple green design with a delicate gold accent on the ring finger. It’s a minimalist approach that still offers a touch of flair.
Consumables:
-
- Essie nail polish in “Going Incognito”
- Gold glitter polish (China Glaze in “Golden Enchantment”)
- Base and top coat (Sally Hansen Hard As Nails Top Coat)
Recommendations:
-
- Use a fine glitter polish for the accent nail to keep the design subtle.
- Apply a top coat to ensure the glitter stays in place.
DIY instructions:
-
- Apply a base coat and let it dry.
- Paint your nails with the green nail polish.
- Apply the gold glitter polish to the ring finger.
- Finish with a top coat to protect the design.
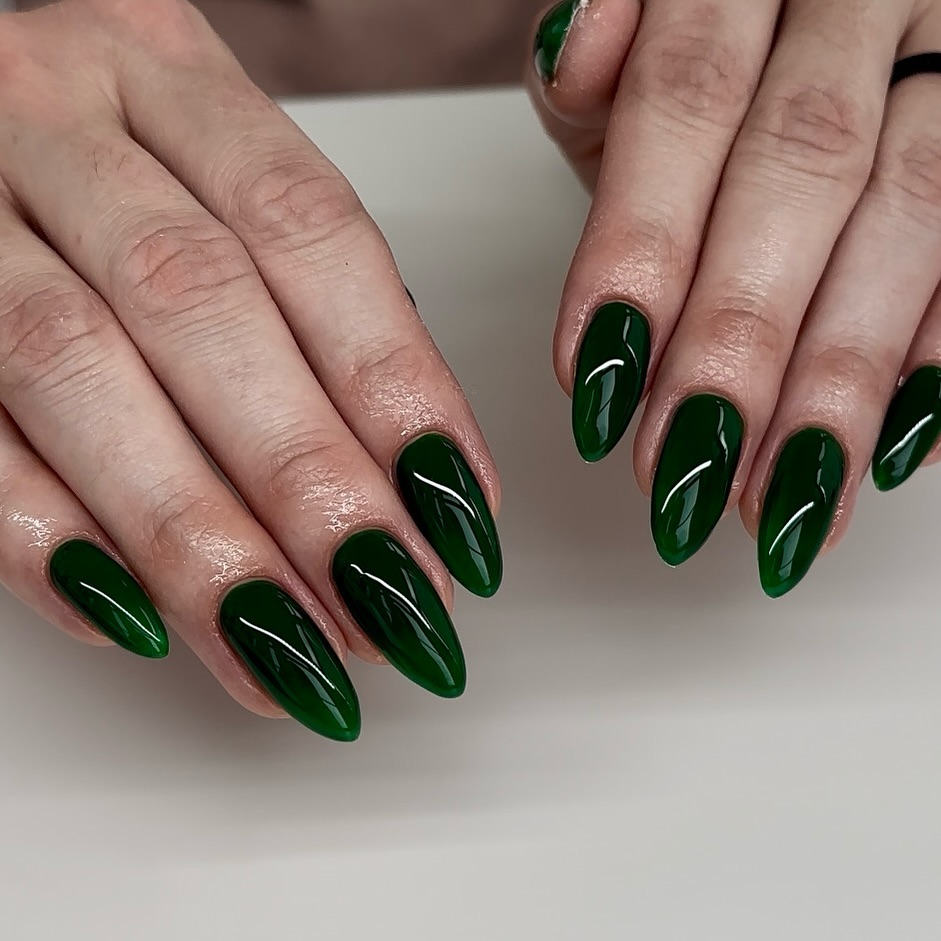
Deep green shiny nails
For a classic and timeless look, these deep green glossy nails are perfect. The high-shine finish makes the dark green color stand out, creating an elegant and sophisticated manicure.
Consumables:
-
- OPI Nail Polish in “Here Today… Aragon Tomorrow”
- Base and top coat (Seche Vite Dry Fast Top Coat)
- Nail file and buffer
Recommendations:
-
- Apply thin coats of nail polish for a smooth and even finish.
- Use a high-gloss top coat to enhance the shine.
DIY instructions:
-
- File and polish your nails into the desired shape.
- Apply a base coat and let it dry.
- Apply two coats of the deep green polish, allowing each coat to dry completely.
- Finish with a glossy top coat.
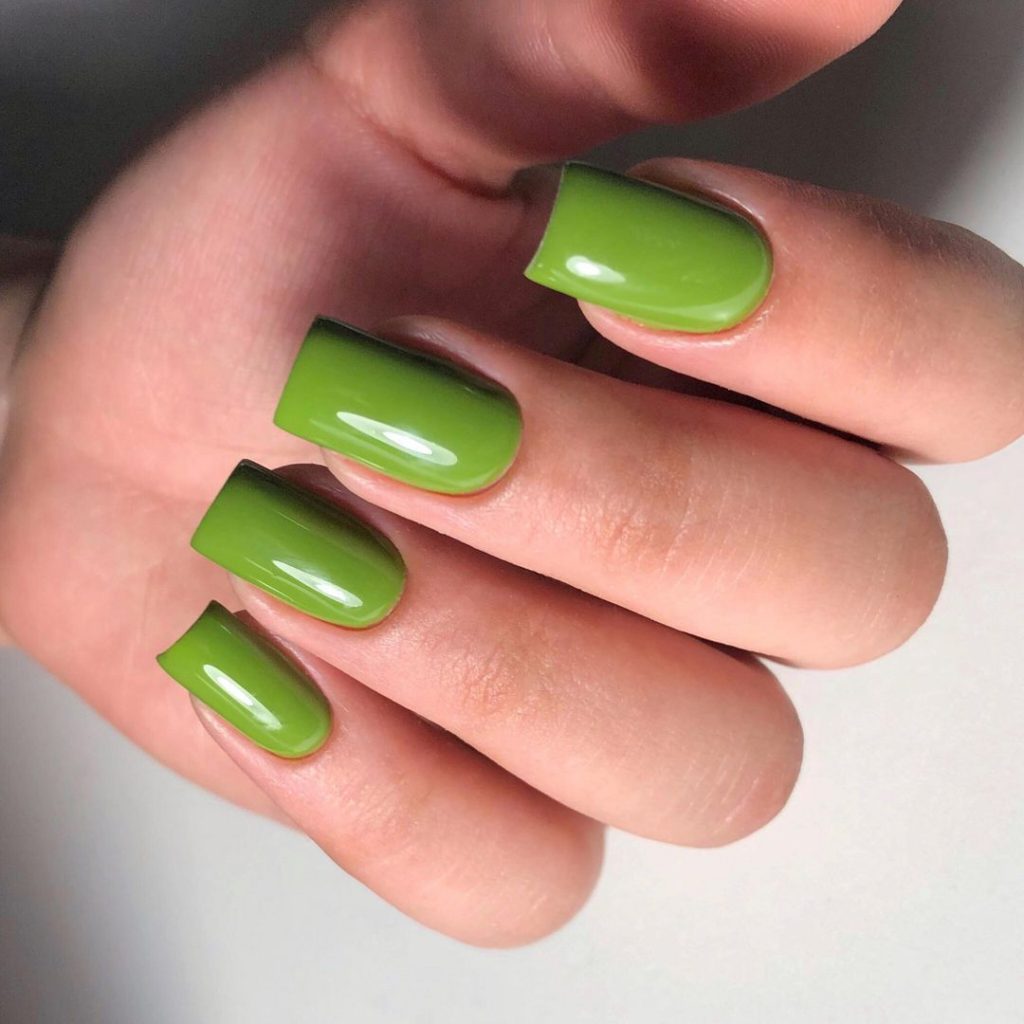
Ombre green nails
These ombre green nails go from soft pastel green to bright lime green, creating a fresh and modern look. The gradient effect is perfect for those who want a vibrant yet subtle design.
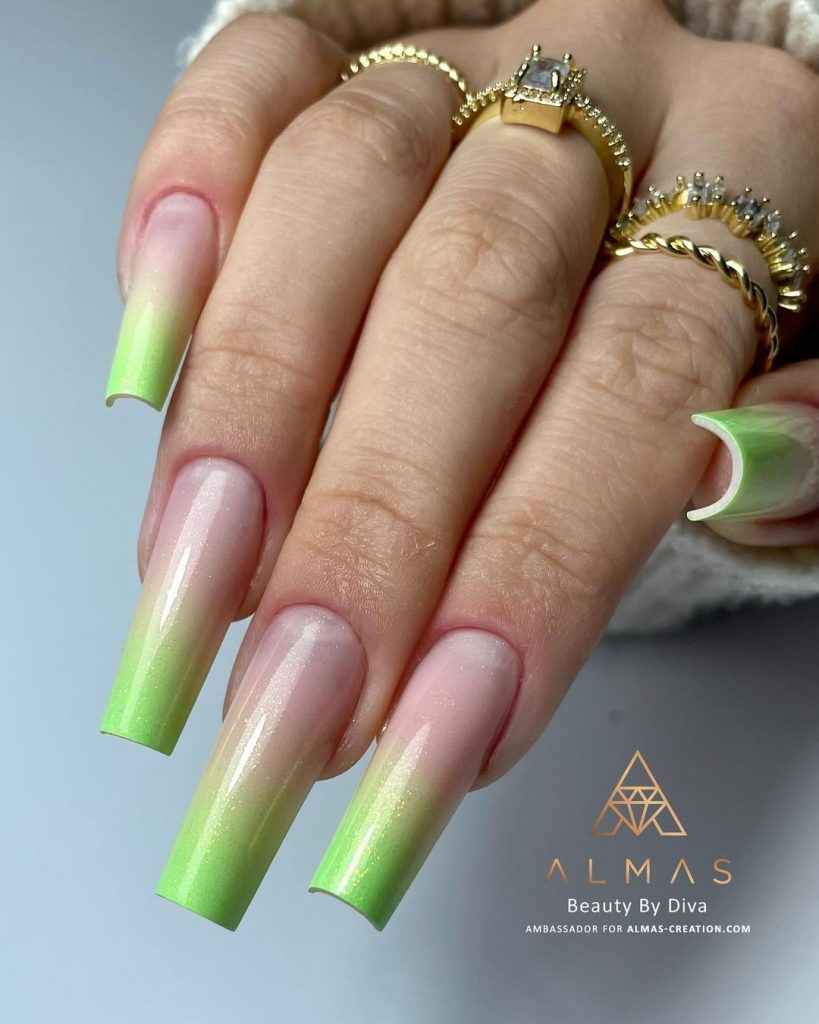
Consumables:
-
- Essie nail polish in “lime green”
- OPI Nail Polish in “You’re such a Budapest”
- Makeup sponge for blending
- Base and top coat (Sally Hansen Miracle Gel Top Coat)
Recommendations:
-
- Use a makeup sponge to blend the colors seamlessly.
- Apply a top coat to smooth out the gradient and add shine.
DIY instructions:
-
- Start with a base coat and let it dry.
- Apply the lightest green polish to the entire nail.
- Dab the makeup sponge with the dark green nail polish and press gently on the nails to create the gradient effect.
- Finish with a top coat to fade the colors and add shine.
Green Ombre with glitter
This unique design has a green ombre effect with a hint of glitter at the cuticles. The combination of matte and glossy finishes along with iridescent glitter adds depth and dimension to the nails.
Consumables:
-
- OPI Nail Polish in “Don’t Tell a Sol”
- Essie Nail Polish in “Blanc”
- Iridescent glitter (available at beauty supply stores)
- Matte top coat (Revlon Matte Top Coat)
- Base and top coat (Seche Vite Dry Fast Top Coat)
Recommendations:
-
- Apply the glitter while the polish is still wet so that it adheres well.
- Use a makeup sponge to create an even ombre effect.
DIY instructions:
-
- Start with a base coat and let it dry.
- Apply the white polish as a base color.
- Use a makeup sponge to dab the green nail polish onto the tips of the nails, creating an ombre effect.
- Apply iridescent glitter near the cuticles.
- Finish with a matte top coat on the plain green nail and a glossy top coat on the glitter nails.
Teal and gold leaf design
This elegant manicure combines a rich teal with delicate gold leaf designs. The combination of solid teal nails and intricate gold details creates a sophisticated look that’s perfect for fall.
Consumables:
-
- Essie nail polish in “Garden Variety”
- Gold leaf foil
- Base and top coat (OPI Top Coat)
- Thin nail art brush
Recommendations:
-
- Use tweezers to gently place the gold leaf on the nails.
- Apply a top coat to ensure the gold leaf stays in place.
DIY instructions:
-
- Apply a base coat and let it dry.
- Paint your nails with the teal nail polish.
- Use tweezers to place the gold leaf on accent nails.
- Seal with a top coat to protect the design.
Colorful abstract green nails
These nails have a vibrant and playful abstract design. The combination of bright green with colorful swirls creates a fun and eye-catching look.
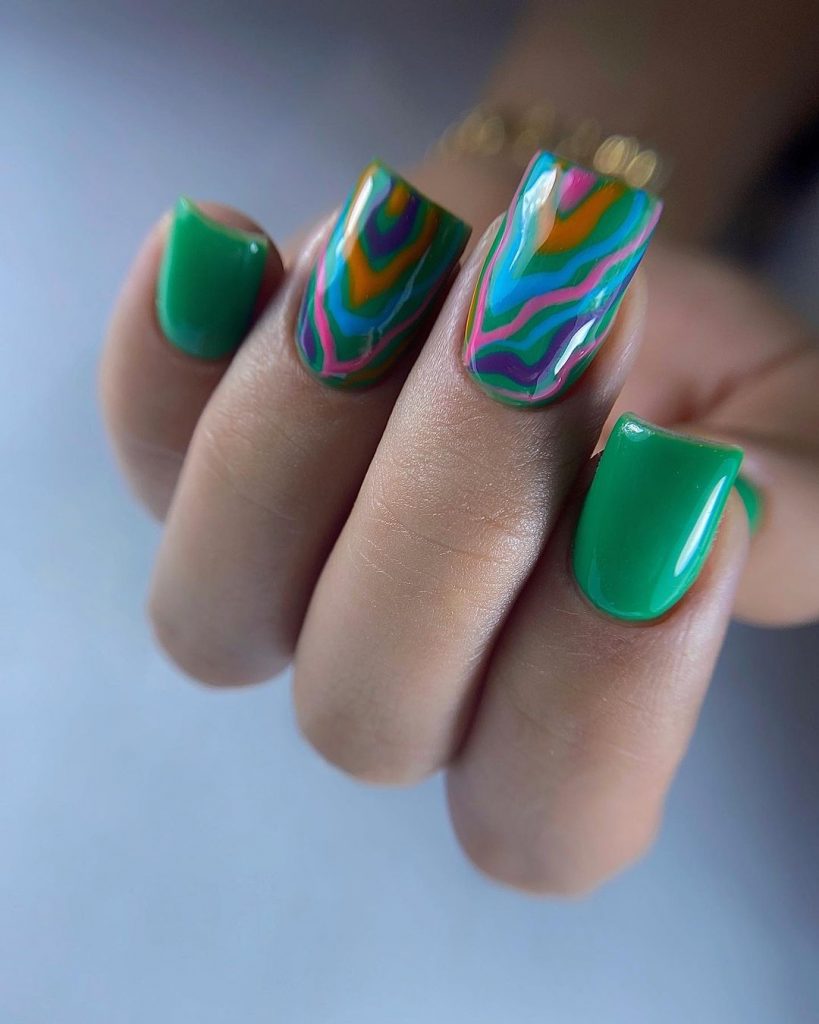
Consumables:
-
- OPI Nail Polish in “I’m so overwhelmed!”
- Various clear polishes (pink, blue, orange)
- Thin nail art brush or toothpick
- Base and top coat (Sally Hansen Miracle Gel Top Coat)
Recommendations:
-
- Use a thin brush to create precise swirls and lines.
- Apply a top coat to smooth the design and add shine.
DIY instructions:
-
- Apply a base coat and let it dry.
- Paint your nails with the green nail polish.
- Use a thin brush to create swirls and lines with the other colors.
- Finish the design with a top coat.
Matte green and silver accents
This chic design combines matte green nails with silver accents. The contrast between the matte finish and the shiny silver provides a modern and stylish look.
Consumables:
-
- Essie matte nail polish in “Spiked With Style”
- Silver nail tape or thin silver polish (Sally Hansen Insta-Dri in “Go for Gold”)
- Base and top coat (Revlon Matte Top Coat)
Recommendations:
-
- Use nail tape for precise silver lines.
- Apply a matte top coat to the green nails to keep the finish consistent.
DIY instructions:
-
- Apply a base coat and let it dry.
- Paint your nails with the matte green polish.
- Use nail tape to create silver accents on a few nails.
- Finish with a matte top coat.
Floral green nails
These nails have a soft green base with beautiful floral motifs. The combination of matte and glossy finishes, along with intricate floral patterns, makes this manicure perfect for lovers of detailed nail art.
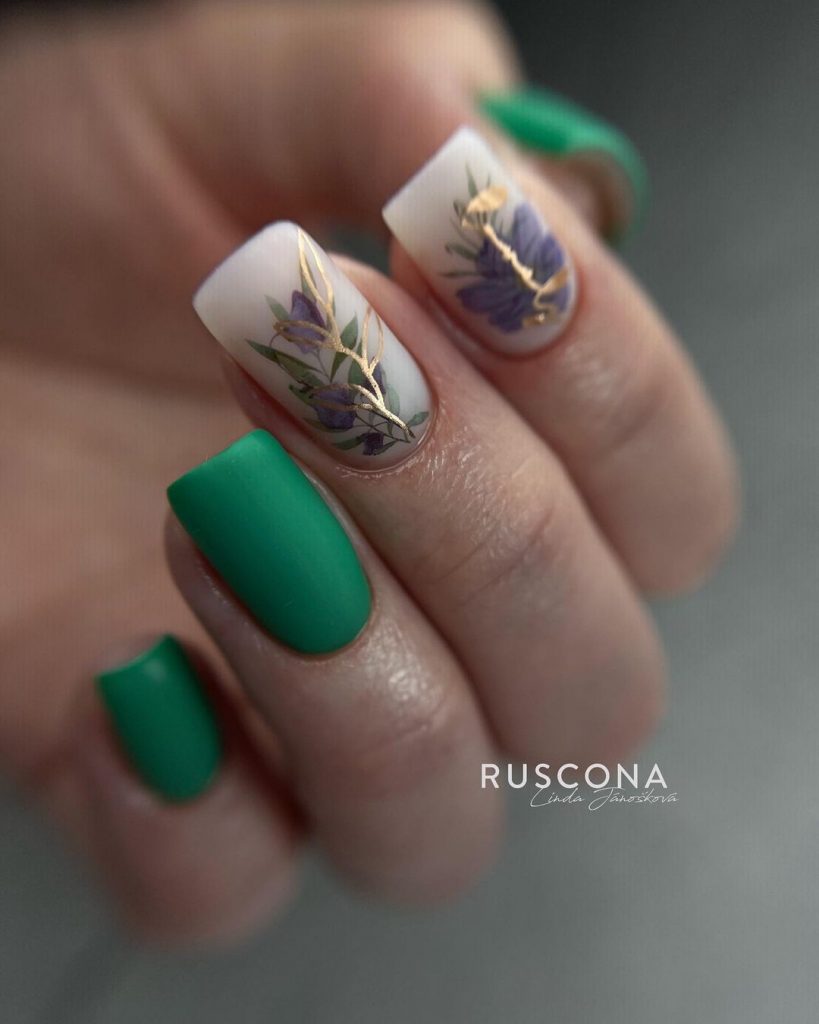
Consumables:
-
- OPI Nail Polish in “You Are So Outta Lime!”
- White and purple polishes for floral motifs (Essie Nail Polish in “Blanc” and “Play Date”)
- Thin nail art brush
- Base and top coat (Seche Vite Dry Fast Top Coat)
Recommendations:
-
- Use a fine brush to paint detailed floral designs.
- Apply a top coat to protect the intricate artwork.
DIY instructions:
-
- Apply a base coat and let it dry.
- Paint your nails with the green nail polish.
- Use a thin brush to create floral designs with white and purple polishes.
- Finish the design with a top coat.

Namie O, a talented writer at Willtiptop, conveys her passion for fashion and beauty in every word she writes. With a keen eye for detail and a deep insight into the latest trends, Namie’s articles and insights captivate readers and provide them with valuable knowledge and inspiration. Through her engaging and informative writing style, Namie aims to empower individuals to explore their style, experiment with beauty techniques, and embrace their unique sense of self.


