Fall Matte Nails 27 Ideas: Embrace the Elegance of the Season
When it comes to fall nail designs, matte finishes are a standout choice. They offer a refined and understated elegance that fits perfectly with the cozy, warm atmosphere of autumn. But how do you choose the right matte design for the season? Let’s explore some stunning fall matte nail ideas that will inspire your next manicure.
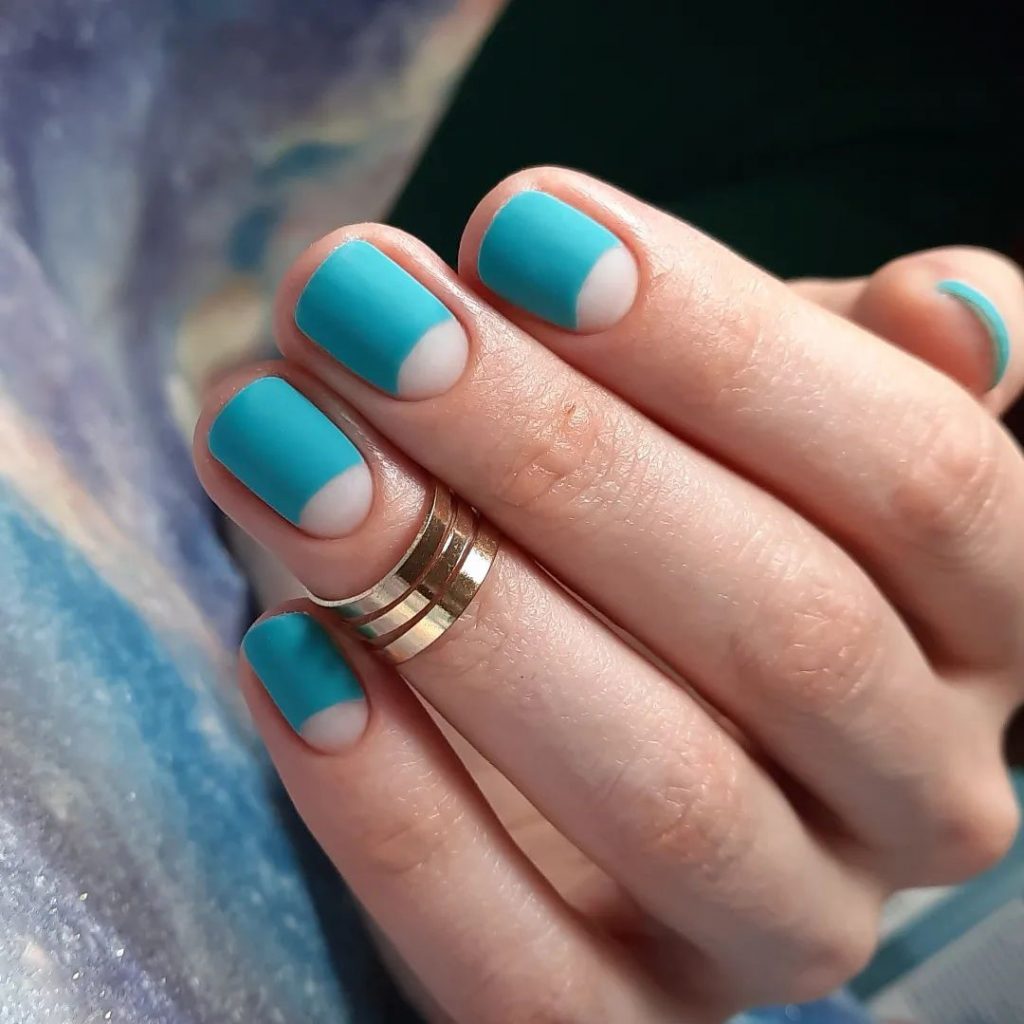
Teal half moon matte nails
This design is a beautiful twist on the classic half-moon manicure, but with a twist. These nails have a matte blue-green base with a natural crescent near the cuticle, creating a chic and minimalist look. The matte finish enhances the vibrant teal color, making it pop without the need for a glossy sheen.
Consumables:
- Base Coat: OPI natural nail base coat
- Blue-green matte polish: Essie Matte About You Top Coat over Essie Naughty Nautical
- Topcoat: Matte topcoat from Sally Hansen
- Cleaning brush: Pana Nail Art Brush
DIY instructions:
- Apply the base coat to protect your natural nails.
- Paint your nails with two coats of teal nail polish, leaving a small crescent at the cuticle.
- Once dry, apply a matte top coat for the perfect finish.
- Remove any excess nail polish around the cuticles with a cleaning brush dipped in acetone.
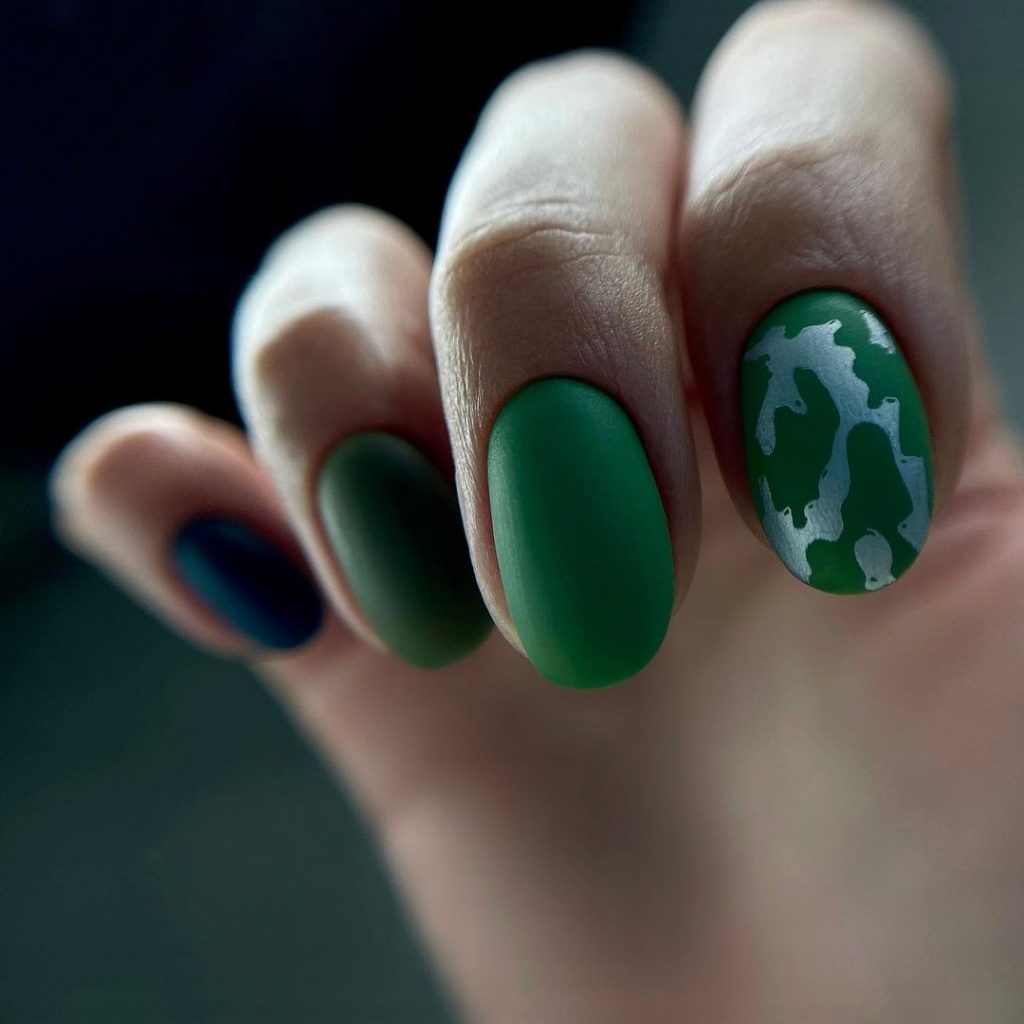
Emerald green abstract matte nails
This design features a beautiful matte emerald green base decorated with abstract black and white line art. The combination of green and the monochrome accents gives this manicure a modern and edgy vibe, perfect for the fall season.
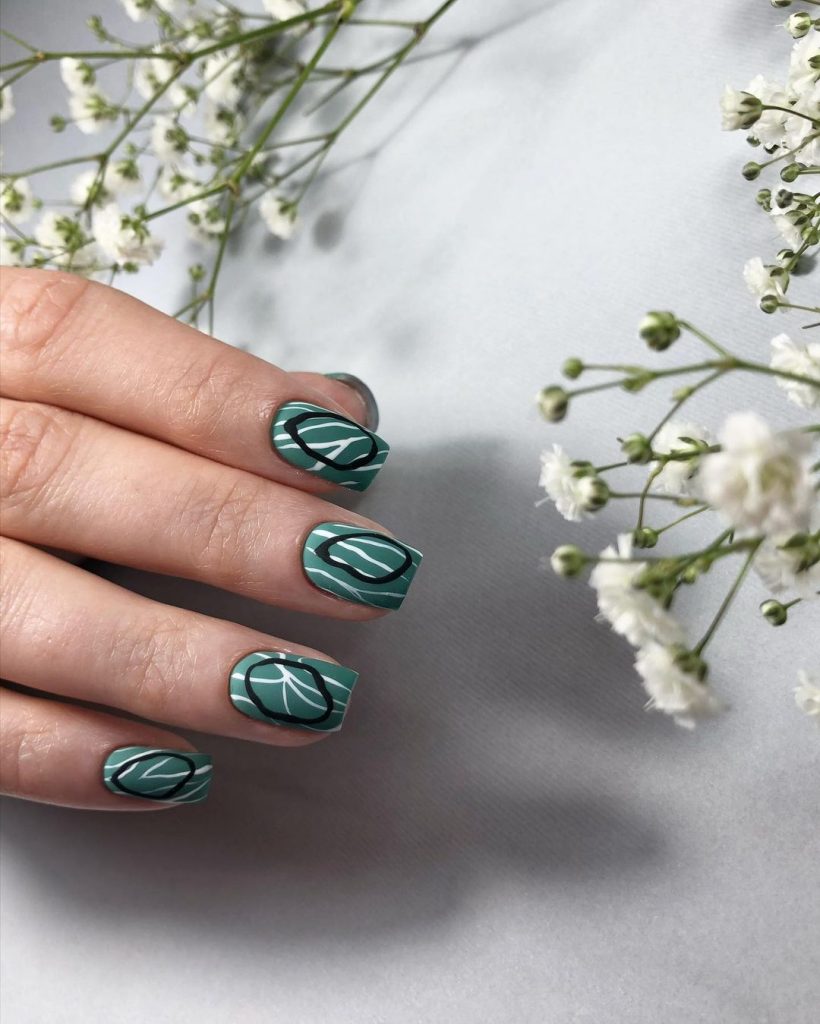
Consumables:
- Base layer: Zoya Anchor base layer
- Emerald green matte lacquer: Zoya Matte Velvet Lacquer in Veruschka
- Black and White Nail Art Pens: Sally Hansen I Heart Nail Art Pen in Black and White
- Top coat: Essie Matte About You
DIY instructions:
- Start with a base coat to protect your nails.
- Apply two coats of the emerald green matte polish.
- Use black and white nail art pens to create abstract lines and shapes on each nail.
- Finish the design with a matte top coat to keep the look cohesive.
Sleek black matte nails
These sleek black matte nails radiate sophistication and elegance. The matte black finish is striking and versatile, making it a perfect choice for the fall season. This design is timeless and effortlessly chic.
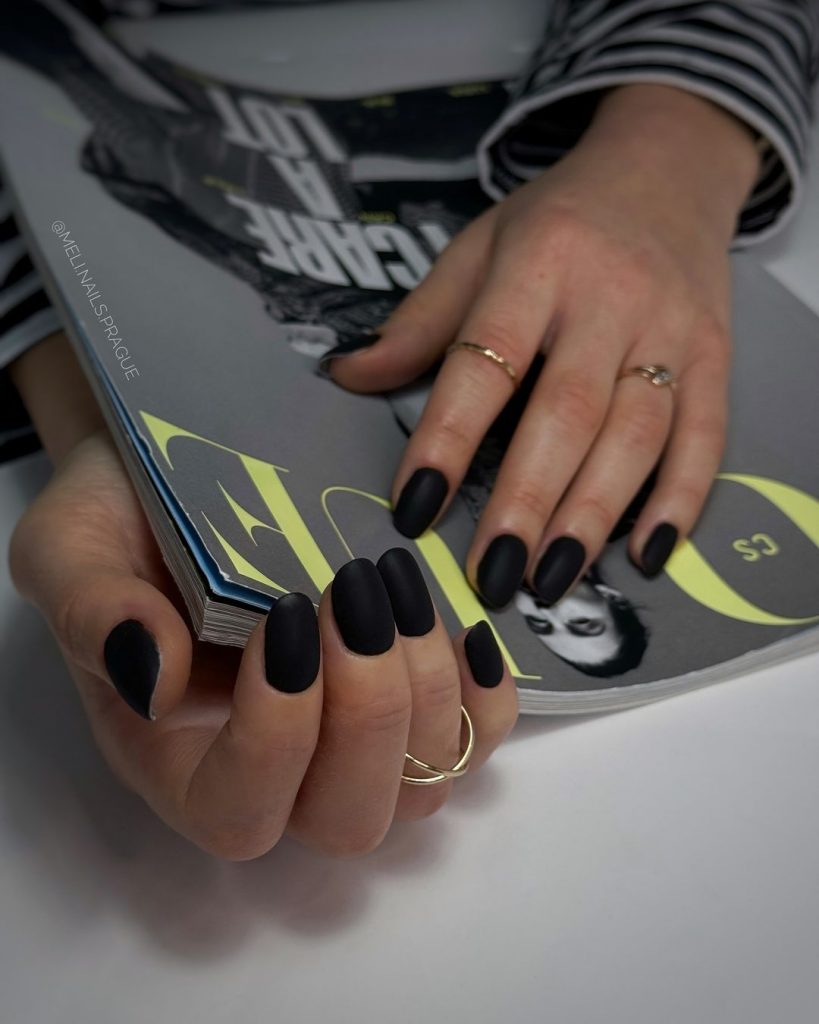
Consumables:
- Base layer: Orly Bonder Base layer
- Black matte paint: OPI Black Onyx with OPI Matte Top Coat
- Cleaning brush: Pana Nail Art Brush
DIY instructions:
- Apply a base coat to prevent stains and ensure that the paint adheres well.
- Paint your nails with two coats of black polish.
- Finish with a matte top coat for a sleek, velvety finish.
- Use a cleaning brush dipped in acetone to clean the edges.
Vibrant matte orange and yellow nails
This vibrant design features a mix of matte orange and yellow nails, capturing the essence of autumn leaves. The bold colors and matte finish make this manicure a vibrant and playful choice for the season.
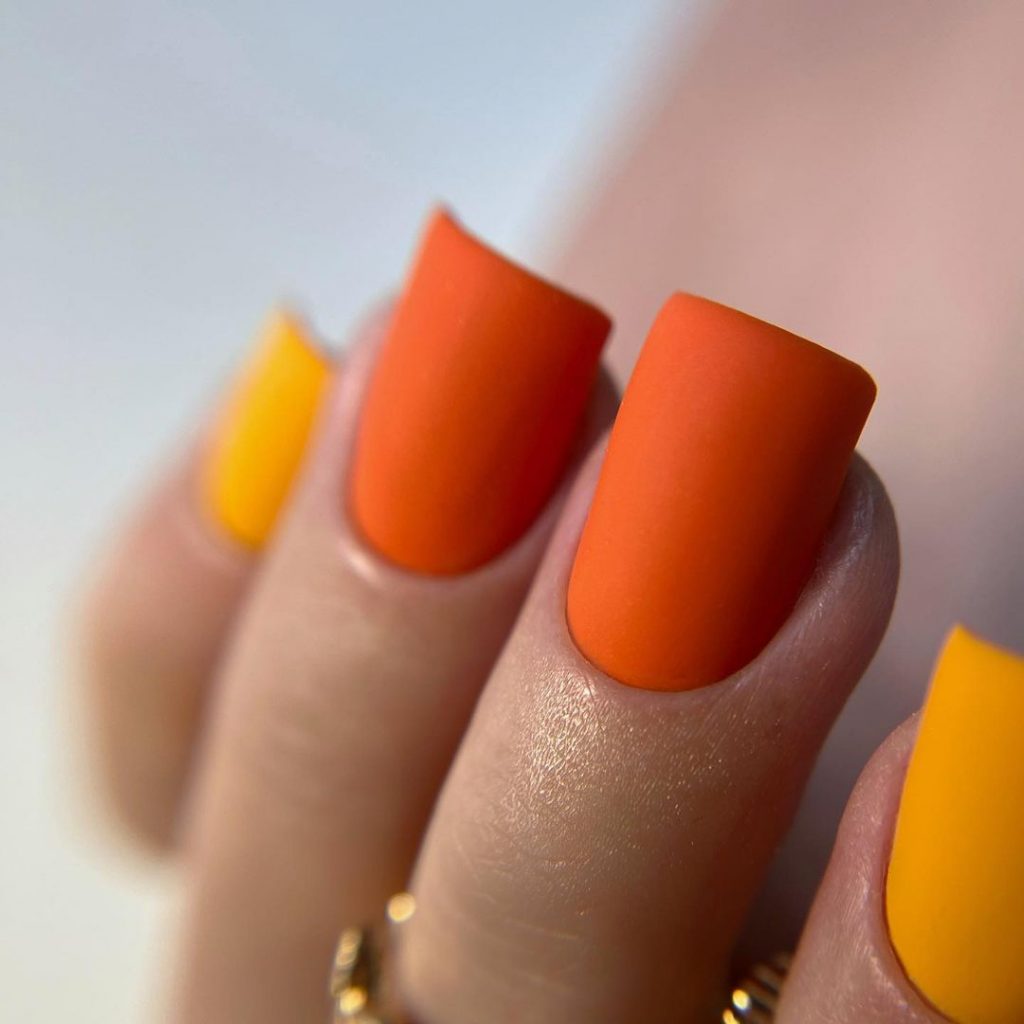
Consumables:
- Base coat: Butter London Nail Foundation Priming Basecoat
- Orange matte paint: China Glaze Orange Knockout (Neon) with OPI Matte Top Coat
- Yellow Matte Polish: Sally Hansen Insta-Dri in Lightning with OPI Matte Top Coat
- Top coat: OPI Matte Topcoat
DIY instructions:
- Apply a base coat to your nails.
- Paint alternate nails with two coats of orange and yellow polish.
- Once the paint is dry, apply a matte top coat to achieve the matte finish.
- Remove any excess nail polish around the cuticles with a cleaning brush dipped in acetone.
Neutral matte almond nails
These neutral, matte almond nails offer a soft and elegant look, perfect for any fall outfit. The almond shape elongates the fingers, while the matte beige color provides a subtle and refined finish.
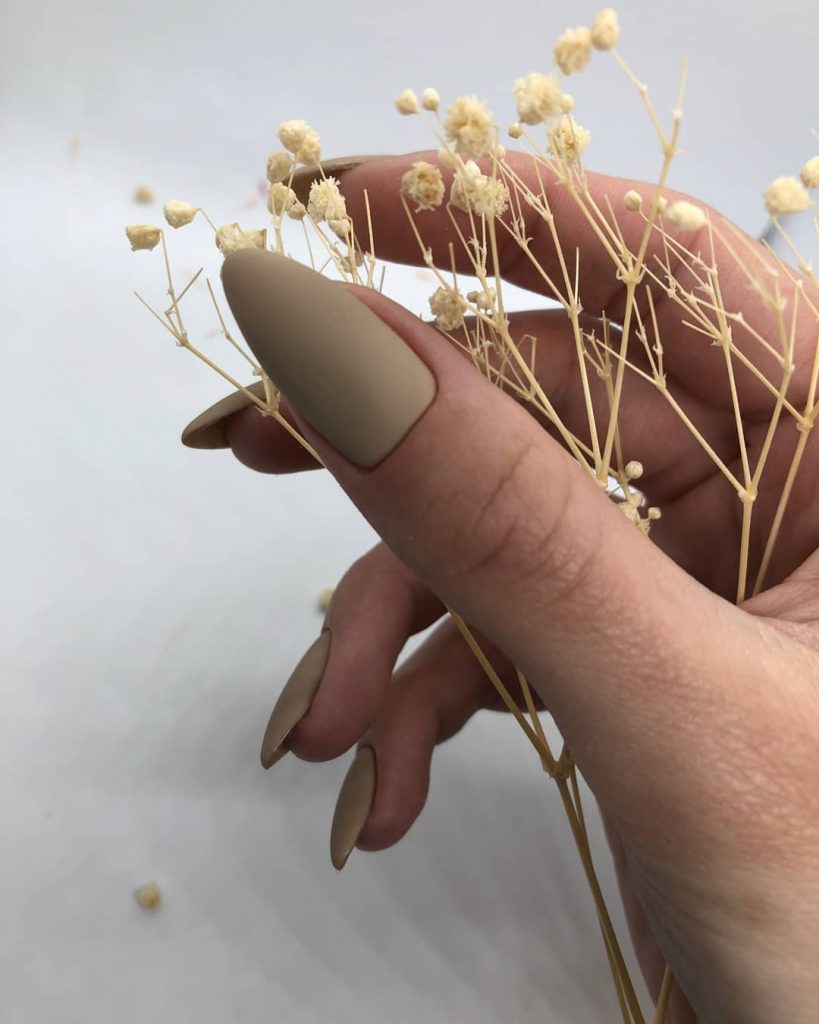
Consumables:
- Base coat: Deborah Lippmann Hard Rock Hydrating Base & Top Coat
- Neutral matte polish: Essie Sand Tropez with Essie Matte About You Top Coat
- Top coat: Essie Matte About You
- Cleaning brush: Pana Nail Art Brush
DIY instructions:
- Start with a base coat to protect your nails and improve nail polish adhesion.
- Apply two coats of the neutral beige polish.
- Finish with a matte top coat for a velvety look.
- Use a cleaning brush dipped in acetone to clean the edges.
Heart accented matte nails
These nails have a beautiful matte brown base with a heart accent on each nail. The deep brown color is perfect for autumn, while the heart gives a cute and playful touch. The matte finish enhances the warmth of the brown shade, making it ideal for the fall season.
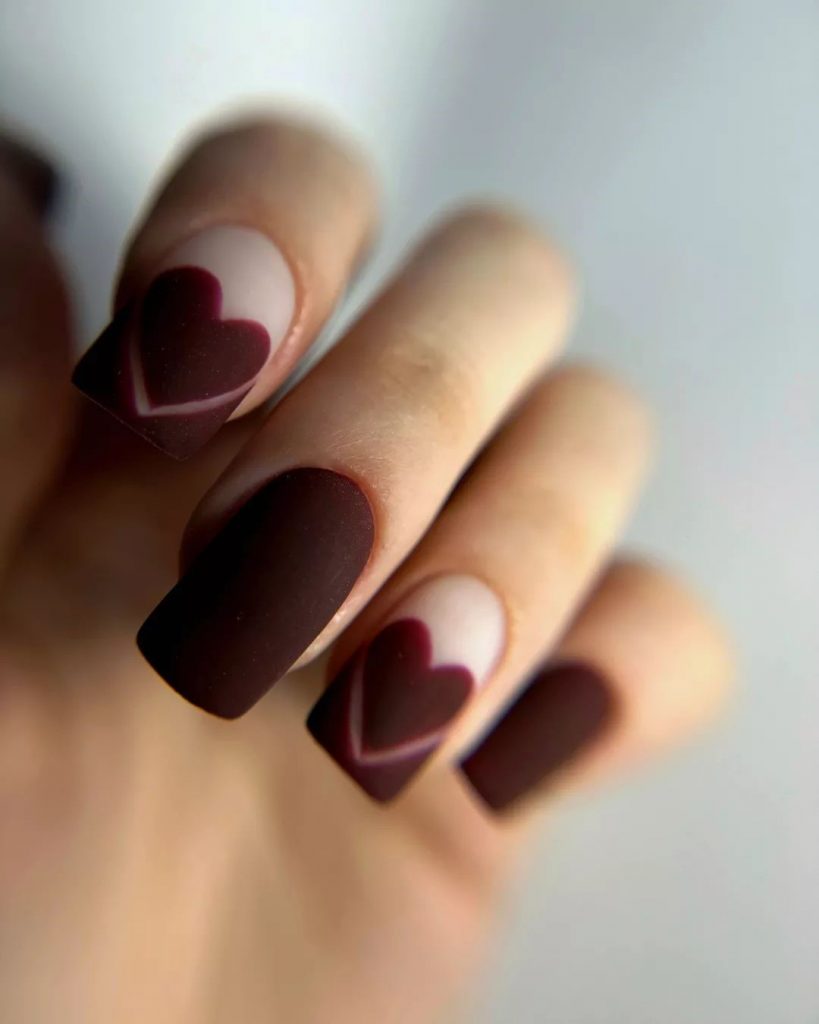
Consumables:
- Base layer: CND Stickey base layer
- Brown matte polish: OPI Chocolate Moose with OPI Matte Top Coat
- Heart stencil or nail art brush: Twinkled T Nail Art Brush
- Top coat: OPI Matte Topcoat
DIY instructions:
- Apply a base coat to your nails.
- Paint your nails with two coats of brown nail polish.
- Use a heart stencil or nail art brush to create the heart accent on each nail.
- Finish with a matte top coat for a smooth, velvety look.
- Remove any excess nail polish around the cuticles with a cleaning brush dipped in acetone.
Green green matte nails
This design has a matte nude base with delicate green leaf accents. The natural nude color serves as a perfect canvas for the soft green leaves, creating a fresh and serene look that’s perfect for fall.
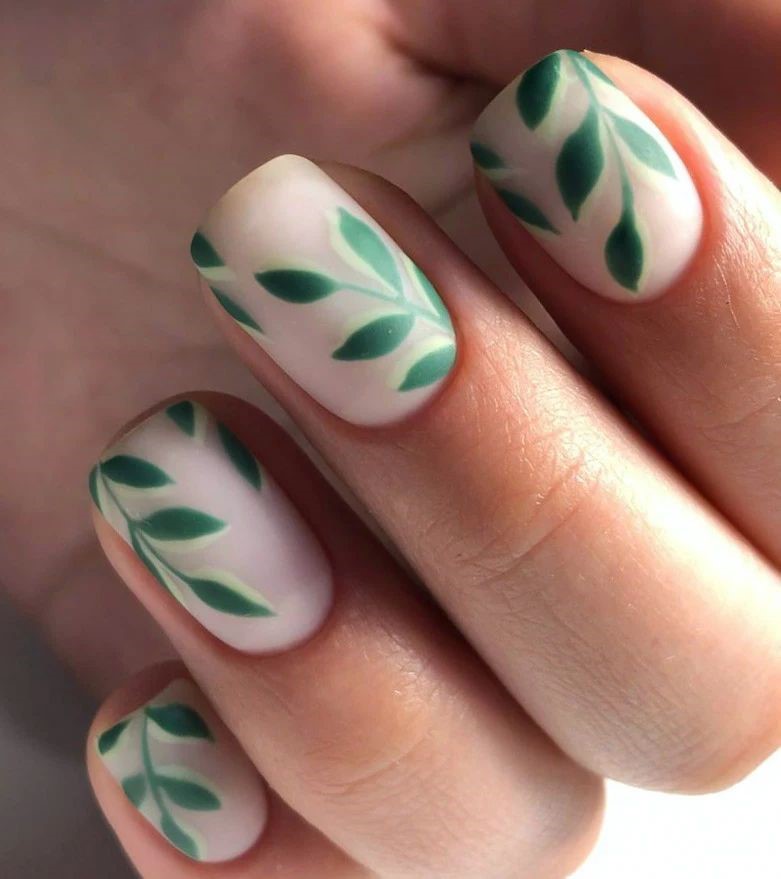
Consumables:
- Base layer: Essie All in One base layer
- Nude matte polish: Zoya Naked Manicure Buff Perfector with Zoya Matte Velvet Top Coat
- Green nail art pens: Sally Hansen I Heart Nail Art Pen in Green
- Top layer: Zoya matt velvet top layer
DIY instructions:
- Start with a base coat to protect your nails.
- Apply two coats of nude matte polish.
- Use a green nail art pen to draw leaf designs on each nail.
- Finish the design with a matte top coat.
- Remove any excess nail polish around the cuticles with a cleaning brush dipped in acetone.
Gradient green matte nails
These nails have a beautiful gradient of matte green shades, from dark forest green to light olive green. The matte finish emphasizes the transition between the colors and creates a refined and elegant look for the autumn season.
Consumables:
- Base layer: Orly Bonder Base layer
- Dark green matte polish: Essie Off Tropic with Essie Matte About You Top Coat
- Light green matte polish: China Glaze Re-Fresh Mint with Essie Matte About You Top Coat
- Color gradient sponge: PANA Nail Art Sponge
- Top coat: Essie Matte About You
DIY instructions:
- Apply a base coat to protect your nails.
- Use a sponge to create a gradient effect with the dark and light green polishes.
- Once the gradient is achieved, apply a matte top coat.
- Remove any excess nail polish around the cuticles with a cleaning brush dipped in acetone.
Bright orange matte nails
These bright orange matte nails are bold and vibrant, perfect for making a statement this fall. The matte finish softens the brightness just enough to keep it sophisticated and seasonal.
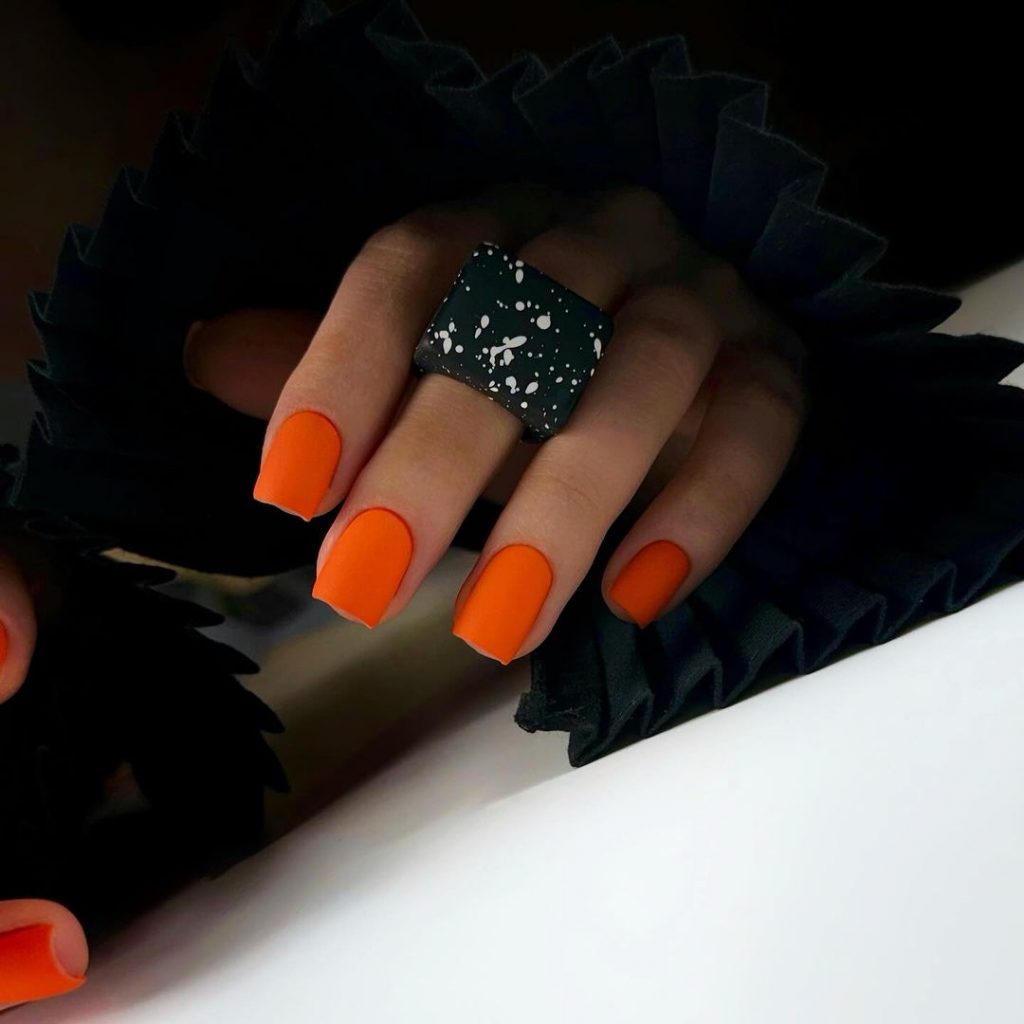
Consumables:
- Base coat: Butter London Nail Foundation Priming Basecoat
- Orange Matte Coat: OPI A good man-darin is hard to find with OPI Matte Top Coat
- Top coat: OPI Matte Topcoat
DIY instructions:
- Apply a base coat to your nails.
- Paint your nails with two coats of bright orange nail polish.
- Finish with a matte top coat for a velvety finish.
- Remove any excess nail polish around the cuticles with a cleaning brush dipped in acetone.
Fox and geometric matte nails
This playful design consists of a mix of matte nails with a cute fox face and geometric patterns. The combination of fun designs and the matte finish creates a unique and trendy look for the autumn season.
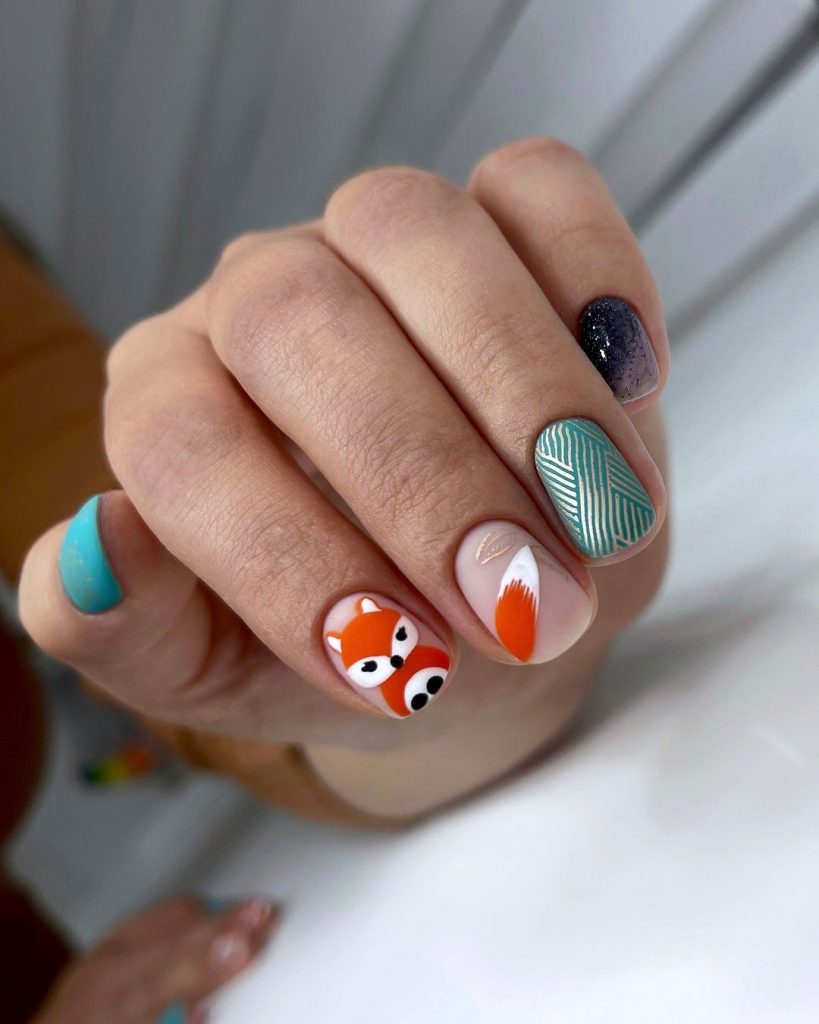
Consumables:
- Base layer: CND Stickey base layer
- Variety of matte polishes: Essie Mint Candy Apple, OPI Big Apple Red, Zoya Purity with matte topcoats
- Nail art brushes and dotting tools: Twinkled T Nail Art brush set
- Top coat: Essie Matte About You
DIY instructions:
- Start with a base coat to protect your nails.
- Paint each nail with a different color and design, using nail art brushes and dotting tools to create the fox face and geometric patterns.
- Once the designs are ready, apply a matte top coat to each nail.
- Remove any excess nail polish around the cuticles with a cleaning brush dipped in acetone.
Rainbow gradient matte nails
These nails have a vibrant rainbow gradient with a matte finish. Each nail shows a smooth transition of colors, creating a playful and striking design that is perfect for lovers of bold looks.
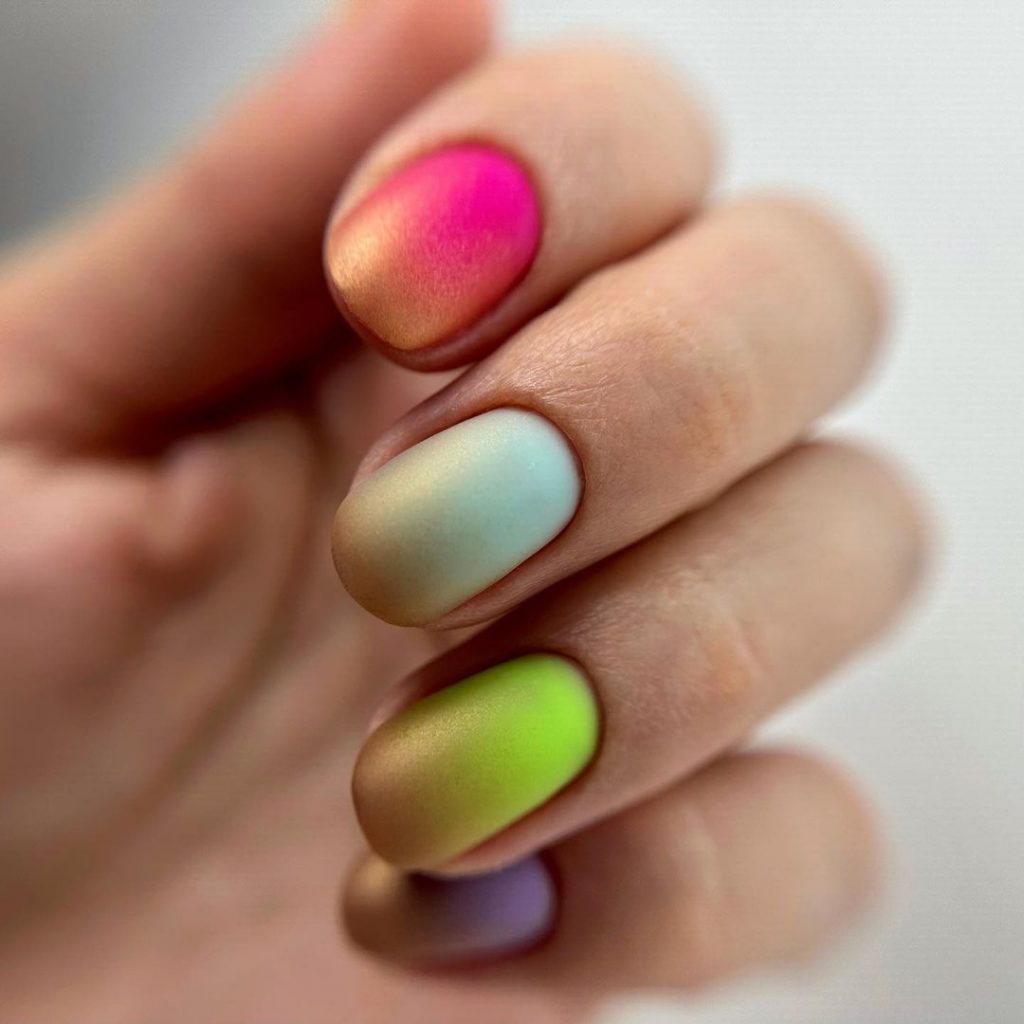
Consumables:
- Base coat: Butter London Nail Foundation Priming Basecoat
- Various matte polishes: Essie Play Date (purple), Essie Tart Deco (orange), Essie Mint Candy Apple (green), Essie Bikini So Teeny (blue), Essie Mod Square (pink)
- Color gradient sponge: PANA Nail Art Sponge
- Top coat: Essie Matte About You
DIY instructions:
- Apply a base coat to protect your nails.
- Use a sponge to apply the gradient effect, blending different colors smoothly across each nail.
- Once the gradient is achieved, apply a matte top coat.
- Remove any excess nail polish around the cuticles with a cleaning brush dipped in acetone.
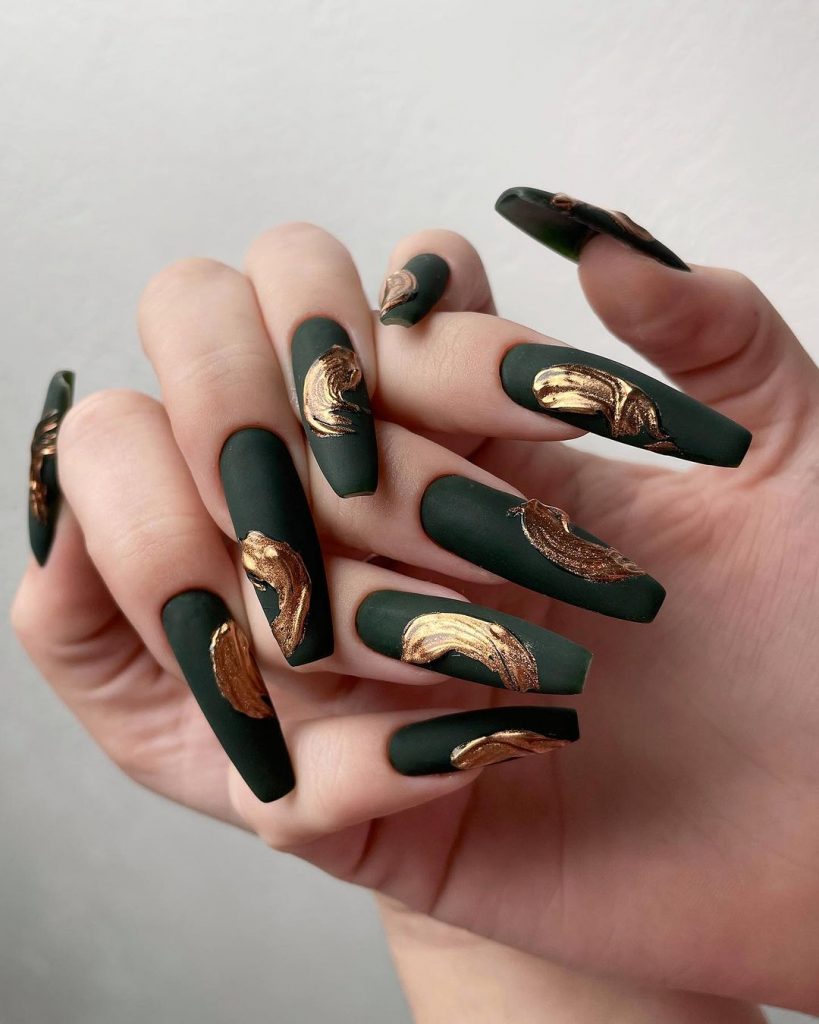
Green and gold matte nails
This design has a matte green base with gold leaf accents. The gold leaf gives a luxurious touch to the matte green, making it perfect for the autumn season.
Consumables:
- Base layer: Orly Bonder Base layer
- Green matte paint: OPI Don’t Mess with OPI with OPI Matte Top Coat
- Gold Leaf: Gold Leaf Flakes from Twinkled T
- Top coat: OPI Matte Topcoat
DIY instructions:
- Apply a base coat to protect your nails.
- Paint your nails with two coats of green nail polish.
- While the polish is still tacky, apply gold leaf flakes with tweezers.
- Finish with a matte top coat to seal the design.
- Remove any excess nail polish around the cuticles with a cleaning brush dipped in acetone.
Subtle green French matte nails
These nails have a matte nude base with a subtle green French tip. The matte finish gives the design a soft and sophisticated look, while the green dots add a pop of color that’s perfect for fall.
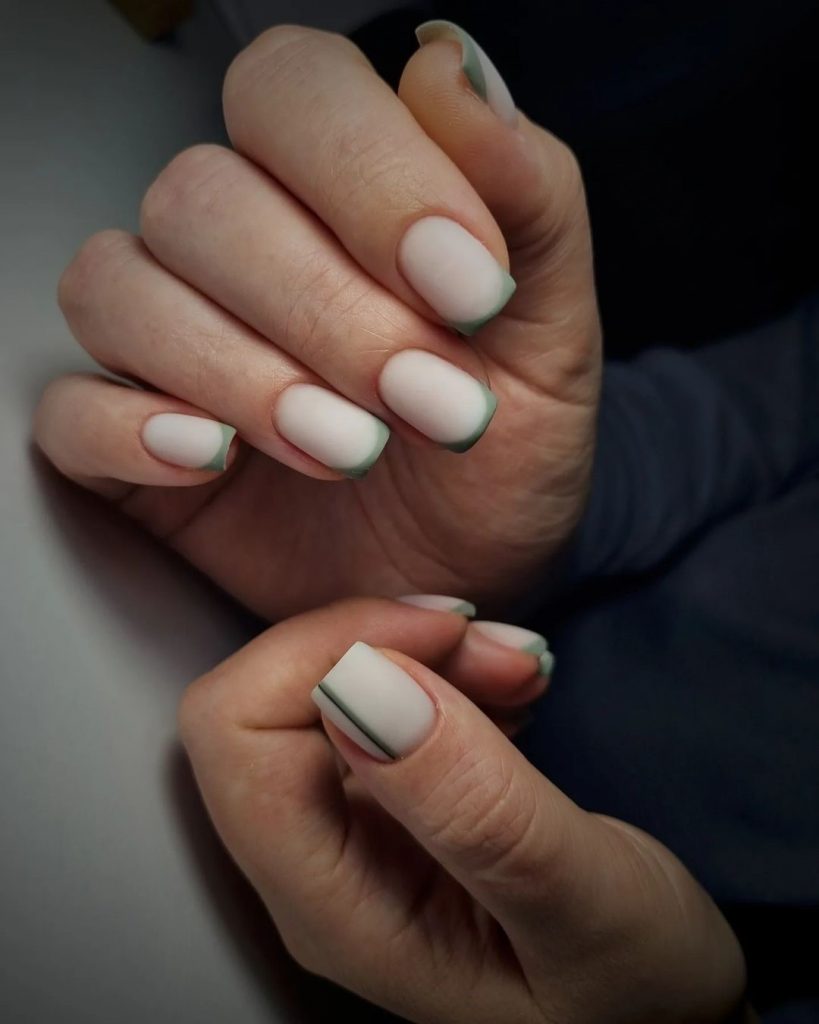
Consumables:
- Base layer: Essie All in One base layer
- Nude matte polish: OPI Bubble Bath with Essie Matte About You Top Coat
- Green polish for tips: Zoya Tilda with OPI Matte Top Coat
- Top coat: Essie Matte About You
DIY instructions:
- Apply a base coat to protect your nails.
- Paint your nails with two layers of nude polish.
- Use a thin brush to apply green nail polish to the tips of your nails.
- Finish with a matte top coat to seal the design.
- Remove any excess nail polish around the cuticles with a cleaning brush dipped in acetone.
Red matte nails with silver accents
These nails have a striking red, matte base with silver foil accents. The combination of red and silver creates a striking and festive look, perfect for the holidays or any fall event.

Consumables:
- Base coat: Butter London Nail Foundation Priming Basecoat
- Red matte polish: Essie Real Red with Essie Matte About You Top Coat
- Silver foil: Silver Leaf Foil from Twinkled T
- Top coat: Essie Matte About You
DIY instructions:
- Apply a base coat to protect your nails.
- Paint your nails with two coats of red polish.
- Apply silver foil accents with tweezers while the polish is still tacky.
- Finish with a matte top coat to seal the design.
- Remove any excess nail polish around the cuticles with a cleaning brush dipped in acetone.
Striking blue and white speckled matte nails
This design features a matte blue and white base with speckled black accents. The speckled pattern adds a fun and dynamic touch to the plain matte colors, making it perfect for a trendy fall look.
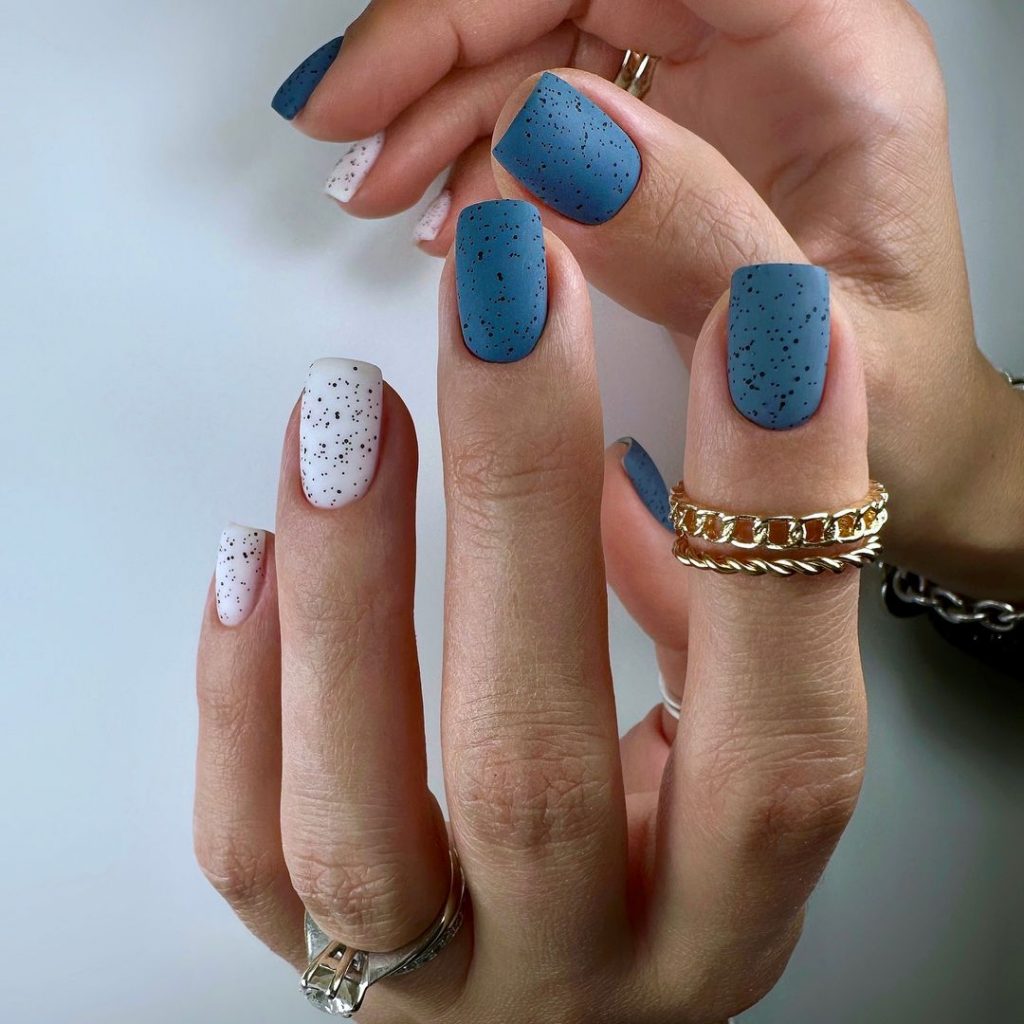
Consumables:
- Base Coat: OPI natural nail base coat
- Blue matte paint: Zoya Blu with OPI Matte Top Coat
- White matte polish: Essie Blanc with OPI Matte Top Coat
- Black speckle effect: Sally Hansen Insta-Dri Black to Black (use a toothbrush for speckle effect)
- Top coat: OPI Matte Topcoat
DIY instructions:
- Apply a base coat to protect your nails.
- Paint your nails alternately with blue and white nail polish.
- Dip a toothbrush into the black polish and wipe it over the nails to create a speckled effect.
- Once dry, apply a matte top coat to seal the design.
- Remove any excess nail polish around the cuticles with a cleaning brush dipped in acetone.
Artistic floral matte nails
These nails have an artistic floral design on a matte black base. The delicate flowers in soft shades of blue, pink and orange add a touch of elegance and creativity to the striking matte black background, making it a striking choice for autumn.
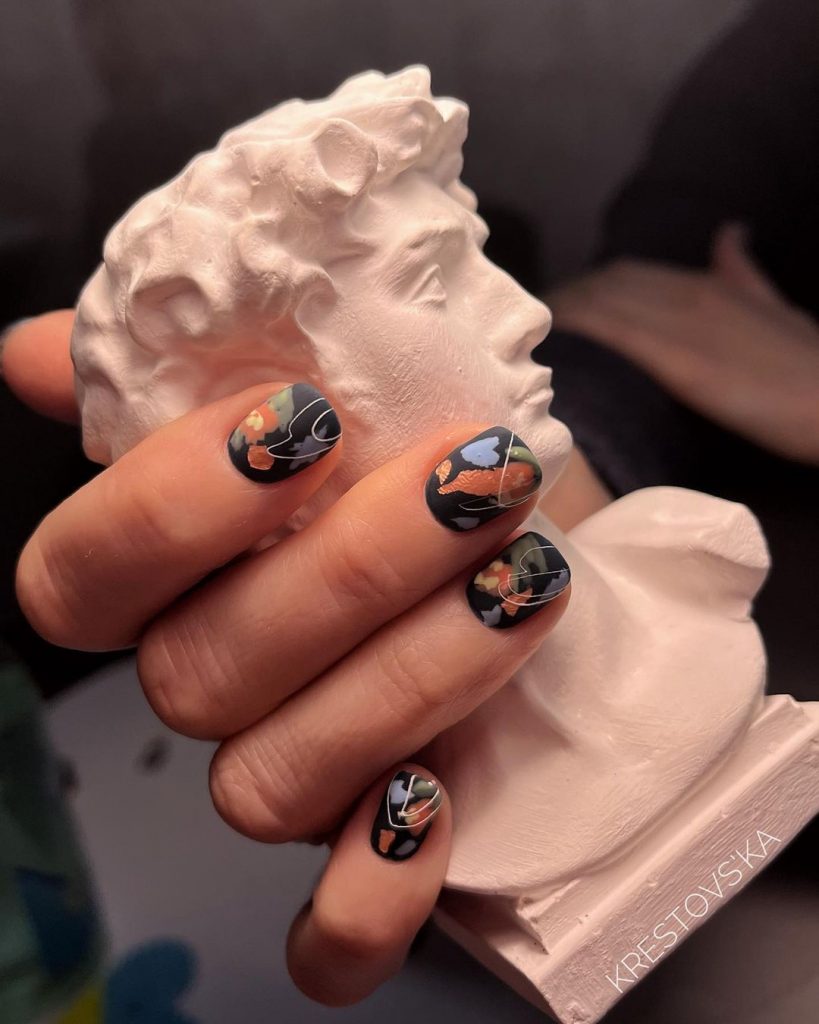
Consumables:
- Base layer: CND Stickey base layer
- Black matte paint: OPI Black Onyx with Essie Matte About You Top Coat
- Nail Art Brushes: Twinkled T Nail Art Brush Set
- Acrylic paint for floral design: Apple Barrel acrylic paint in blue, pink and orange
- Top coat: Essie Matte About You
DIY instructions:
- Apply a base coat to protect your nails.
- Paint your nails with two coats of black polish.
- Use nail art brushes to paint delicate floral designs on each nail with acrylic paint.
- Finish with a matte top coat to seal the design.
- Remove any excess nail polish around the cuticles with a cleaning brush dipped in acetone.
Nude and gold half moon matte nails
These nails have a nude matte base with gold glitter crescent accents. The combination of the soft nude color and the sparkling gold glitter creates a refined and glamorous look that is perfect for any occasion.
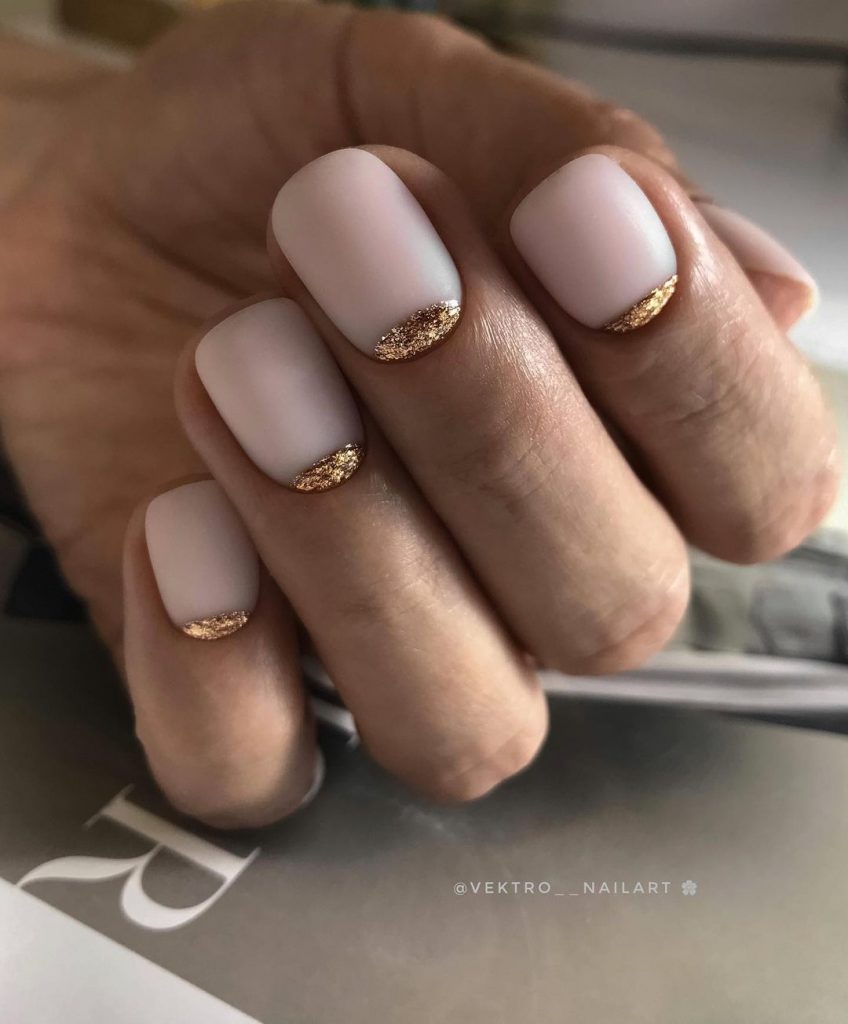
Consumables:
- Base layer: Orly Bonder Base layer
- Nude matte polish: Essie Ballet Slippers with Essie Matte About You Top Coat
- Gold glitter polish: OPI All Sparkly and Gold
- Cleaning brush: Pana Nail Art Brush
- Top coat: Essie Matte About You
DIY instructions:
- Apply a base coat to protect your nails.
- Paint your nails with two layers of nude polish.
- Using a small brush, apply gold glitter polish to the crescent area near the cuticles.
- Finish with a matte top coat to seal the design.
- Remove any excess nail polish around the cuticles with a cleaning brush dipped in acetone.
Minimalist matte nails with gold accents
These minimalist matte nails feature a soft pastel color palette with a single gold stripe and a black dot accent on each nail. The combination of muted colors and the elegant gold detail makes this design perfect for a modern and chic autumn look.
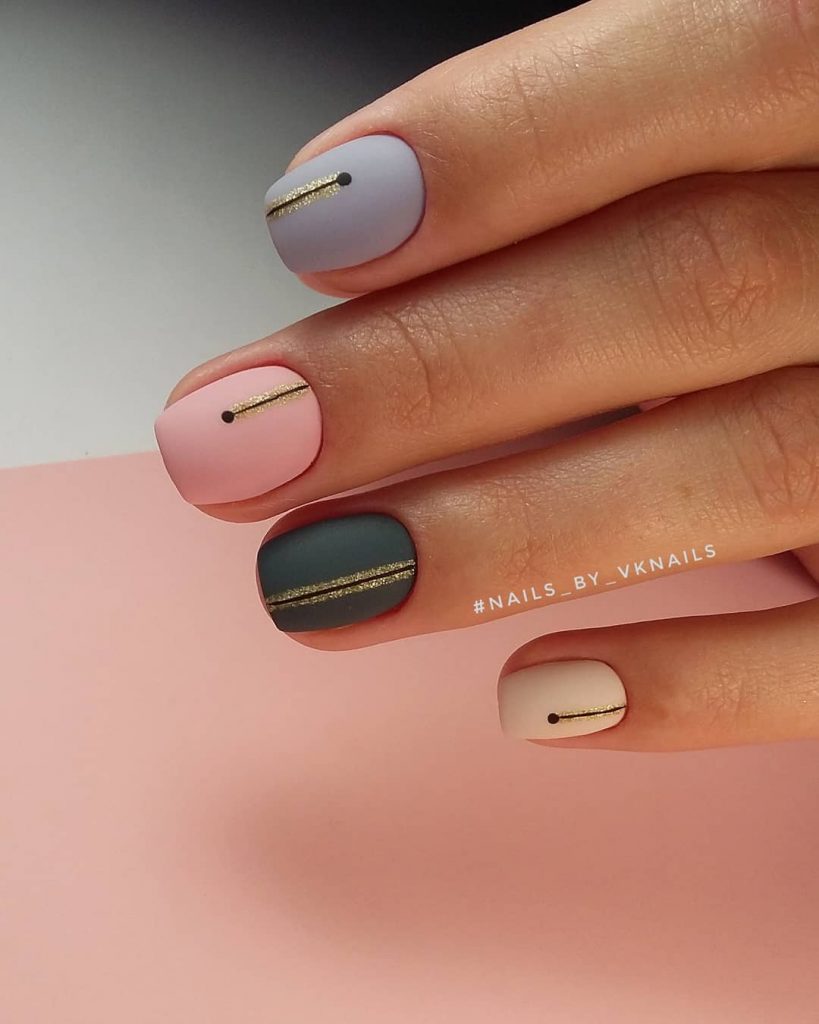
Consumables:
- Base layer: Essie All in One base layer
- Pastel matte polishes: Essie Fiji (pink), Essie Lilacism (lavender), Essie Mint Candy Apple (green), Essie Sand Tropez (nude)
- Gold striping tape: Born Pretty Gold Striping Tape
- Black dotting tool: Pana Nail Art Dotting Tool
- Top coat: Essie Matte About You
DIY instructions:
- Apply a base coat to protect your nails.
- Paint each nail with a different pastel color.
- Apply a gold striping tape horizontally across each nail and add a black dot with the dotting tool.
- Finish with a matte top coat to seal the design.
- Remove any excess nail polish around the cuticles with a cleaning brush dipped in acetone.
Matte nails with abstract line art
These nails have a matte nude base with intricate black line art. The abstract patterns create a modern and artistic look that is both unique and stylish for the fall season.
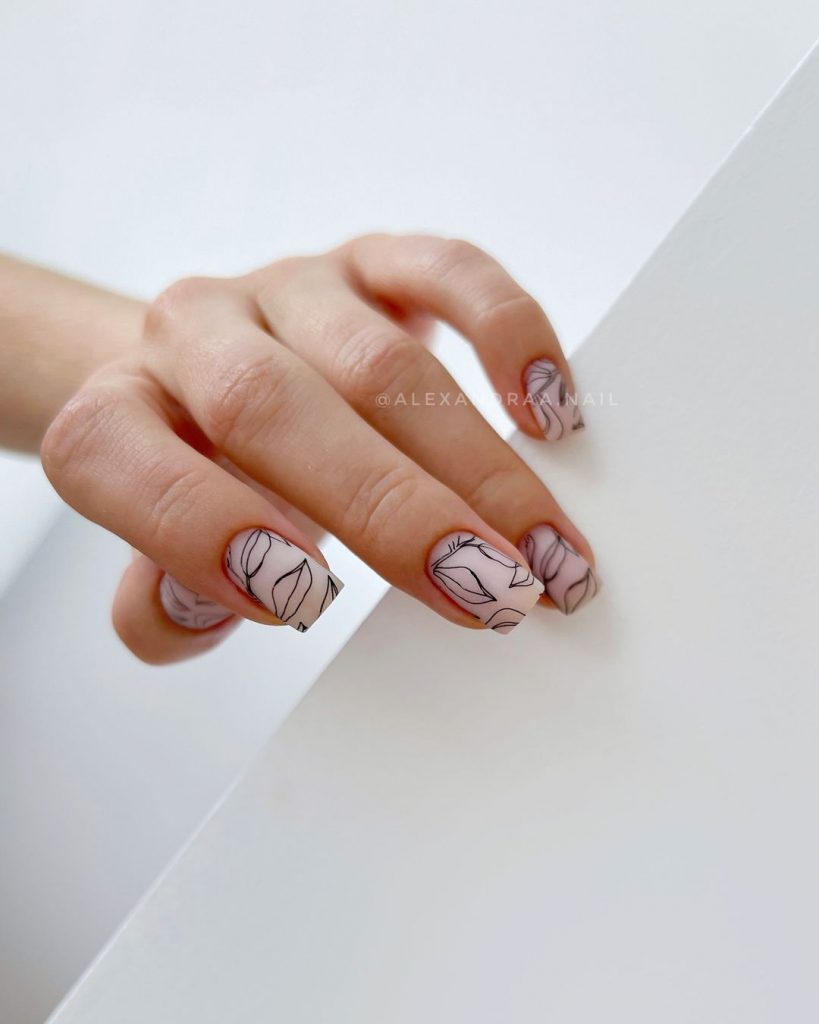
Consumables:
- Base coat: Butter London Nail Foundation Priming Basecoat
- Nude matte polish: OPI Samoan Sand with OPI Matte Top Coat
- Black nail art pen: Sally Hansen I Heart Nail Art Pen in Black
- Top coat: OPI Matte Topcoat
DIY instructions:
- Apply a base coat to protect your nails.
- Paint your nails with two layers of nude polish.
- Use a black nail art pen to draw intricate line art on each nail.
- Finish with a matte top coat to seal the design.
- Remove any excess nail polish around the cuticles with a cleaning brush dipped in acetone.
Nude matte nails with gold stripes
These nails have a soft, nude matte base with elegant gold stripe accents. The gold stripes add a touch of sophistication and glamor to the minimalist nude base, making it a perfect choice for any fall occasion.
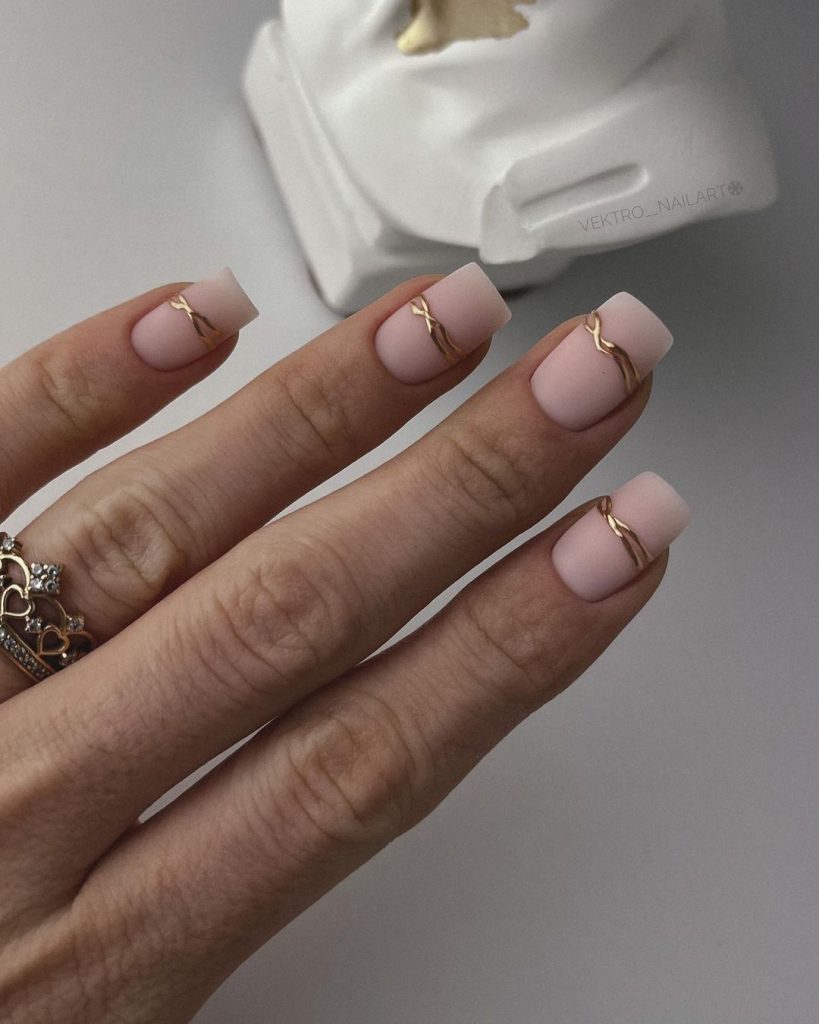
Consumables:
- Base layer: CND Stickey base layer
- Nude matte polish: Essie Mademoiselle with Essie Matte About You Top Coat
- Gold striping tape: Born Pretty Gold Striping Tape
- Top coat: Essie Matte About You
DIY instructions:
- Apply a base coat to protect your nails.
- Paint your nails with two layers of nude polish.
- Apply gold striping tape to create horizontal or vertical stripes on each nail.
- Finish with a matte top coat to seal the design.
- Remove any excess nail polish around the cuticles with a cleaning brush dipped in acetone.
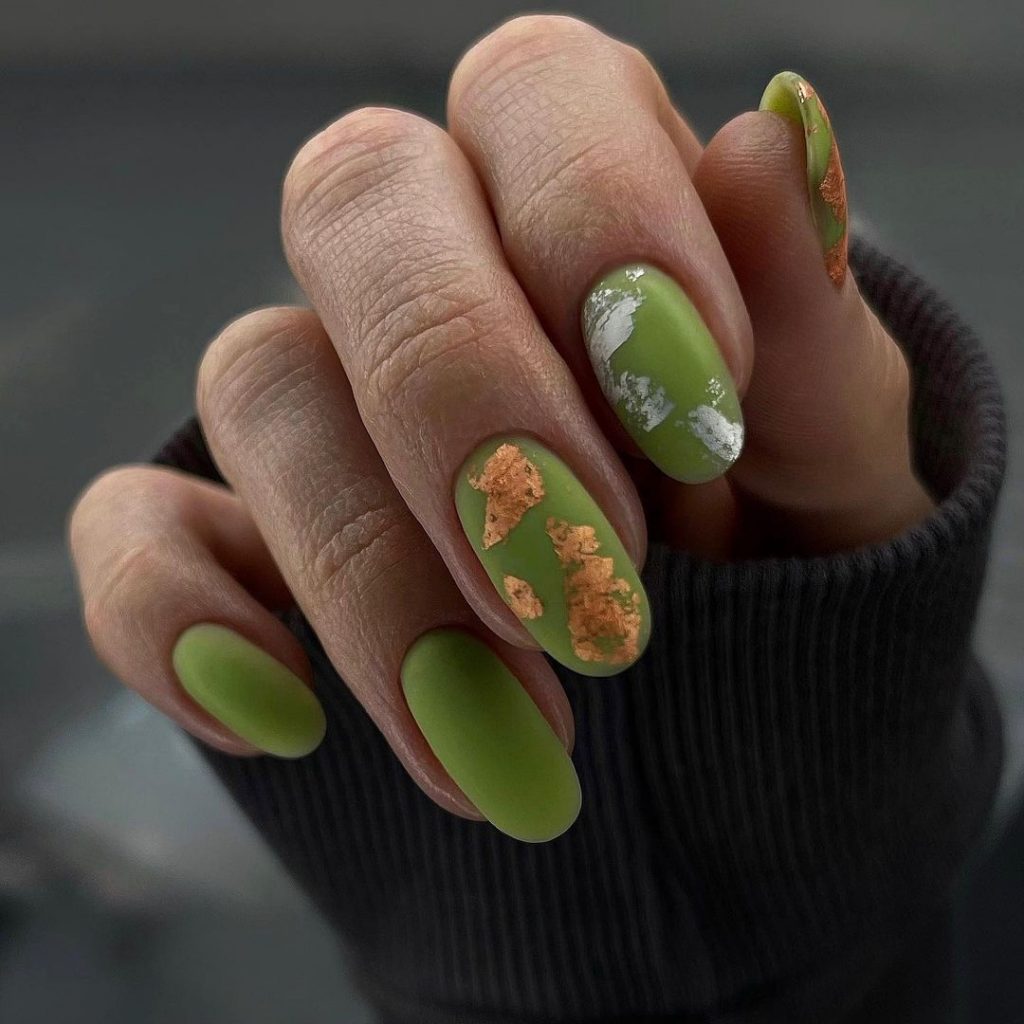
Green and gold matte nails with silver leaf accent
These nails feature a sophisticated combination of matte green and nude with gold foil accents and a silver leaf design on one nail. The mix of earthy green and shiny gold creates a luxurious look, perfect for autumn.
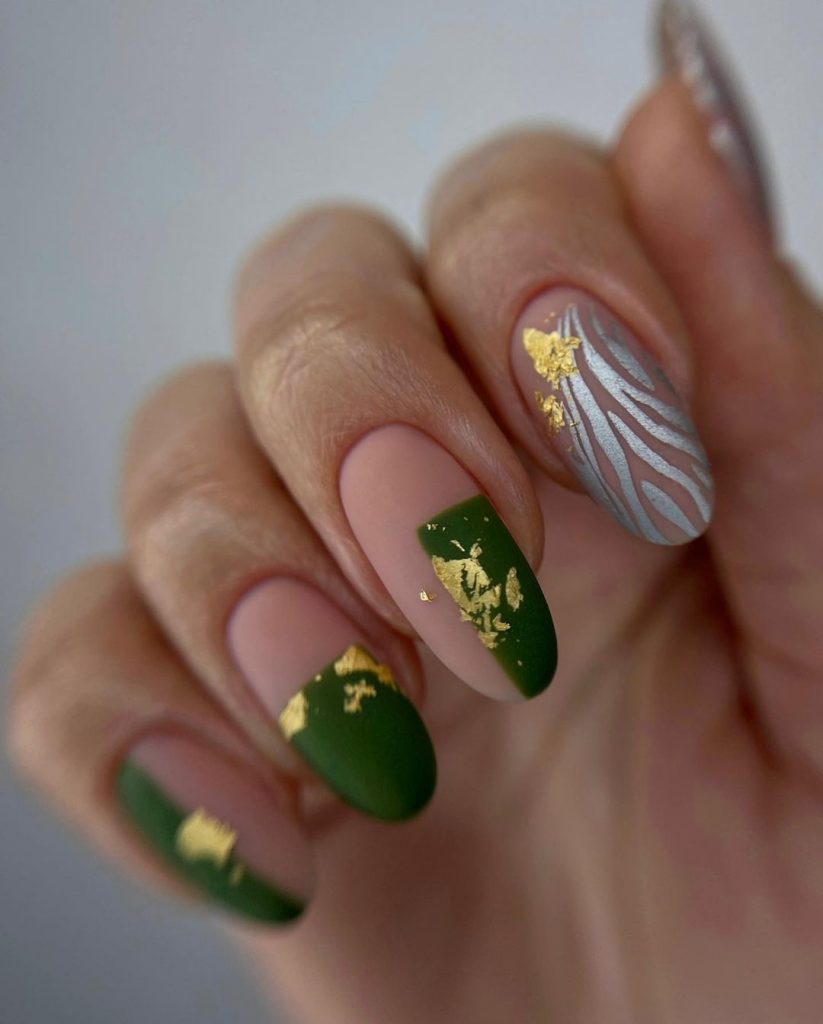
Consumables:
- Base layer: CND Stickey base layer
- Nude matte polish: Essie Topless & Barefoot with Essie Matte About You Top Coat
- Green matte polish: OPI Stay Off the Lawn with Essie Matte About You Top Coat
- Gold Foil: Twinkled T Gold Leaf Flakes
- Silver nail art pen: Sally Hansen I Heart Nail Art Pen in silver
- Top coat: Essie Matte About You
DIY instructions:
- Apply a base coat to protect your nails.
- Paint some nails with nude polish and others with green nail polish.
- Apply gold foil flakes to the green nails using tweezers.
- Use a silver nail art pen to create a leaf design on one nude nail.
- Finish with a matte top coat to seal the design.
- Remove any excess nail polish around the cuticles with a cleaning brush dipped in acetone.
Bright pink matte nails
These nails have a vibrant bright pink matte finish. The striking color and matte texture create a striking and playful look, making it a fun choice for any occasion.
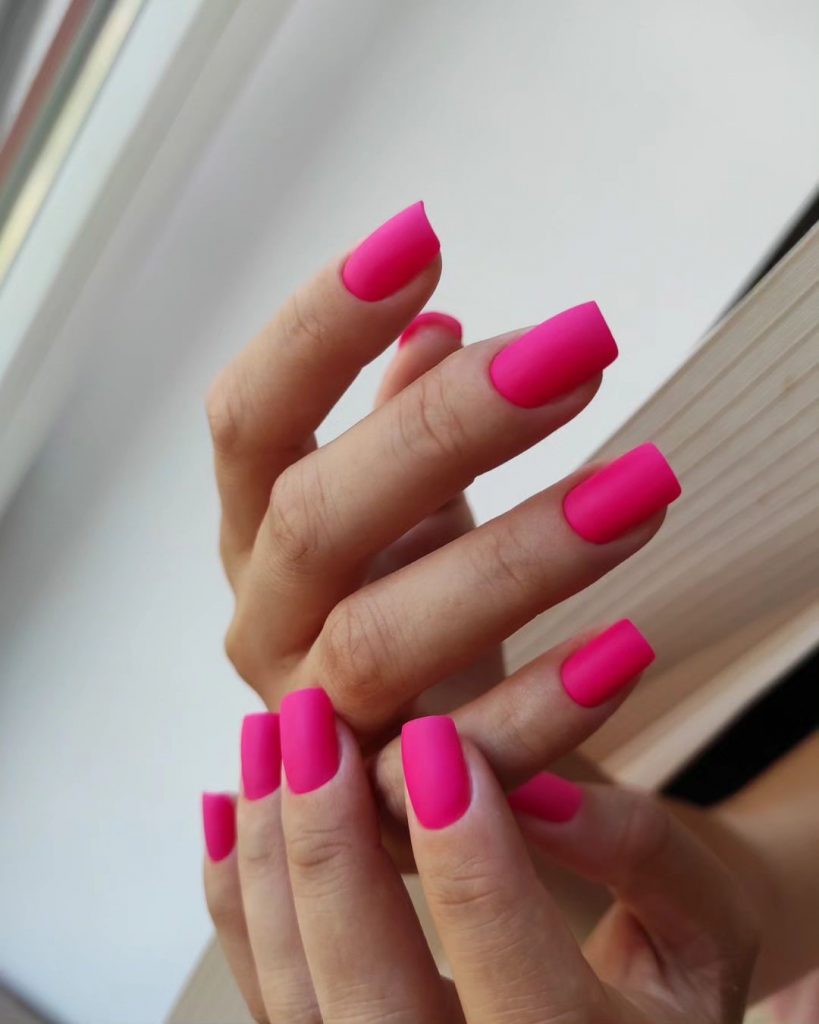
Consumables:
- Base Coat: OPI natural nail base coat
- Pink matte paint: China Glaze Pink Voltage with OPI Matte Top Coat
- Top coat: OPI Matte Topcoat
DIY instructions:
- Apply a base coat to protect your nails.
- Paint your nails with two coats of pink polish.
- Finish with a matte top coat to seal the design.
- Remove any excess nail polish around the cuticles with a cleaning brush dipped in acetone.
Gray matte nails with black flower art
These nails have a matte gray base with detailed black floral motifs. The combination of the soft gray and intricate black flowers creates a sophisticated and elegant look, perfect for autumn.

Consumables:
- Base layer: Essie All in One base layer
- Gray matte polish: Zoya Dove with Essie Matte About You Top Coat
- Black nail art pen: Sally Hansen I Heart Nail Art Pen in Black
- Top coat: Essie Matte About You
DIY instructions:
- Apply a base coat to protect your nails.
- Paint your nails with two coats of gray polish.
- Use a black nail art pen to draw floral designs on each nail.
- Finish with a matte top coat to seal the design.
- Remove any excess nail polish around the cuticles with a cleaning brush dipped in acetone.
Black matte nails with glitter accents
These nails have a matte black base with glitter accents at the cuticles. The contrast between the matte black and the sparkling glitter adds a touch of glamor to the bold base color, making it a perfect choice for evening events.
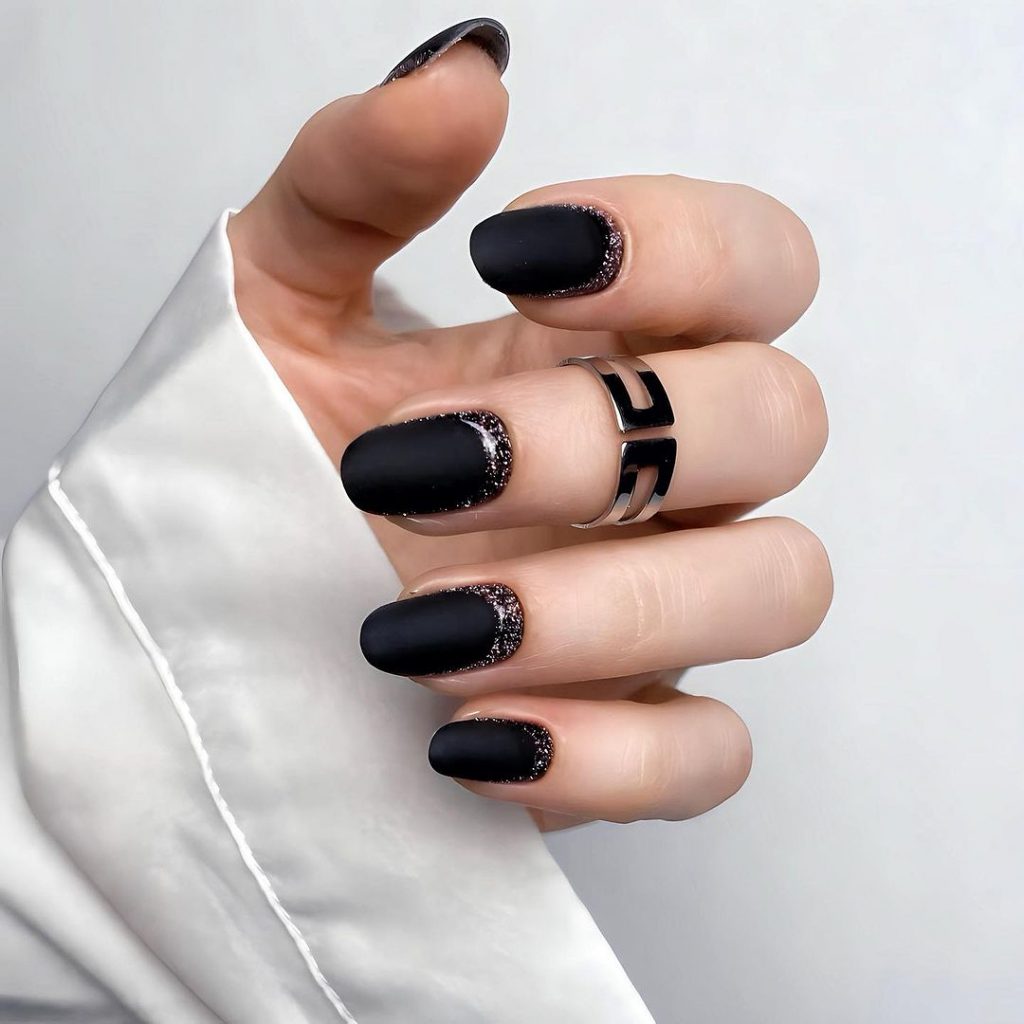
Consumables:
- Base coat: Butter London Nail Foundation Priming Basecoat
- Black matte paint: OPI Black Onyx with OPI Matte Top Coat
- Glitter polish: China Glaze Fairy Dust
- Top coat: OPI Matte Topcoat
DIY instructions:
- Apply a base coat to protect your nails.
- Paint your nails with two coats of black polish.
- Apply glitter polish to the cuticles of each nail.
- Finish with a matte top coat to seal the design.
- Remove any excess nail polish around the cuticles with a cleaning brush dipped in acetone.
Floral matte nails with dark base
These nails have a dark matte base with intricate floral designs on accent nails. The combination of the deep color and detailed flowers creates a refined and elegant look, perfect for autumn.
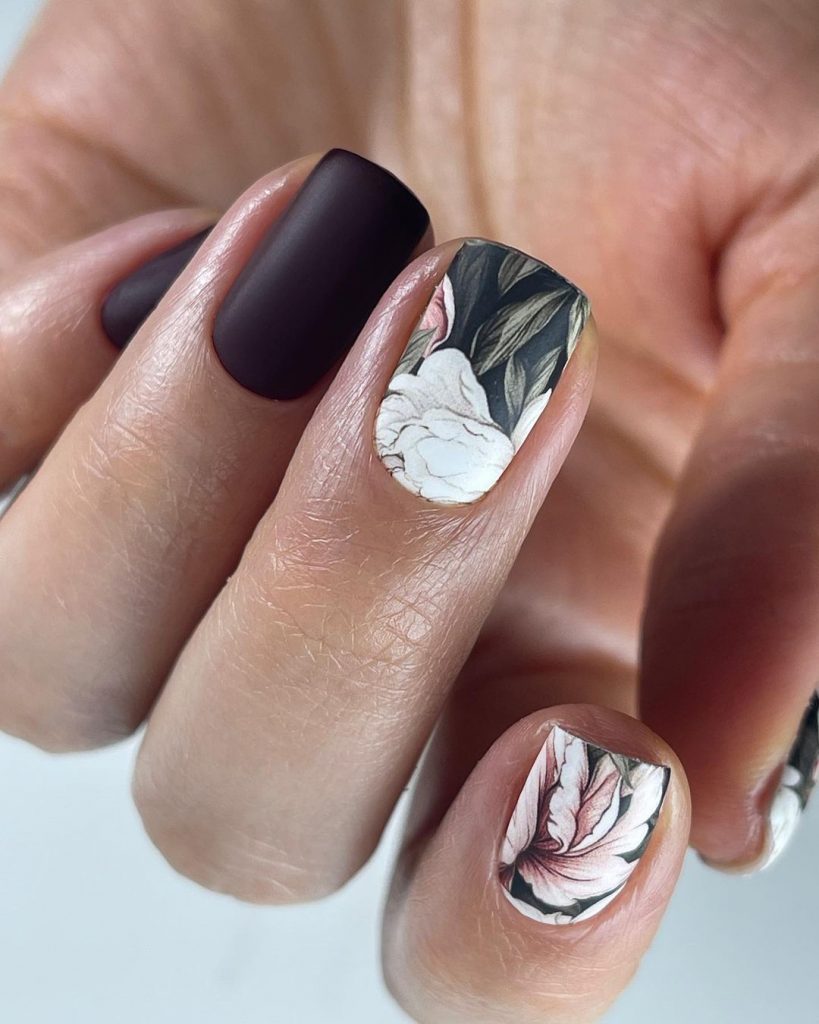
Consumables:
- Base layer: Orly Bonder Base layer
- Dark matte polish: Essie Wicked with Essie Matte About You Top Coat
- Nail stickers with flowers: Born Pretty Nail stickers with flowers
- Top coat: Essie Matte About You
DIY instructions:
- Apply a base coat to protect your nails.
- Paint your nails with two coats of dark nail polish.
- Apply floral nail stickers to the accent nails.
- Finish with a matte top coat to seal the design.
- Remove any excess nail polish around the cuticles with a cleaning brush dipped in acetone.
Bold blue matte nails
These nails have a striking, vibrant blue, matte finish. The striking color and smooth, matte texture make this design a standout choice for those who like to make a statement with their nails.
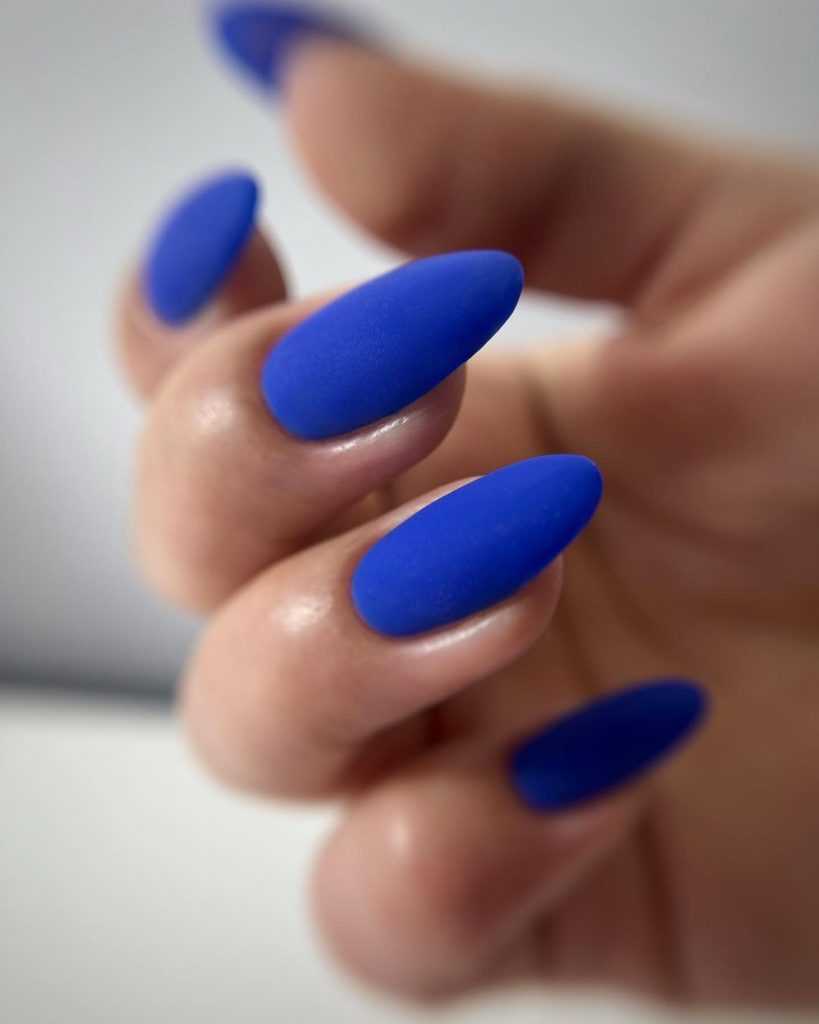
Consumables:
- Base Coat: OPI natural nail base coat
- Blue matte polish: Essie Butler Please with Essie Matte About You Top Coat
- Top coat: Essie Matte About You
DIY instructions:
- Apply a base coat to protect your nails.
- Paint your nails with two coats of blue polish.
- Finish with a matte top coat to seal the design.
- Remove any excess nail polish around the cuticles with a cleaning brush dipped in acetone.
Artistic matte nails with gold foil and green accents
These nails feature a combination of matte green and nude with gold foil accents and intricate designs on one nail. The mix of matte textures and shiny gold details provides a luxurious and unique look.
Consumables:
- Base layer: CND Stickey base layer
- Nude matte polish: Essie Topless & Barefoot with Essie Matte About You Top Coat
- Green matte polish: OPI Stay Off the Lawn with Essie Matte About You Top Coat
- Gold Foil: Twinkled T Gold Leaf Flakes
- Silver nail art pen: Sally Hansen I Heart Nail Art Pen in silver
- Top coat: Essie Matte About You
DIY instructions:
- Apply a base coat to protect your nails.
- Paint some nails with nude polish and others with green nail polish.
- Apply gold foil flakes to the green nails using tweezers.
- Use a silver nail art pen to create intricate designs on one nude nail.
- Finish with a matte top coat to seal the design.
- Remove any excess nail polish around the cuticles with a cleaning brush dipped in acetone.
Save pin


Namie O, a talented writer at Willtiptop, conveys her passion for fashion and beauty in every word she writes. With a keen eye for detail and a deep insight into the latest trends, Namie’s articles and insights captivate readers and provide them with valuable knowledge and inspiration. Through her engaging and informative writing style, Namie aims to empower individuals to explore their style, experiment with beauty techniques, and embrace their unique sense of self.