Fall Ombre Nails 21 Ideas: The Ultimate Guide
Autumn is the magical season when the leaves turn fiery hues, the air becomes crisp and our style naturally changes to embrace warmth and vibrancy. But have you ever thought about channeling that fall charm to your fingertips? Fall ombre nails are the perfect way to do this. In this guide, we explore stunning ideas, unique designs and irresistible color palettes to inspire your next manicure. From deep burgundy to glowing amber and every shade in between, prepare to fall head over heels for these fall-inspired creations.
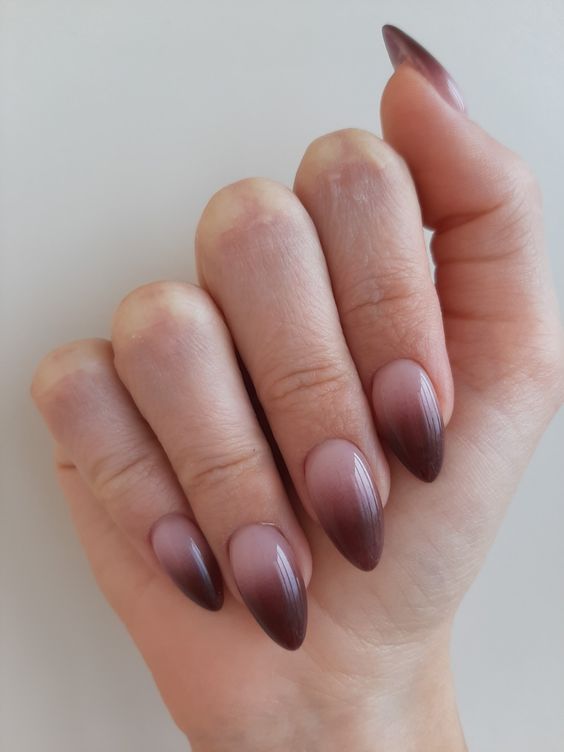
Burgundian Ombre Elegance
Nothing says as much about the richness of burgundy red: a hue that radiates warmth, depth and refinement. This burgundy ombre transitions seamlessly from a velvety, deep wine tone at the ends to a soft, natural base, creating a flawless gradient. The almond-shaped nails add a graceful silhouette, enhancing the sophisticated appeal of the design. Perfect for both everyday chic and evening glamour, this look blends effortlessly with your outfit and accessories, making it a true seasonal piece.
Consumables needed:
- Burgundy nail polish (e.g. OPI “Got the Blues for Red”)
- Nude base layer (e.g. Essie “Ballet Slippers”)
- Top coat (e.g. Seche Vite Dry Fast Top Coat)
- Sponge for creating the gradient
- Nail file for shaping
How to create at home:
- Start by filing your nails into an almond shape.
- Apply a nude base coat and let it dry completely.
- On a makeup sponge, apply a strip of burgundy nail polish and a strip of nude polish next to it.
- Dab the sponge onto your nails, starting at the tips and working towards the base to create the gradient.
- Repeat until the desired coverage is achieved.
- Finish with a top coat to seal and protect the design.
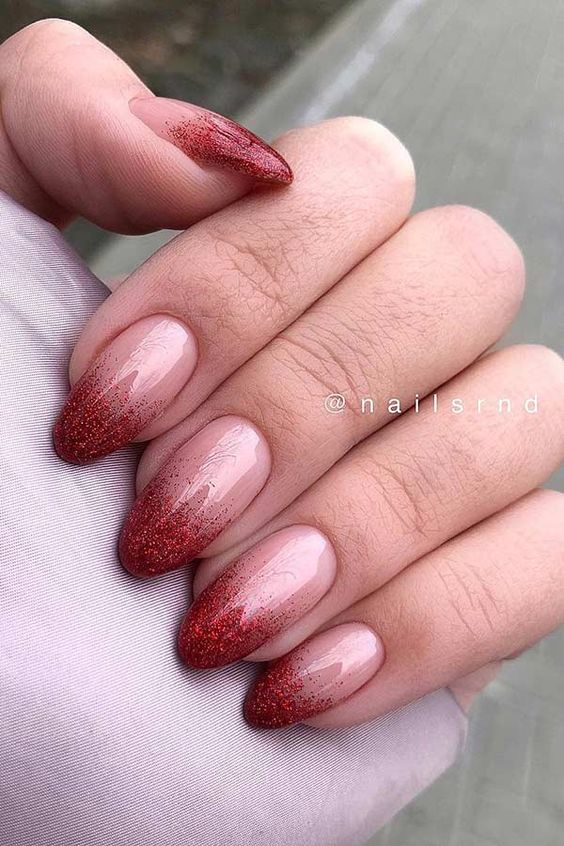
Glittery Red Ombre
For those who love a bit of sparkle, this glittery red ombre is a showstopper. The red glitter fades to a clear, shiny base, making it look like the glitter is running down the nails. This design is perfect for a night out or a festive occasion where you want to make your nails shine.
Consumables needed:
- Red glitter nail polish (e.g. China Glaze “Ruby Pumps”)
- Clear base coat (e.g. Sally Hansen “Hard As Nails”)
- Top coat (e.g. Seche Vite Dry Fast Top Coat)
- Sponge for creating the gradient
- Nail file for shaping
How to create at home:
- File your nails into the desired shape.
- Apply a clear base coat and let it dry completely.
- Apply a strip of red glitter polish on a make-up sponge and a strip of clear polish next to it.
- Dab the sponge onto your nails, starting at the tips and working towards the base to create the gradient.
- Repeat until the desired glitter density is achieved.
- Finish with a top coat to seal and protect the design.
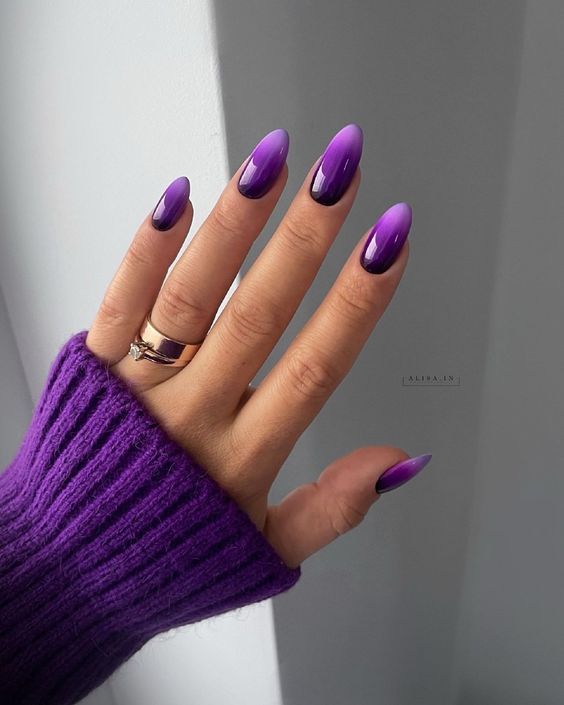
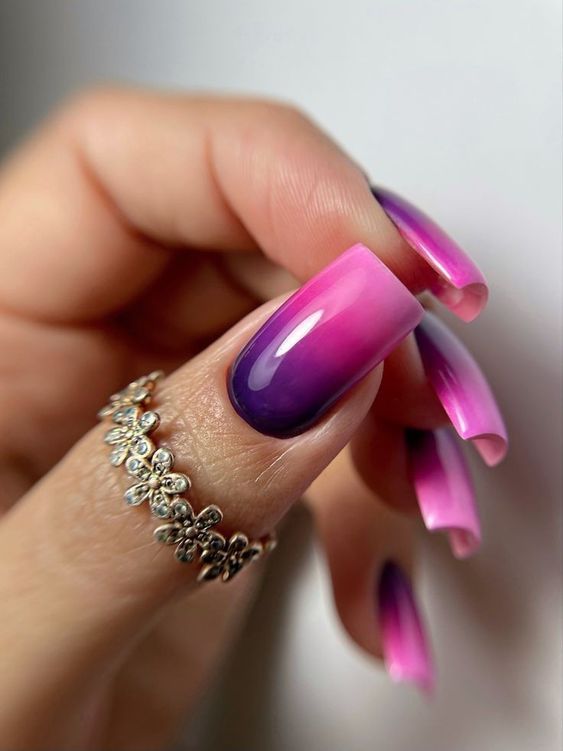
Purple Ombre Magic
This purple ombre design is both bold and enchanting, perfect for those who like to make a statement. The color gradient goes from deep royal purple to lighter lavender, creating a magical and enchanting effect. The glossy finish adds a touch of elegance, making it suitable for any occasion.
Consumables needed:
- Dark purple nail polish (e.g. Essie “Sexy Divide”)
- Light lavender nail polish (e.g. OPI “Do You Lilac It?”)
- Top coat (e.g. Seche Vite Dry Fast Top Coat)
- Sponge for creating the gradient
- Nail file for shaping
How to create at home:
- File your nails into the desired shape.
- Apply the light lavender base coat and let it dry completely.
- On a makeup sponge, apply a strip of dark purple nail polish and a strip of light lavender polish next to it.
- Dab the sponge onto your nails, starting at the tips and working towards the base to create the gradient.
- Repeat until the desired coverage is achieved.
- Finish with a top coat to seal and protect the design.
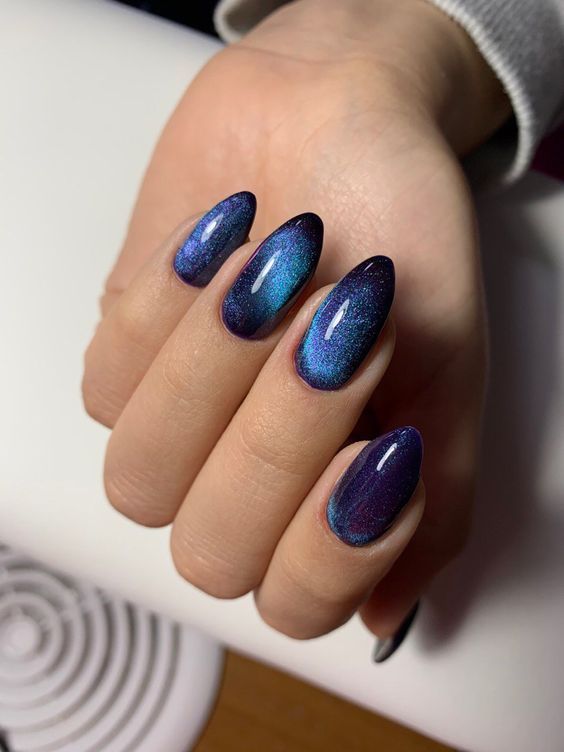
Mystical Blue Ombre
The mystical blue ombre design is ideal for those who like a touch of mystery in their look. The gradient goes from dark, shimmering blue to lighter, metallic blue, creating a captivating and otherworldly effect. This design is perfect for evening events or when you want your nails to be the center of attention.
Consumables needed:
- Dark blue nail polish (e.g. Zoya “Dream”)
- Light metallic blue nail polish (e.g. OPI “I’m not really a waitress”)
- Top coat (e.g. Seche Vite Dry Fast Top Coat)
- Sponge for creating the gradient
- Nail file for shaping
How to create at home:
- File your nails into the desired shape.
- Apply the light metallic blue base coat and let it dry completely.
- Apply a strip of dark blue polish to a make-up sponge and a strip of light metallic blue polish next to it.
- Dab the sponge onto your nails, starting at the tips and working towards the base to create the gradient.
- Repeat until the desired coverage is achieved.
- Finish with a top coat to seal and protect the design.
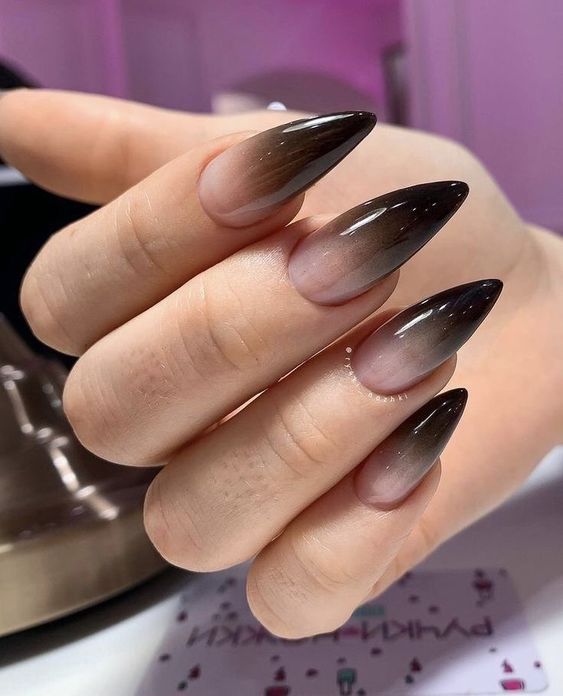
Classic black ombre
The classic black ombre design is timeless and chic, perfect for those who prefer a more dramatic look. The color gradient goes from jet black at the ends to a softer, grayish shade at the base, creating a sleek and modern effect. This design is versatile and can be paired with any outfit, making it an indispensable part of your nail collection.
Consumables needed:
- Black nail polish (e.g. Essie “Licorice”)
- Gray nail polish (e.g. OPI “I Am What I Amethyst”)
- Top coat (e.g. Seche Vite Dry Fast Top Coat)
- Sponge for creating the gradient
- Nail file for shaping
How to create at home:
- File your nails into the desired shape.
- Apply the gray base coat and let it dry completely.
- On a make-up sponge, apply a strip of black polish and a strip of gray polish next to it.
- Dab the sponge onto your nails, starting at the tips and working towards the base to create the gradient.
- Repeat until the desired coverage is achieved.
- Finish with a top coat to seal and protect the design.
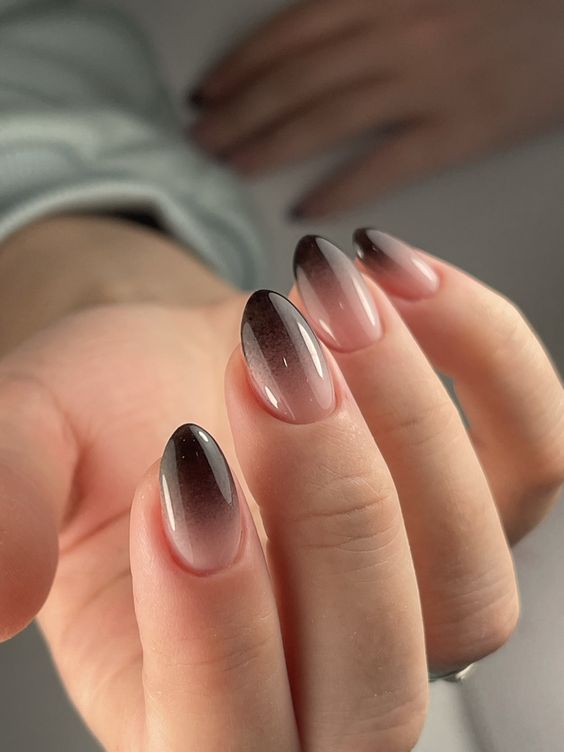
Subtle black Ombre
This black ombre design exudes a subtle yet sophisticated charm, transitioning from deep black at the ends to a soft, natural base. The flowing gradient creates an elegant and sophisticated look, perfect for any occasion, whether it’s a casual day out or a formal event. The glossy finish adds a touch of luxury, making your nails look sleek and polished.
Consumables needed:
- Black nail polish (e.g. Essie “Licorice”)
- Nude base layer (e.g. Essie “Ballet Slippers”)
- Top coat (e.g. Seche Vite Dry Fast Top Coat)
- Sponge for creating the gradient
- Nail file for shaping
How to create at home:
- File your nails into the desired shape.
- Apply a nude base coat and let it dry completely.
- On a makeup sponge, apply a strip of black nail polish and a strip of nude polish next to it.
- Dab the sponge onto your nails, starting at the tips and working towards the base to create the gradient.
- Repeat until the desired coverage is achieved.
- Finish with a top coat to seal and protect the design.
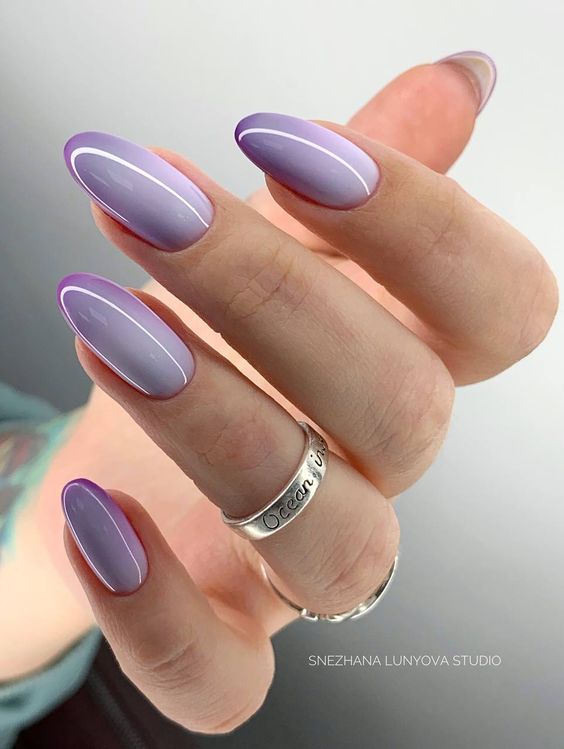
Lavender Ombre with outline
This lavender ombre design is perfect for anyone who loves a pop of color. The color gradient goes from deep lavender to a lighter shade, with a delicate white outline adding a unique and chic touch. The almond shape enhances the elegance and femininity of this design, making it ideal for both everyday use and special occasions.
Consumables needed:
- Dark lavender nail polish (e.g. OPI “Do You Lilac It?”)
- Light lavender nail polish (e.g. Essie “Lilacism”)
- White Nail Art Pen for the outline
- Top coat (e.g. Seche Vite Dry Fast Top Coat)
- Sponge for creating the gradient
- Nail file for shaping
How to create at home:
- File your nails in an almond shape.
- Apply the light lavender base coat and let it dry completely.
- On a makeup sponge, apply a strip of dark lavender polish and a strip of light lavender polish next to it.
- Dab the sponge onto your nails, starting at the tips and working towards the base to create the gradient.
- Use a white nail art pen to carefully draw the outline.
- Finish with a top coat to seal and protect the design.
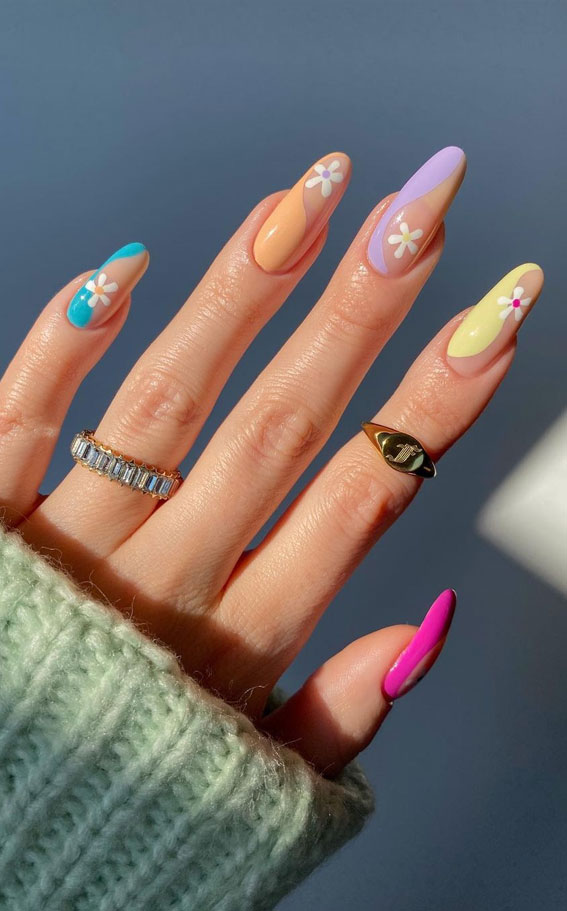
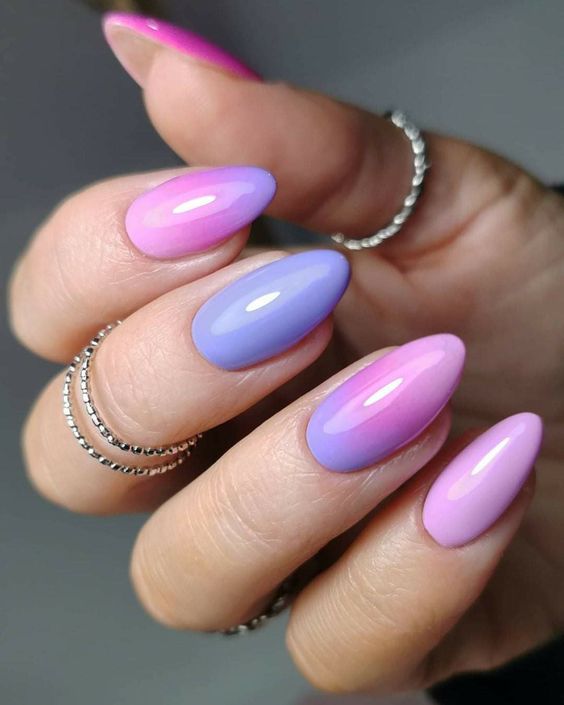
Pastel Pink and Purple Ombre
This playful pastel pink and purple ombre design is perfect for anyone who loves a fun and colorful look. The gradient transitions seamlessly between the two shades, creating a vibrant and striking effect. The glossy finish adds a touch of sophistication, making this design suitable for both casual and formal occasions.
Consumables needed:
- Pink nail polish (e.g. OPI “Pink Flamenco”)
- Purple nail polish (e.g. Essie “Play Date”)
- Top coat (e.g. Seche Vite Dry Fast Top Coat)
- Sponge for creating the gradient
- Nail file for shaping
How to create at home:
- File your nails into the desired shape.
- Apply the pink base coat and let it dry completely.
- On a makeup sponge, apply a strip of purple nail polish and a strip of pink nail polish next to it.
- Dab the sponge onto your nails, starting at the tips and working towards the base to create the gradient.
- Repeat until the desired coverage is achieved.
- Finish with a top coat to seal and protect the design.
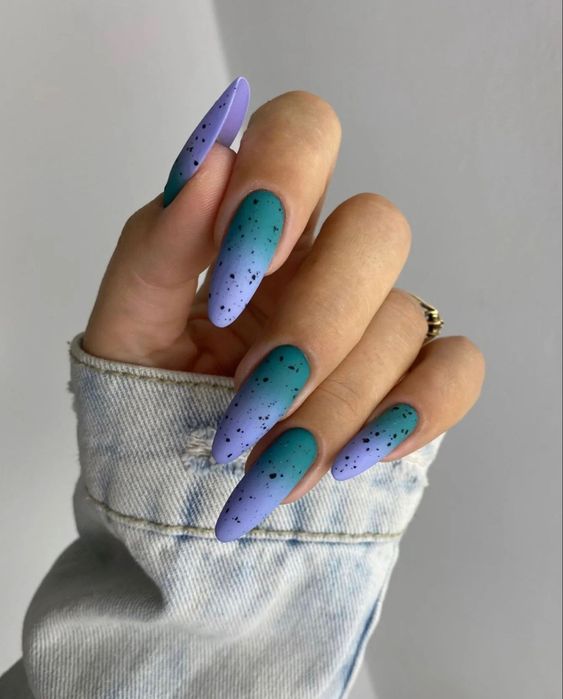
Teal and Purple Speckled Ombre
This unique teal and purple speckled ombre design is perfect for those who like to experiment with colors and textures. The color gradient goes from deep blue-green to light purple, with black speckles adding an interesting and sharp touch. The matte finish gives this design a modern and trendy look, making it perfect for the fall season.
Consumables needed:
- Teal nail polish (e.g. China Glaze “For Audrey”)
- Light purple nail polish (e.g. OPI “You’re Such a Budapest”)
- Black speckled paint (e.g. Nubar “Black Polka Dot”)
- Matte top coat (e.g. OPI Matte top coat)
- Sponge for creating the gradient
- Nail file for shaping
How to create at home:
- File your nails into the desired shape.
- Apply the light purple base coat and let it dry completely.
- On a makeup sponge, apply a strip of teal nail polish and a strip of light purple nail polish next to it.
- Dab the sponge onto your nails, starting at the tips and working towards the base to create the gradient.
- Apply the black speckle polish over the gradient.
- Finish with a matte top coat to seal and protect the design.
Sunset Ombre with accent
This vibrant sunset ombre design captures the essence of a beautiful autumn sunset, transitioning from bright orange to deep burgundy. The accent nail, decorated with a delicate and colorful design, adds a unique and artistic touch. This design is perfect for lovers of bold and colorful nails that make a statement.

Consumables needed:
- Orange nail polish (e.g. OPI “A Good Man-darin is Hard to Find”)
- Burgundy nail polish (e.g. Essie “Bahama Mama”)
- Nail art accessories for the accent nail (e.g. rhinestones, glitter, stickers)
- Top coat (e.g. Seche Vite Dry Fast Top Coat)
- Sponge for creating the gradient
- Nail file for shaping
How to create at home:
- File your nails into the desired shape.
- Apply the orange base coat and let it dry completely.
- On a makeup sponge, apply a strip of burgundy nail polish and a strip of orange nail polish next to it.
- Dab the sponge onto your nails, starting at the tips and working towards the base to create the gradient.
- Add your desired nail art accessories to the accent nail.
- Finish with a top coat to seal and protect the design.
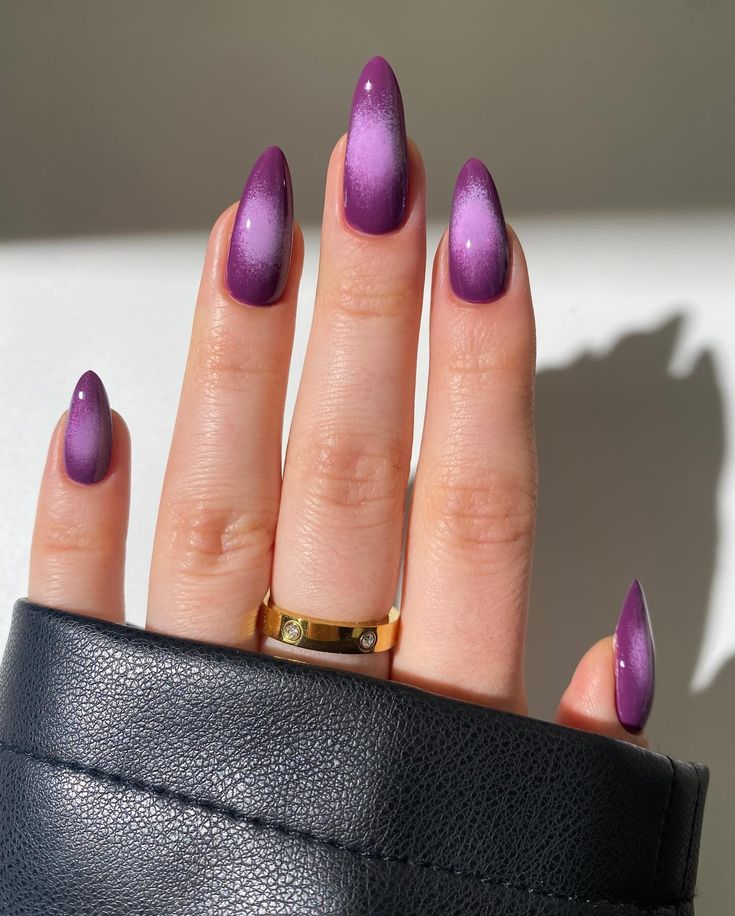
Deep Purple Ombre
This deep purple ombre design is rich and luxurious, transitioning from dark, velvety purple at the ends to softer lavender at the base. The glossy finish enhances the vibrant shades, making your nails look sleek and sophisticated. Perfect for fall, this design is both bold and elegant. It makes a statement without being too flashy.
Consumables needed:
- Dark purple nail polish (e.g. Essie “Sexy Divide”)
- Lavender nail polish (e.g. OPI “Do You Lilac It?”)
- Top coat (e.g. Seche Vite Dry Fast Top Coat)
- Sponge for creating the gradient
- Nail file for shaping
How to create at home:
- File your nails into the desired shape.
- Apply the lavender base coat and let it dry completely.
- On a makeup sponge, apply a strip of dark purple nail polish and a strip of lavender polish next to it.
- Dab the sponge onto your nails, starting at the tips and working towards the base to create the gradient.
- Repeat until the desired coverage is achieved.
- Finish with a top coat to seal and protect the design.
Pink and Purple Ombre
This vibrant pink and purple ombre design is a perfect blend of fun and elegance. The color gradient goes from bright pink to deep purple, creating a powerful and striking effect. The glossy finish adds a touch of sophistication, making this design suitable for both casual outings and formal events.
Consumables needed:
- Hot pink nail polish (e.g. OPI “Hotter than You Pink”)
- Deep purple nail polish (e.g. Essie “Bahama Mama”)
- Top coat (e.g. Seche Vite Dry Fast Top Coat)
- Sponge for creating the gradient
- Nail file for shaping
How to create at home:
- File your nails into the desired shape.
- Apply the bright pink base coat and let it dry completely.
- On a makeup sponge, apply a strip of deep purple nail polish and a strip of bright pink nail polish next to it.
- Dab the sponge onto your nails, starting at the tips and working towards the base to create the gradient.
- Repeat until the desired coverage is achieved.
- Finish with a top coat to seal and protect the design.
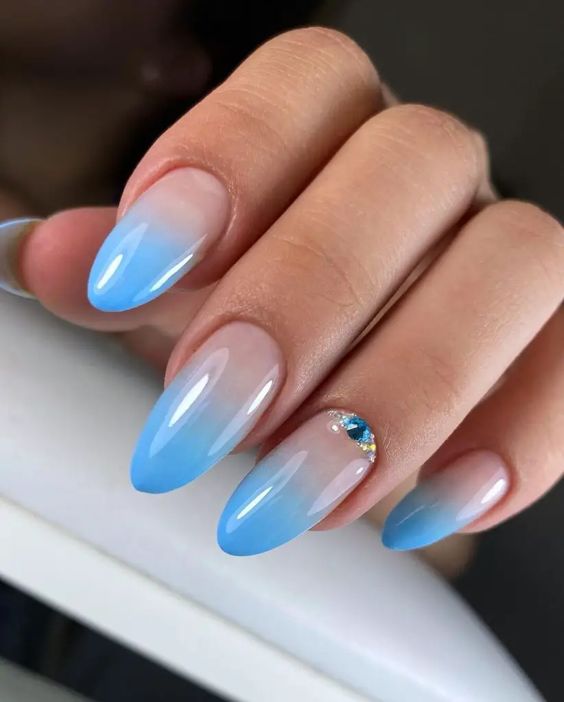
Blue Ombre with accent
Serene and captivating, this blue ombre design transitions from light sky blue at the ends to a soft, natural shade at the base. The single accent nail, decorated with a small gem, adds a touch of sparkle and elegance. This design is perfect for those who love a minimalist yet chic look.
Consumables needed:
- Light blue nail polish (e.g. Essie “Bikini So Teeny”)
- Clear base coat (e.g. Sally Hansen “Hard As Nails”)
- Nail gemstones for accent
- Top coat (e.g. Seche Vite Dry Fast Top Coat)
- Sponge for creating the gradient
- Nail file for shaping
How to create at home:
- File your nails into the desired shape.
- Apply the transparent base coat and let it dry completely.
- On a makeup sponge, apply a strip of light blue nail polish and a strip of clear nail polish next to it.
- Dab the sponge onto your nails, starting at the tips and working towards the base to create the gradient.
- Apply the nail gem to the accent nail.
- Finish with a top coat to seal and protect the design.
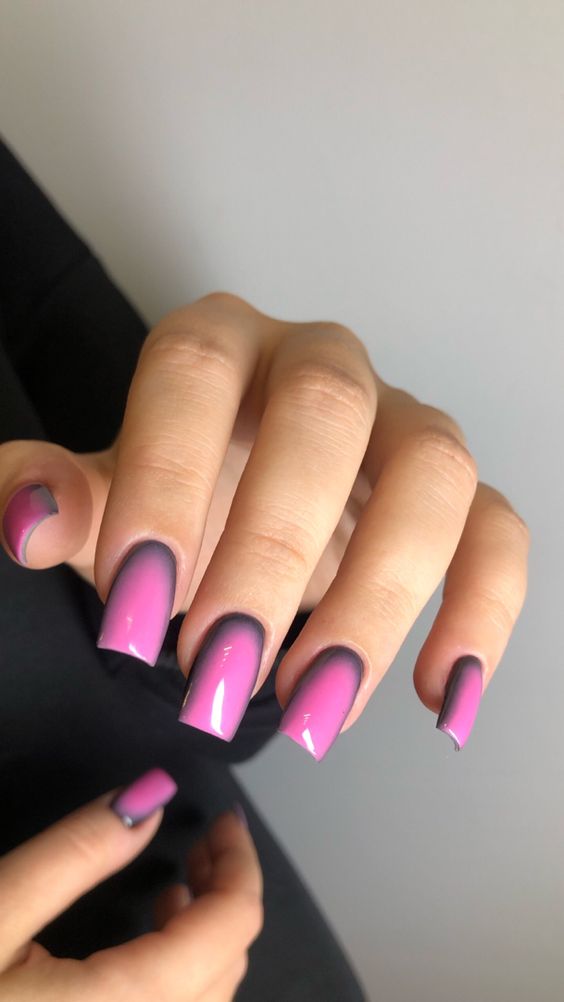
Pink and Black Ombre
This striking pink and black ombre design is bold and daring, perfect for those who like to make a statement. The gradient goes from bright pink to deep black, creating a dramatic and striking effect. The glossy finish enhances the vibrant colours, making this design perfect for a night out or a special occasion.
Consumables needed:
- Hot pink nail polish (e.g. OPI “La Paz-itively Hot”)
- Black nail polish (e.g. Essie “Licorice”)
- Top coat (e.g. Seche Vite Dry Fast Top Coat)
- Sponge for creating the gradient
- Nail file for shaping
How to create at home:
- File your nails into the desired shape.
- Apply the bright pink base coat and let it dry completely.
- On a makeup sponge, apply a strip of black polish and a strip of bright pink polish next to it.
- Dab the sponge onto your nails, starting at the tips and working towards the base to create the gradient.
- Repeat until the desired coverage is achieved.
- Finish with a top coat to seal and protect the design.
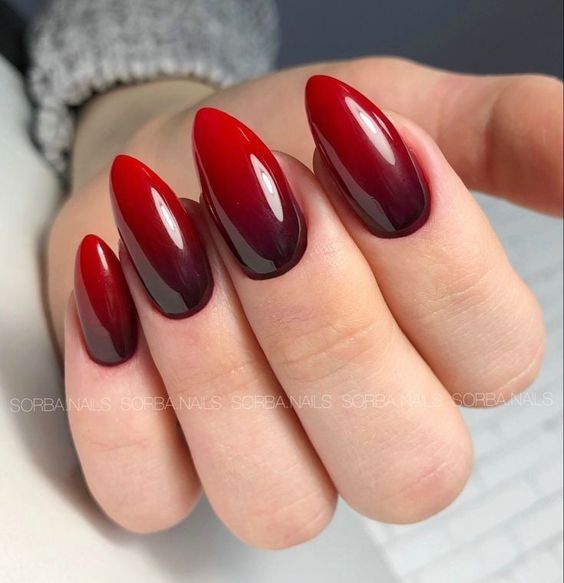
Burgundy Ombre
This classic burgundy ombre design is elegant and timeless, transitioning from deep burgundy at the ends to a softer red at the base. The glossy finish adds a touch of luxury, making your nails look sleek and sophisticated. Perfect for fall, this design is both bold and elegant. It makes a statement without being too flashy.
Consumables needed:
- Burgundy nail polish (e.g. Essie “Bahama Mama”)
- Red nail polish (e.g. OPI “Big Apple Red”)
- Top coat (e.g. Seche Vite Dry Fast Top Coat)
- Sponge for creating the gradient
- Nail file for shaping
How to create at home:
- File your nails into the desired shape.
- Apply the red base coat and let it dry completely.
- On a make-up sponge, apply a strip of burgundy lacquer and a strip of red lacquer next to it.
- Dab the sponge onto your nails, starting at the tips and working towards the base to create the gradient.
- Repeat until the desired coverage is achieved.
- Finish with a top coat to seal and protect the design.
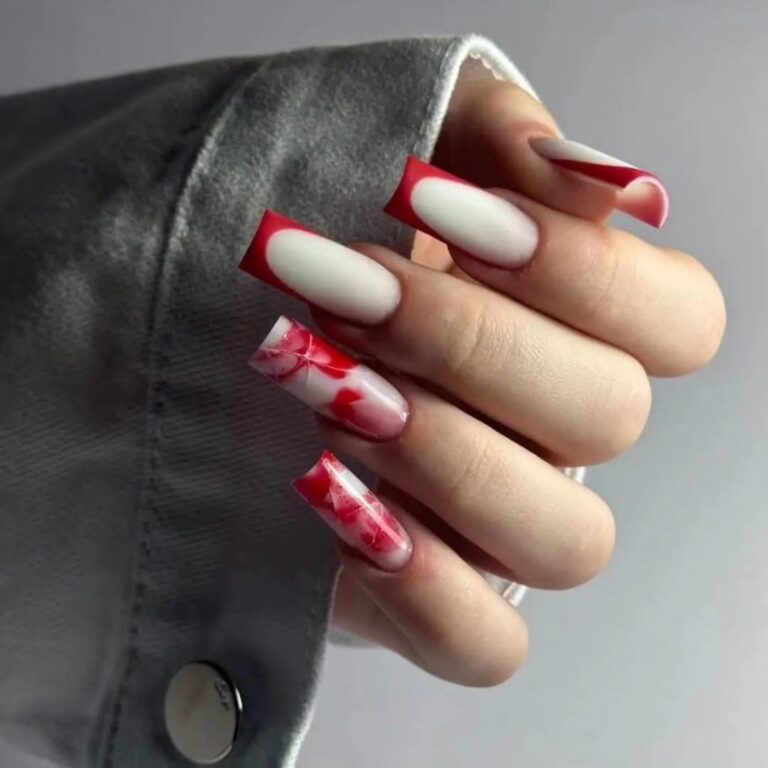
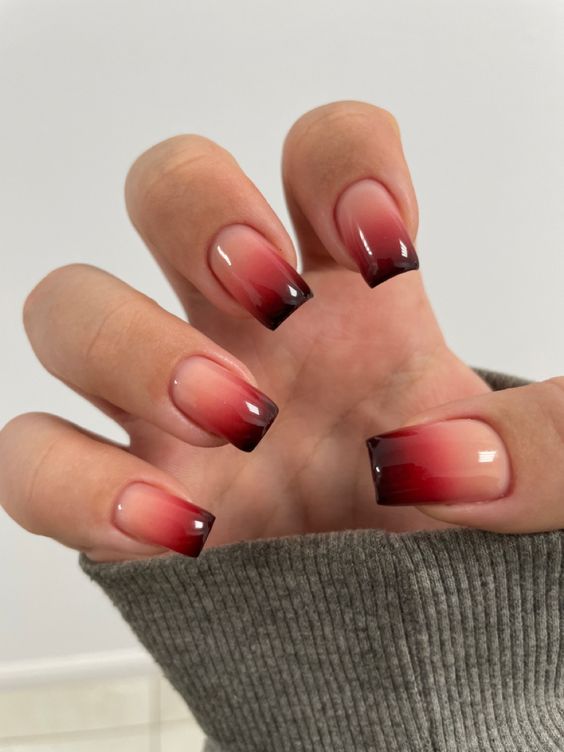
Burgundy French Ombre
This burgundy French ombre design is a modern take on the classic French manicure. The color gradient goes from deep burgundy at the ends to a bright, natural base, creating a refined and elegant look. The square shape adds a chic and contemporary touch, making this design perfect for both casual and formal occasions.
Consumables needed:
- Burgundy nail polish (e.g. Essie “Berry Naughty”)
- Clear base coat (e.g. OPI “Natural Nail Base Coat”)
- Top coat (e.g. Seche Vite Dry Fast Top Coat)
- Sponge for creating the gradient
- Nail file for shaping
How to create at home:
- File your nails into a square shape.
- Apply a clear base coat and let it dry completely.
- On a makeup sponge, apply a strip of burgundy nail polish and a strip of clear polish next to it.
- Dab the sponge onto your nails, starting at the tips and working towards the base to create the gradient.
- Repeat until the desired coverage is achieved.
- Finish with a top coat to seal and protect the design.
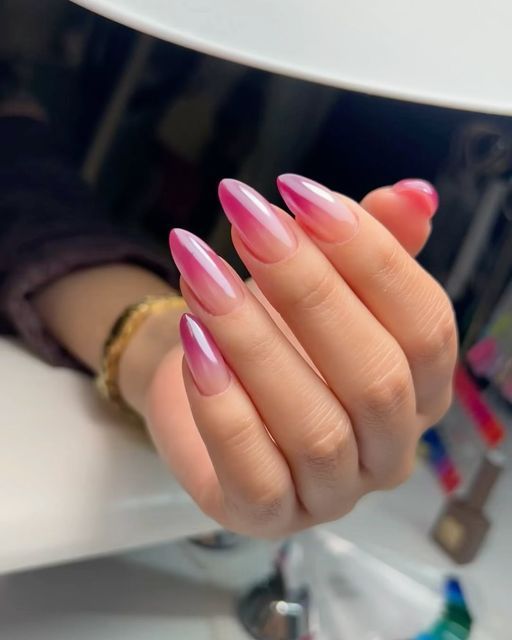
Pink Ombre Delight
This pink ombre design is feminine and beautiful, transitioning from deep pink at the ends to a lighter, almost translucent pink at the base. The almond shape enhances the soft and elegant look, making it perfect for everyday use or special occasions.
Consumables needed:
- Deep pink nail polish (e.g. OPI “Kiss Me on My Tulips”)
- Light pink nail polish (e.g. Essie “Ballet Slippers”)
- Top coat (e.g. Seche Vite Dry Fast Top Coat)
- Sponge for creating the gradient
- Nail file for shaping
How to create at home:
- File your nails in an almond shape.
- Apply the light pink base coat and let it dry completely.
- Apply a strip of deep pink polish on a make-up sponge and a strip of light pink polish next to it.
- Dab the sponge onto your nails, starting at the tips and working towards the base to create the gradient.
- Repeat until the desired coverage is achieved.
- Finish with a top coat to seal and protect the design.
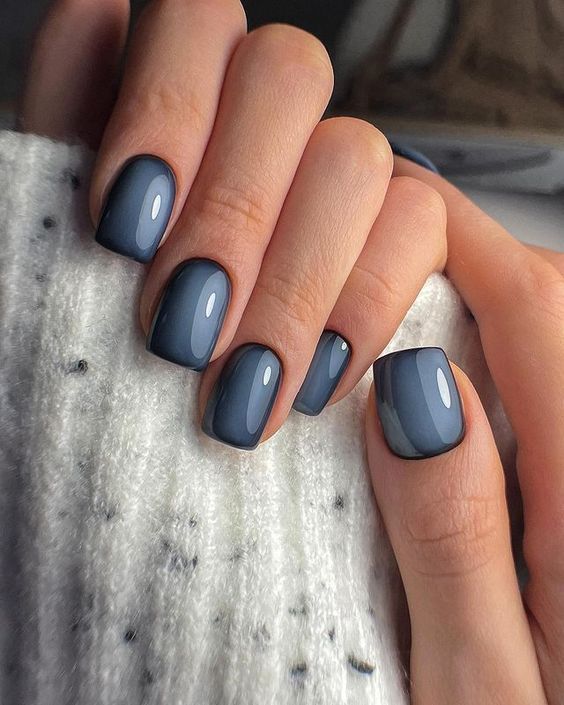
Gray Ombre
This gray ombre design is sleek and modern, transitioning from dark gray at the ends to a lighter gray at the base. The glossy finish gives it a polished and sophisticated look, perfect for those who prefer a minimalist yet chic style. The square shape contributes to the contemporary look of this design.
Consumables needed:
- Dark gray nail polish (e.g. OPI “Suzi & the Arctic Fox”)
- Light gray nail polish (e.g. Essie “Chinchilly”)
- Top coat (e.g. Seche Vite Dry Fast Top Coat)
- Sponge for creating the gradient
- Nail file for shaping
How to create at home:
- File your nails into a square shape.
- Apply the light gray base coat and let it dry completely.
- Apply a strip of dark gray polish on a make-up sponge and a strip of light gray polish next to it.
- Dab the sponge onto your nails, starting at the tips and working towards the base to create the gradient.
- Repeat until the desired coverage is achieved.
- Finish with a top coat to seal and protect the design.
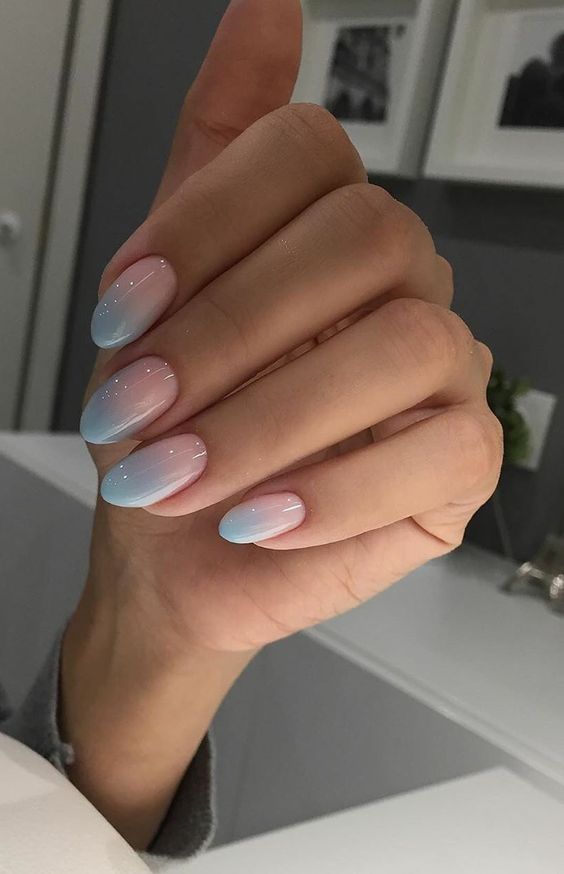
Pastel Blue Ombre
This pastel blue ombre design is soft and soothing, transitioning from light blue at the ends to a bright base. The glossy finish adds a touch of elegance, making it suitable for any occasion. The oval shape complements the delicate gradient and enhances the overall look.
Consumables needed:
- Light blue nail polish (e.g. Essie “Bikini So Teeny”)
- Clear base coat (e.g. Sally Hansen “Hard As Nails”)
- Top coat (e.g. Seche Vite Dry Fast Top Coat)
- Sponge for creating the gradient
- Nail file for shaping
How to create at home:
- File your nails into an oval shape.
- Apply a clear base coat and let it dry completely.
- On a makeup sponge, apply a strip of light blue nail polish and a strip of clear nail polish next to it.
- Dab the sponge onto your nails, starting at the tips and working towards the base to create the gradient.
- Repeat until the desired coverage is achieved.
- Finish with a top coat to seal and protect the design.
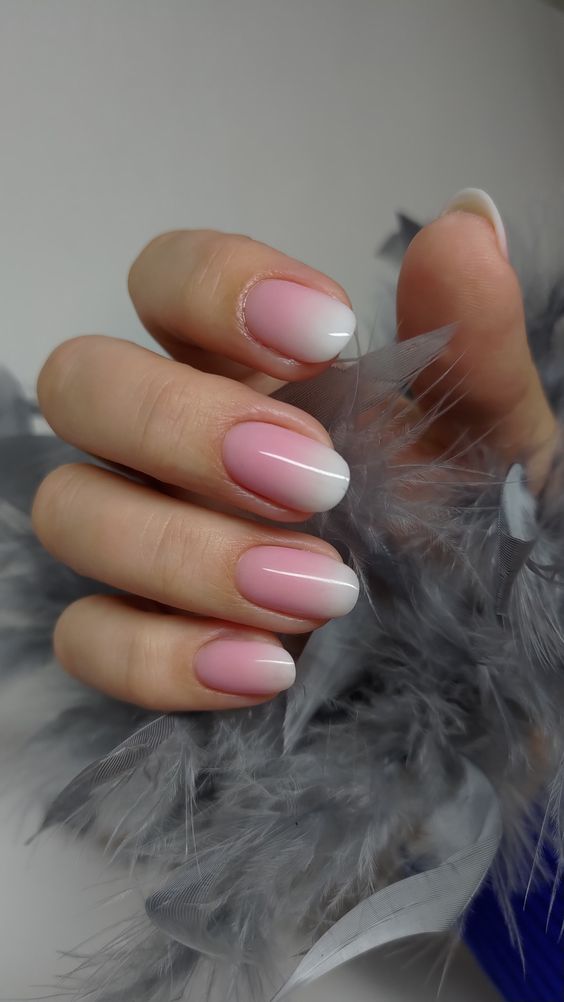
Classic French Ombre
This classic French ombre design is timeless and elegant, transitioning from a soft white tip to a natural pink base. The smooth gradient creates a refined and polished look, perfect for any occasion. The oval shape enhances the delicate and refined appearance of this design.
Consumables needed:
- White nail polish (e.g. OPI “Alpine Snow”)
- Natural pink nail polish (e.g. Essie “Mademoiselle”)
- Top coat (e.g. Seche Vite Dry Fast Top Coat)
- Sponge for creating the gradient
- Nail file for shaping
How to create at home:
- File your nails into an oval shape.
- Apply the natural pink base coat and let it dry completely.
- On a makeup sponge, apply a strip of white nail polish and a strip of natural pink nail polish next to it.
- Dab the sponge onto your nails, starting at the tips and working towards the base to create the gradient.
- Repeat until the desired coverage is achieved.
- Finish with a top coat to seal and protect the design.
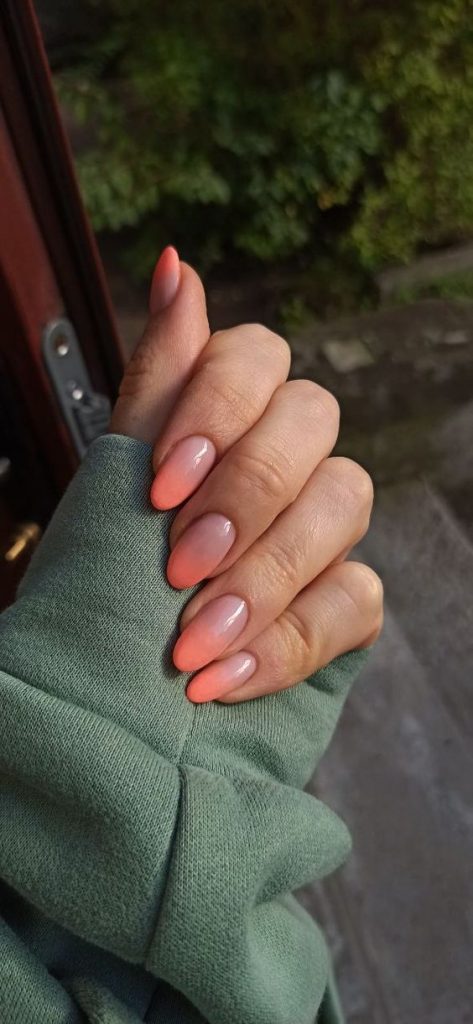
Peach Ombre
This peach ombre design is fresh and vibrant, transitioning from a bright peach at the ends to a soft nude base. The glossy finish adds a touch of sophistication, making it perfect for both casual and formal occasions. The almond shape enhances the lively and playful look of this design.
Consumables needed:
- Clear peach nail polish (e.g. OPI “Cajun Shrimp”)
- Nude base layer (e.g. Essie “Ballet Slippers”)
- Top coat (e.g. Seche Vite Dry Fast Top Coat)
- Sponge for creating the gradient
- Nail file for shaping
How to create at home:
- File your nails in an almond shape.
- Apply the nude base coat and let it dry completely.
- On a makeup sponge, apply a strip of clear peach nail polish and a strip of nude polish next to it.
- Dab the sponge onto your nails, starting at the tips and working towards the base to create the gradient.
- Repeat until the desired coverage is achieved.
- Finish with a top coat to seal and protect the design.

Namie O, a talented writer at Willtiptop, conveys her passion for fashion and beauty in every word she writes. With a keen eye for detail and a deep insight into the latest trends, Namie’s articles and insights captivate readers and provide them with valuable knowledge and inspiration. Through her engaging and informative writing style, Namie aims to empower individuals to explore their style, experiment with beauty techniques, and embrace their unique sense of self.