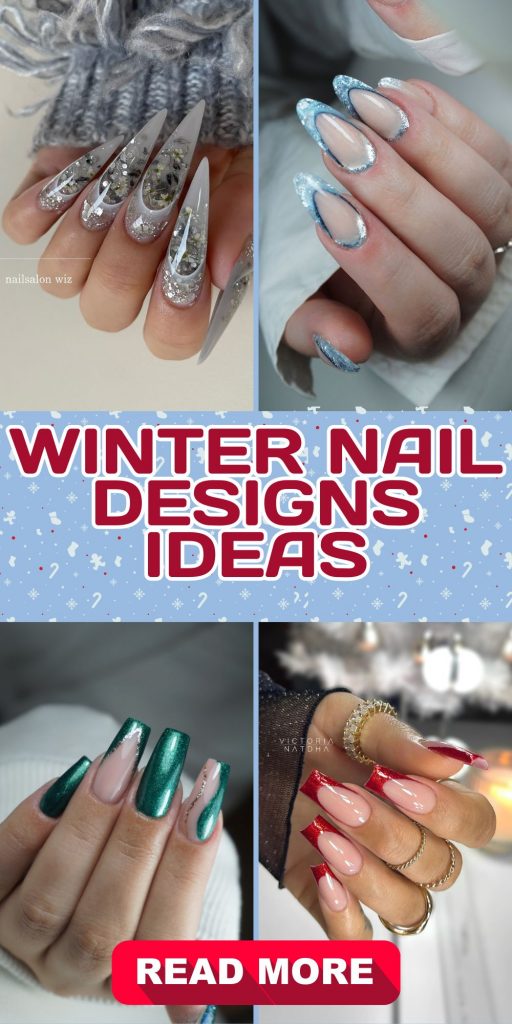
Winter Nail Designs: Stunning 25 Ideas to Try This Season
Winter is here, and there’s no better time to change up your manicure game with fresh and exciting winter nail designs. Whether you’re looking for something simple, stylish or daring, there’s a style for everyone this season. From short to almond-shaped nails, and from white to red, this article will inspire your next winter manicure. Let’s take a look at some of the most striking winter nail ideas, and I’ll guide you in recreating them.
Snowflake inspired winter nail design with bows
Combining soft blue and white tones, this design offers a delicate winter aesthetic with beautiful snowflake accents. The long, coffin-shaped nails have a translucent gradient that transitions from light blue to white, giving the nails a matte appearance. Two of the nails are decorated with elegant white bows, adding a chic touch to this otherwise simple design. The snowflakes are the standout feature, perfect for those who want a cute and stylish winter look.
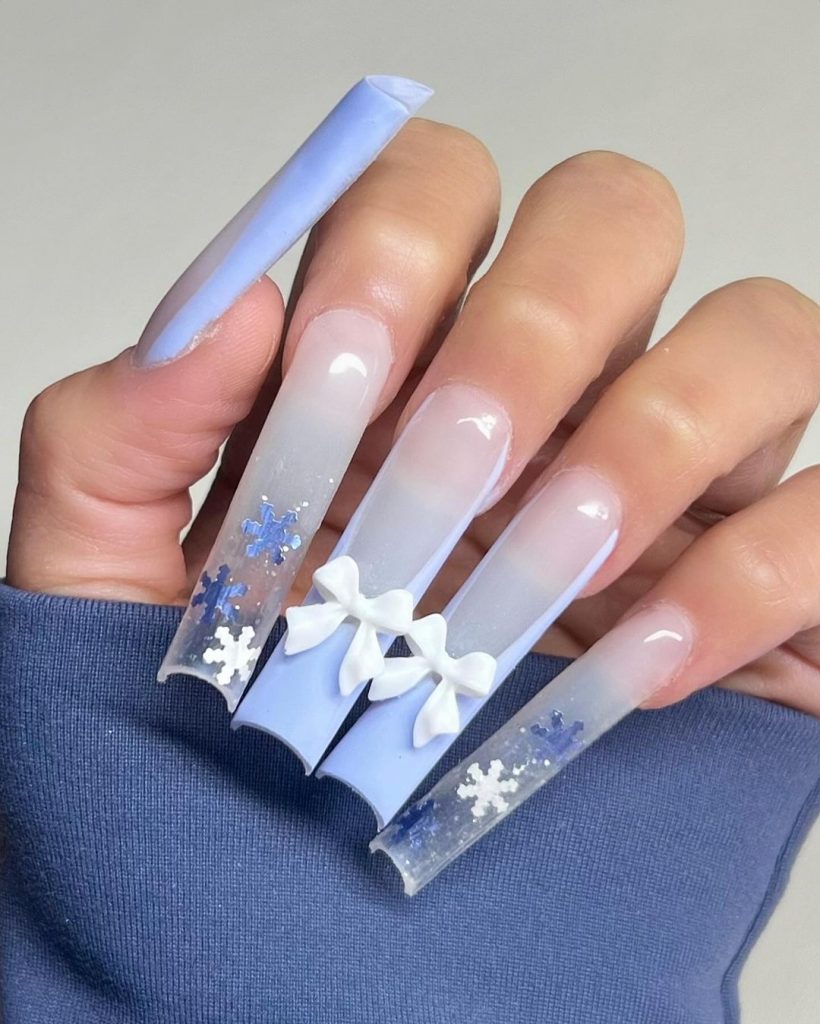
Consumables:
- OPI Nail Lacquer in “Alpine Snow” for the white base
- Essie nail polish in “Bikini So Teeny” for the blue color gradient
- Nail Art Bow Charms for embellishments
- Snowflake nail stickers or hand drawn designs with a thin nail art brush
How to make this design:
- Start by applying a white base coat to all nails.
- Create the blue gradient using a makeup sponge to blend the blue nail polish from the tips to the center of the nails.
- Apply the snowflake stickers or paint the snowflakes by hand with a fine brush.
- Attach the bow charms to two accent nails with nail glue.
- Finish everything off with a high-gloss gel top coat to add durability and shine.
Dark glitter winter nails
This set is for everyone who likes a cool, dark and glamorous look. The nails have a striking deep black base with blue glitter accents that mimic the night sky during winter. Some nails are decorated with delicate snowflake designs, perfect for adding a touch of Christmas cheer. The almond shape gives this manicure an elongated, elegant finish, making it both chic and stylishly simple.
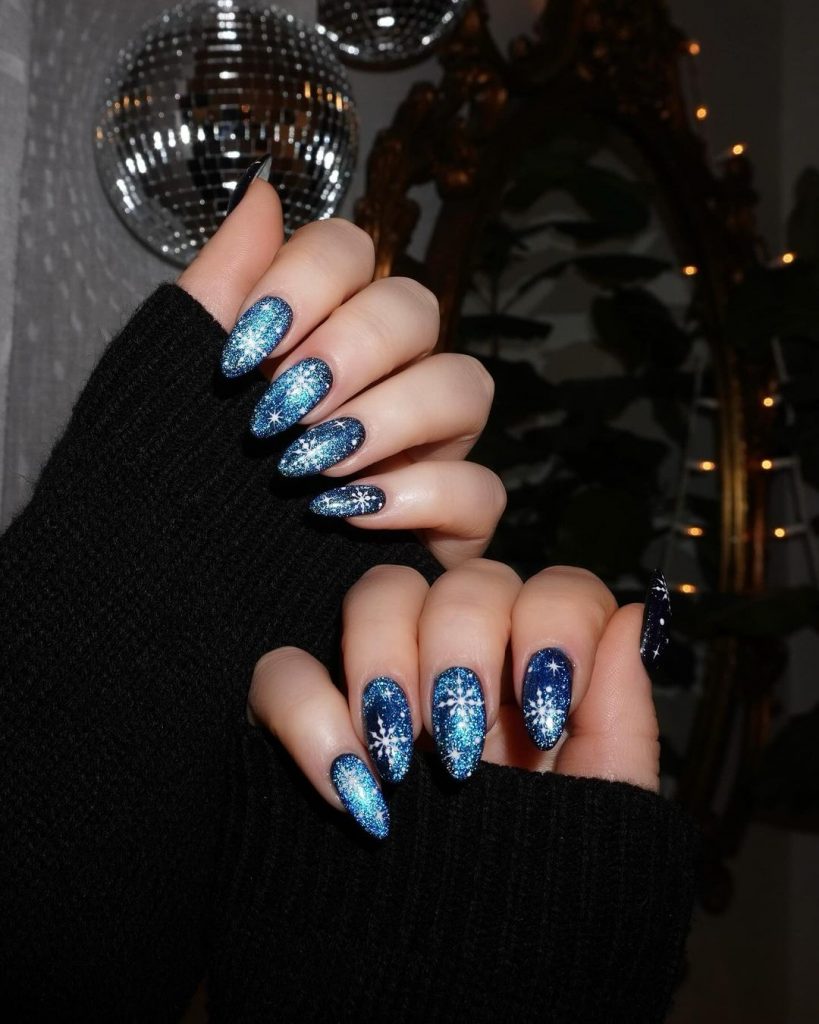
Consumables:
- OPI Nail Polish in “Black Onyx” for the base
- Zoya PixieDust in “Nyx” for the glitter accents
- Nail snowflake stickers or hand-painted designs with white polish
- Almond shaped nail tips for the desired length and shape
How to make this design:
- Apply a black base coat to all nails.
- Use a blue glitter polish on the ring and center nails to create a sparkling effect.
- Use a thin nail brush to paint snowflakes on the index and pinky nails or apply stickers.
- Finish with a gel top coat for a glossy, long-lasting finish.
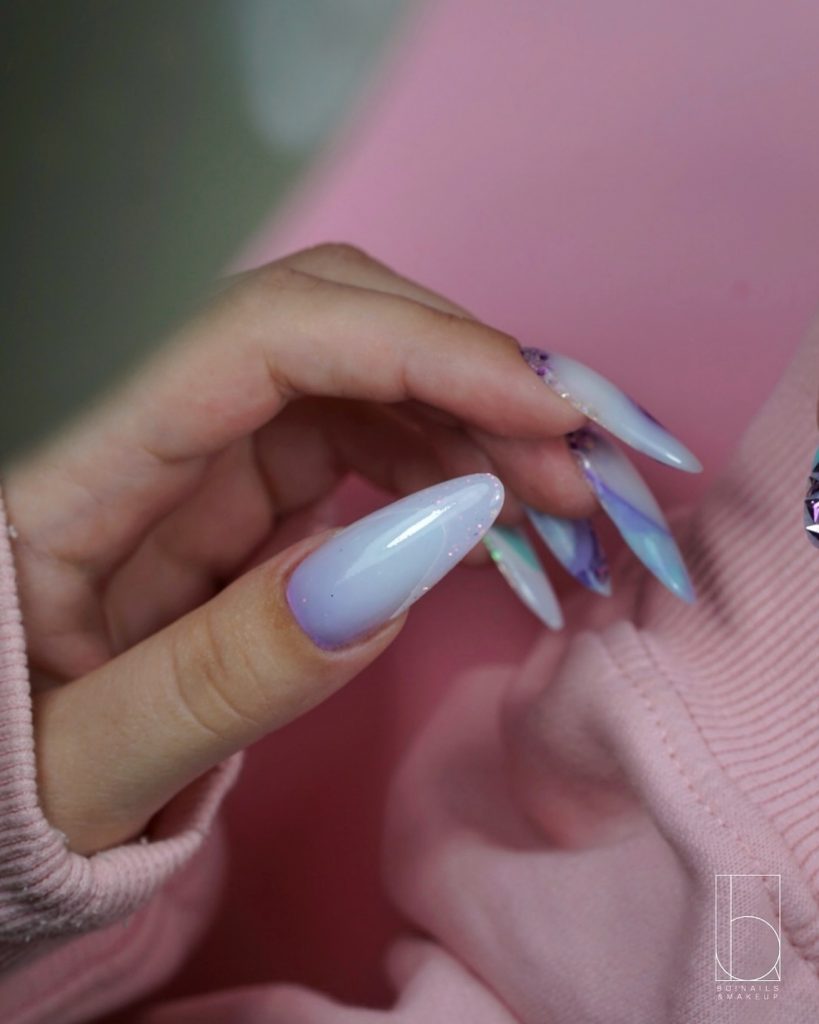
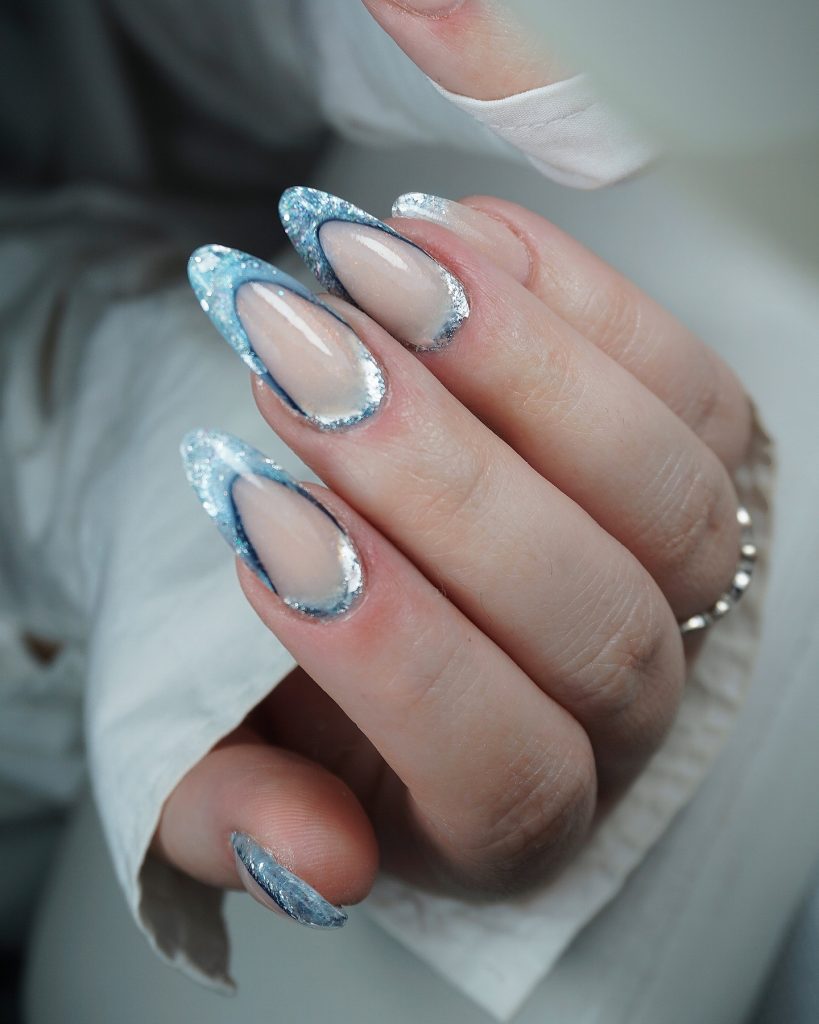
Light blue and glitter coffin nails
This design is all about mixing cute and sparkly elements for a wintery feel. The blue tones are soft and cool, ideal for the winter season. One nail is covered in glitter, while the other has a clear tip with snowflakes above it. The combination of matte and gloss finishes gives this look a fresh and versatile feel, perfect for the upcoming Ideas 2025.
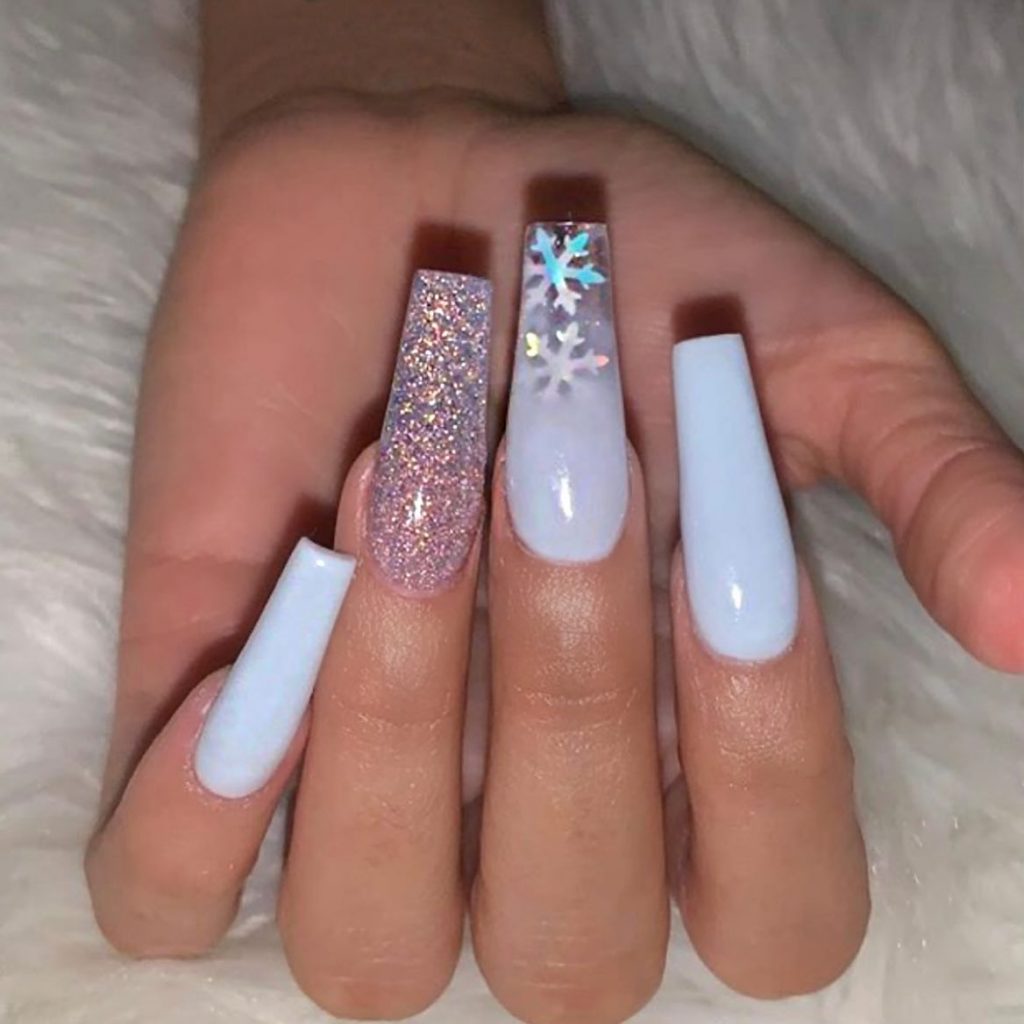
Consumables:
- OPI Nail Polish in “It’s a Boy!” for the light blue
- Essie nail polish in “Set in Stones” for the glitter
- Clear coffin nail tips
- Snowflake stickers or hand drawn snowflakes
How to make this design:
- Start by applying the light blue base to all nails except the accent nail.
- Apply glitter polish to one accent nail for shine.
- On the other accent nail, leave the tip exposed and place snowflake stickers or hand paint them.
- Finish with a gel top coat to secure the design.
Magenta nails with gold star details
If you’re looking for something a little more vibrant yet stylish, these pink magenta nails are for you. The bright color contrasts beautifully with the gold star accents, making this design stand out. The almond shape adds an extra touch of elegance and the minimalist gold details make this manicure suitable for both casual and formal winter occasions.
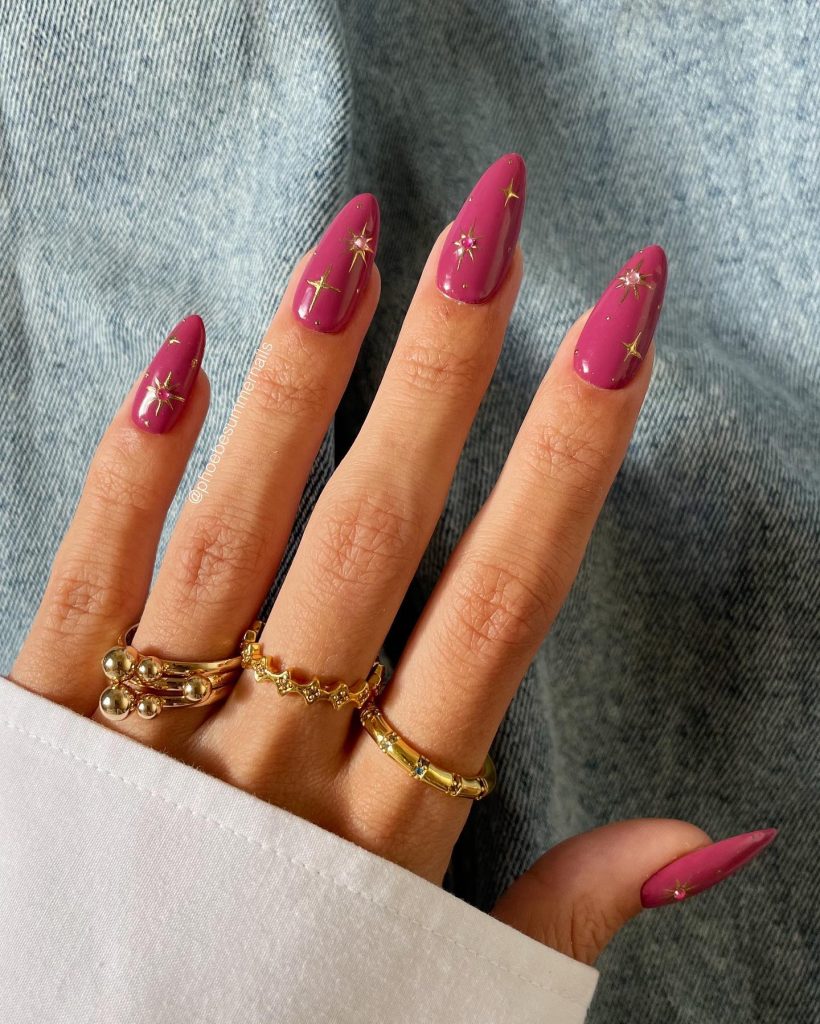
Consumables:
- Essie nail polish in “Big Spender” for the magenta pink
- Gold foil or star nail stickers
- Almond nail tips for shaping
How to make this design:
- Apply two coats of magenta pink nail polish.
- Use tweezers to apply the gold star stickers or paint them by hand with a fine brush.
- Finish with a gel top coat to give the nails a nice and easy finish.
White Snowflake Winter Nail Design
This white snowflake nail design is perfect for those who prefer a simple, clean yet cute winter look. The nails are kept short, making this hairstyle easy to maintain and still look festive. Small snowflake accents and a touch of glitter create a Christmas atmosphere without going overboard. This manicure is ideal for those looking for short yet impactful winter nail designs.
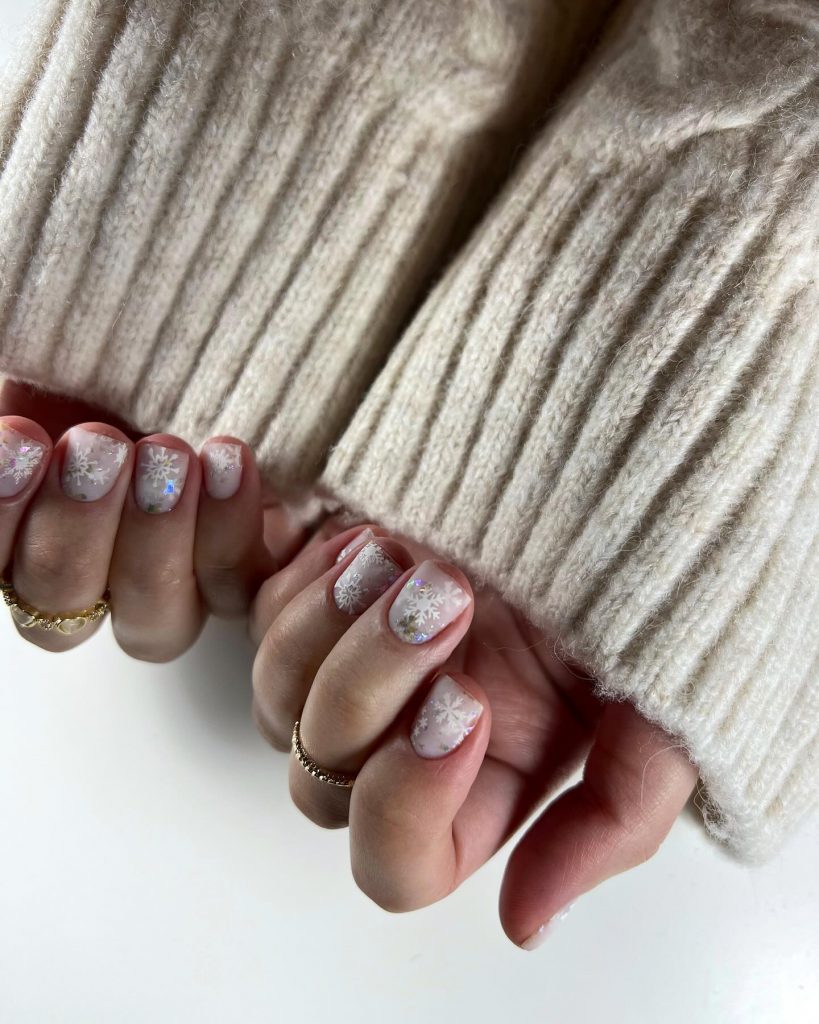
Consumables:
- OPI Nail Lacquer in “Alpine Snow” for the white base
- Glitter top coat for shine
- Snowflake stickers or nail art stamps
- Short round or square nail tips for shaping
How to make this design:
- Apply the white base coat to all nails.
- Add glitter polish to a few accent nails.
- Apply snowflake stickers or stamp them on the nails.
- Finish with a gel top coat to keep the design durable and shiny.
Pastel heart and glitter winter nails
This design gives a playful and romantic atmosphere to winter nail art. It has soft pink and purple shades and combines glitter, hearts and snowflakes for a playful look. The long, coffin-shaped nails provide a perfect canvas for intricate details like mini hearts and rhinestone accents. Using glitter on one nail adds extra sparkle, while the snowflake designs keep a wintery theme. This is perfect for someone looking for a chic yet cute winter manicure.
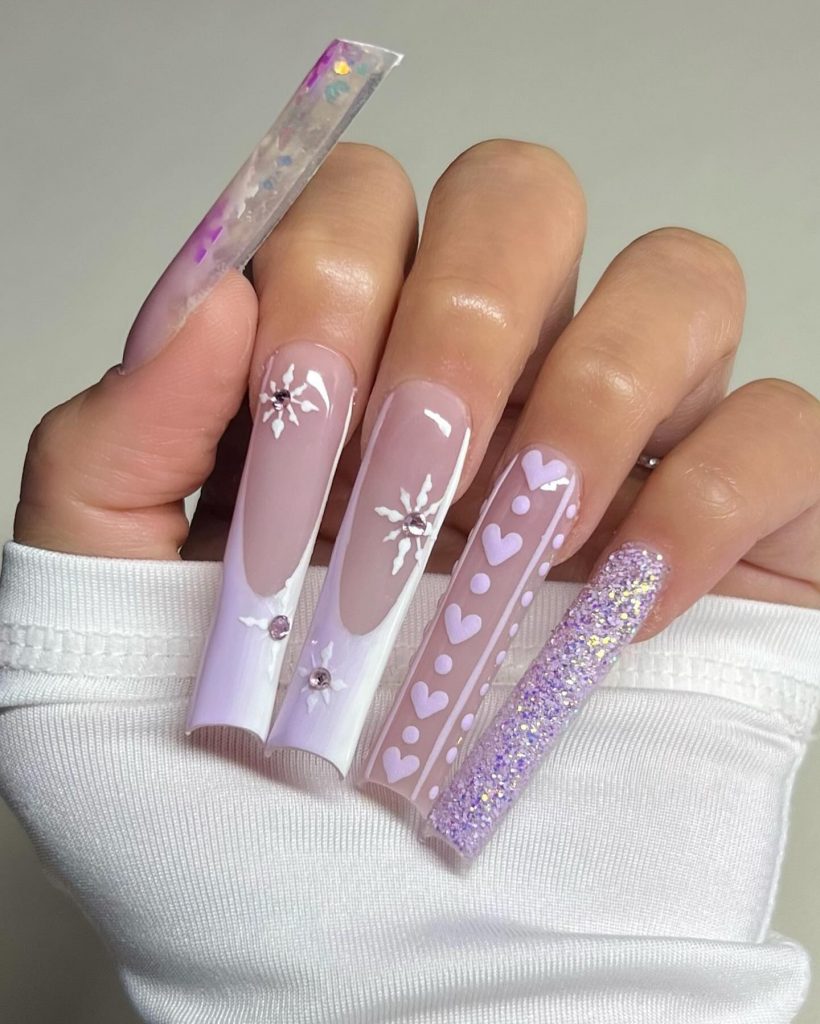
Consumables:
- OPI Nail Lacquer in “Mod About You” for the pink hearts
- Essie nail polish in “Lilacism” for the base
- Glitter nail polish like Sally Hansen’s “Disco Ball”
- Pebbles for the snowflake centers
- Nail art brush for painting hearts and snowflakes
How to make this design:
- Apply a pastel pink and purple base to alternating nails.
- Use a fine brush to paint mini hearts on one nail and a snowflake on the other.
- Apply glitter polish to the accent nail for extra shine.
- Finish with rhinestone details and seal with a gel top coat for a smooth finish.
White snowy winter nails
These white nails embody the essence of winter with delicate snowflakes and subtle stripes that resemble cozy winter sweaters. The matte finish gives a stylish, simple look, while the short box shape makes them practical for everyday use. This design is ideal for those looking for short winter nail designs that are both elegant and easy to maintain.
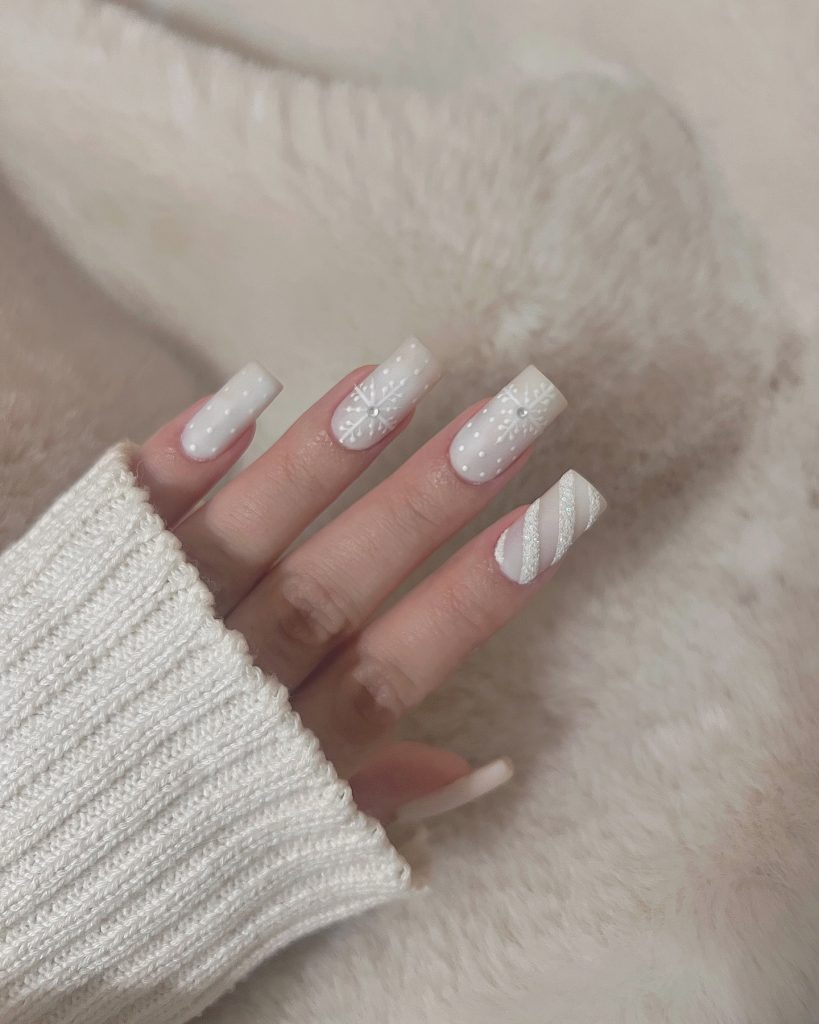
Consumables:
- OPI Nail Lacquer in “Alpine Snow” for the base
- Nail striping tape or thin nail art brush for the striped accent nail
- White snowflake nail stamps or hand painted designs
- Matte top coat for a velvety finish
How to make this design:
- Start with a white base coat on all nails.
- Use striping tape or a nail art brush to create diagonal stripes on one accent nail.
- Stamp or hand-paint snowflakes onto two other nails.
- Finish with a matte top coat for a soft, wintery look.
Gray and white sweater-inspired nails
For those who love a simple yet chic design, these gray and white nails combine classic winter elements like snowflakes and knitted sweater patterns. The mix of gray and white provides a cool, neutral palette that matches any winter outfit. This design is perfect for easy winter nail ideas and also adds some fun texture with the 3D sweater pattern.
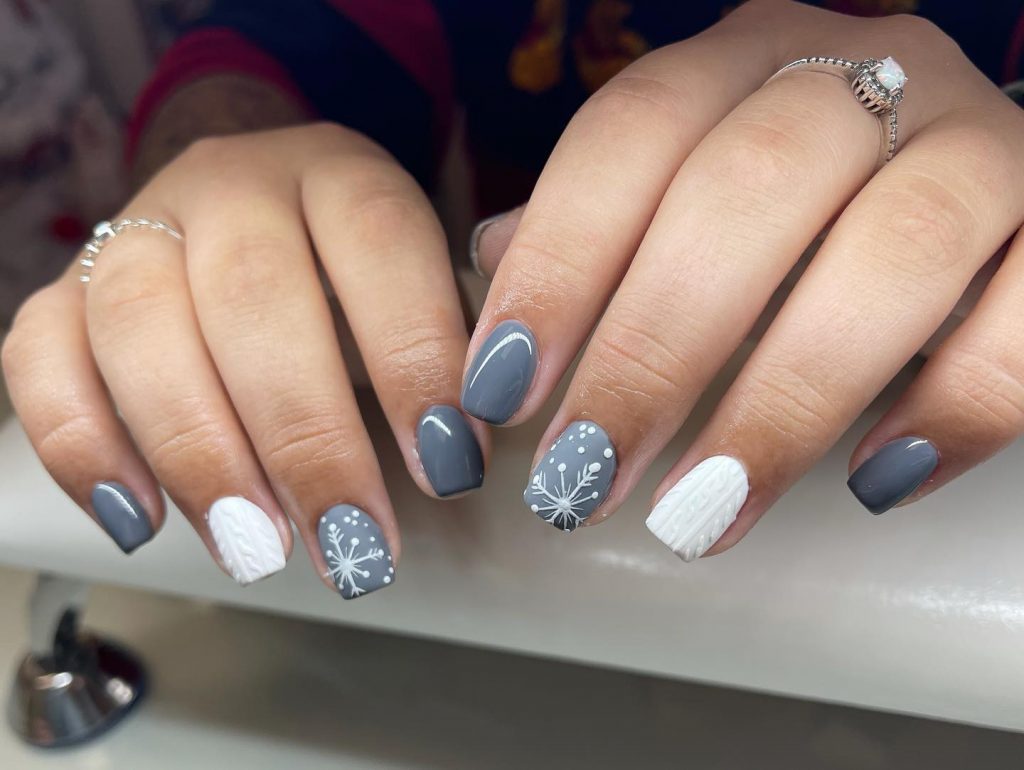
Consumables:
- Essie nail polish in “Masterplan” for gray
- OPI Nail Lacquer in “Alpine Snow” for the white base
- 3D gel polish for the sweater texture effect
- Snowflake nail stamps or hand painted designs
How to make this design:
- Apply a gray base to most nails, but leave two for a white base coat.
- Use 3D gel polish to create a diamond texture on the accent nail.
- Stamp or hand-paint snowflakes onto another accent nail.
- Finish with a gel top coat to maintain the 3D effect.
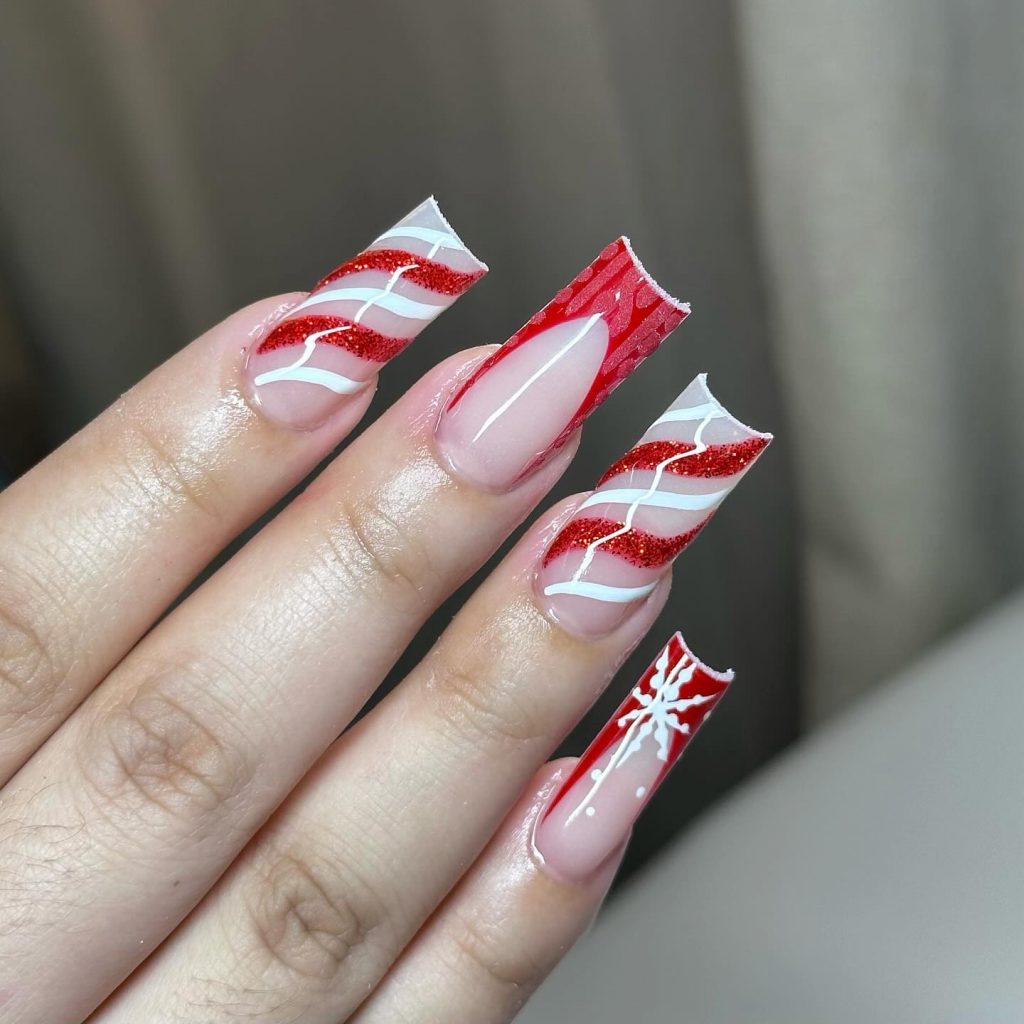
Peppermint Candy Red Winter Nails
These festive red nails are perfect for the holidays. With candy cane swirls and a bold red bow accent, this design embraces the spirit of Christmas. The red glitter accent nail adds a touch of glamour, while the bright tips with peppermint candy patterns offer a playful yet chic winter vibe. This set is ideal for anyone who wants to try winter nail designs in red with a creative twist.
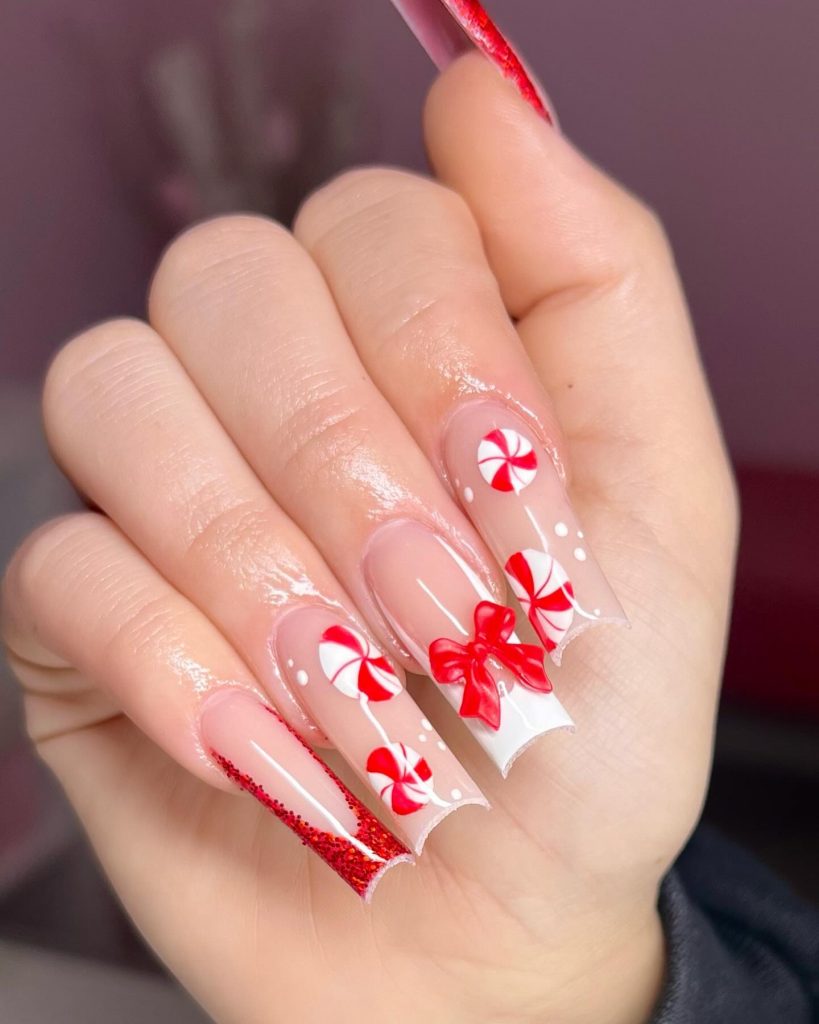
Consumables:
- Essie nail polish in “Really Red” for the base and candy-colored stripes
- Red glitter polish like OPI’s “Big Apple Red”
- Bow nail charms for accent
- Nail art brush for painting peppermint candies
How to make this design:
- Apply a clear base coat to the nails, leaving room for the peppermint swirls.
- Use a thin nail brush to paint candy cane stripes and place a red bow charm on one nail.
- Apply red glitter polish to one accent nail for extra shine.
- Seal with a gel top coat to protect the design and give a glossy finish.
Icy blue almond shaped nails
This blue icy design is perfect for those who love almond shaped nail designs in winter. The soft, ice blue color is decorated with delicate snowflakes, giving the nails a serene and magical winter feeling. The almond shape adds elegance and the subtle shine makes these nails perfect for both casual and formal winter events.

Consumables:
- OPI Nail Lacquer in “I Can Never Hut Up” for the blue base
- White nail art paint for snowflake details
- Fine glitter for an icy shine
- Almond shaped nail tips
How to make this design:
- Apply an icy blue base coat to all nails.
- Use a fine nail art brush to paint intricate snowflakes on each nail.
- Add a light coat of fine glitter to mimic the shine of snow.
- Finish with a gel top coat to give the nails a long-lasting shine.
Glittery short winter nails
This nail design is all about keeping it simple yet cute. The short, round nails are covered with a soft, light pink polish and finished with delicate holographic glitter. The subtle sparkle makes this manicure perfect for everyday use, while still maintaining the festive winter nail design vibe. Ideal for those who prefer a stylish, simple look that is easy to maintain. This design offers chic and effortless winter style.
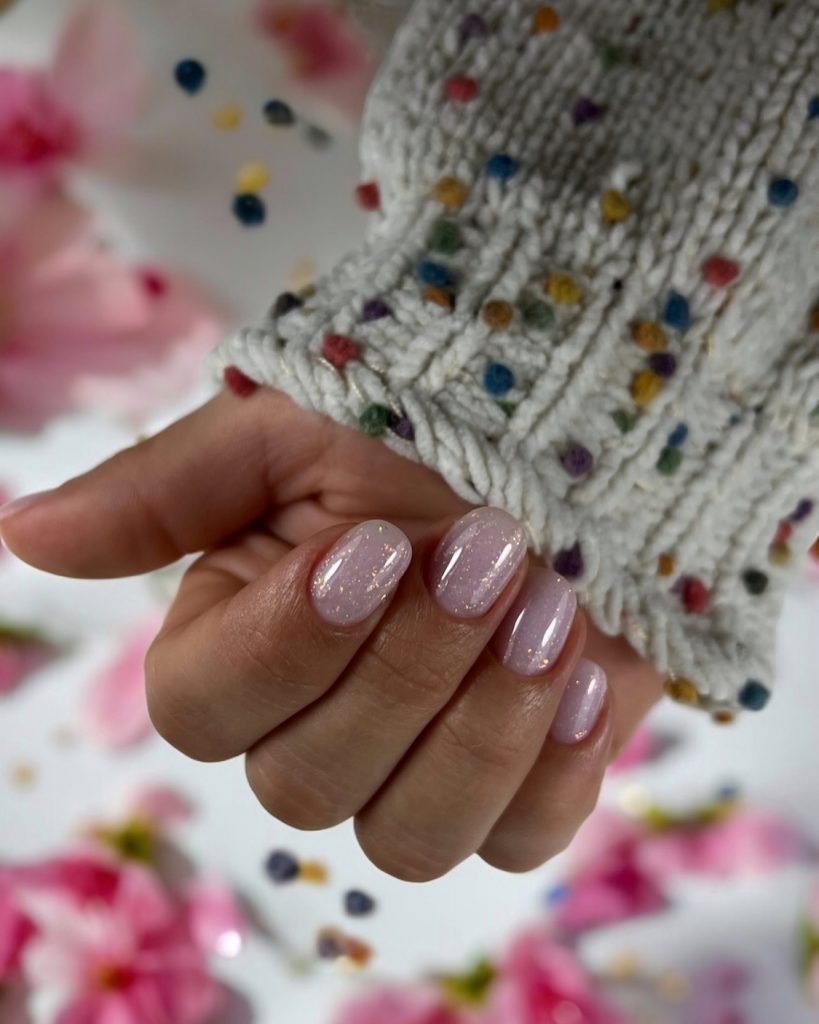
Consumables:
- OPI Nail Lacquer in “Bubble Bath” for the light pink base
- Essie Top Coat in “Summit of Style” for the holographic glitter
- Rounded short nail tips for easy maintenance
How to make this design:
- Start by applying two coats of light pink nail polish.
- Add a coat of glitter polish to create a subtle shine.
- Top everything off with a high-shine gel top coat to enhance the glitter and make it last longer.
Cute winter nails with an animal theme
This cute and playful design features adorable winter-themed animals such as penguins, foxes and reindeer. The red and white color scheme, along with glitter and detailed animal artwork, make this manicure festive and playful, perfect for Christmas. The long almond shape of the nails allows for intricate designs, making this a striking winter nail design for the holidays.
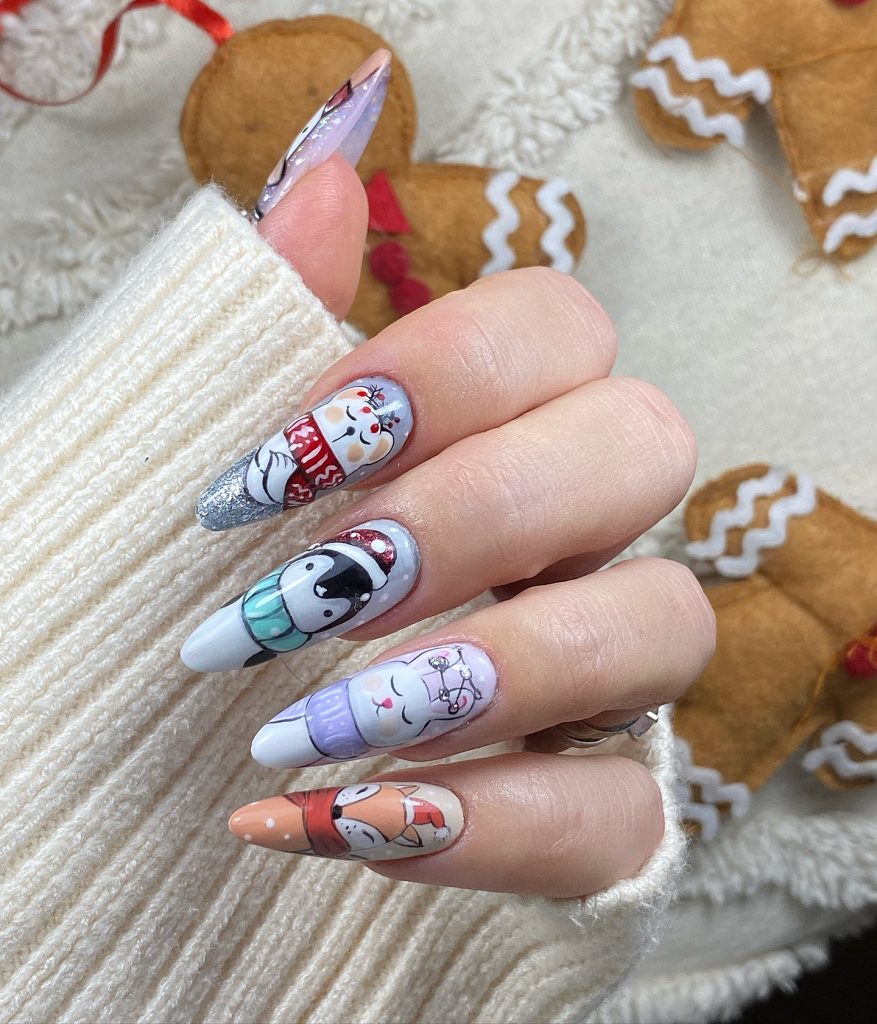
Consumables:
- Essie nail polish in “Blanc” for the base
- OPI Nail Polish in “Big Apple Red” for accent details
- Nail art brushes and stamping tools for animal designs
- Glitter top coat for extra shine
How to make this design:
- Apply a white base coat to all nails.
- Use fine nail art brushes to create the detailed animal figures on each nail.
- Add red accents for a festive touch and finish with a glitter top coat for a festive shine.
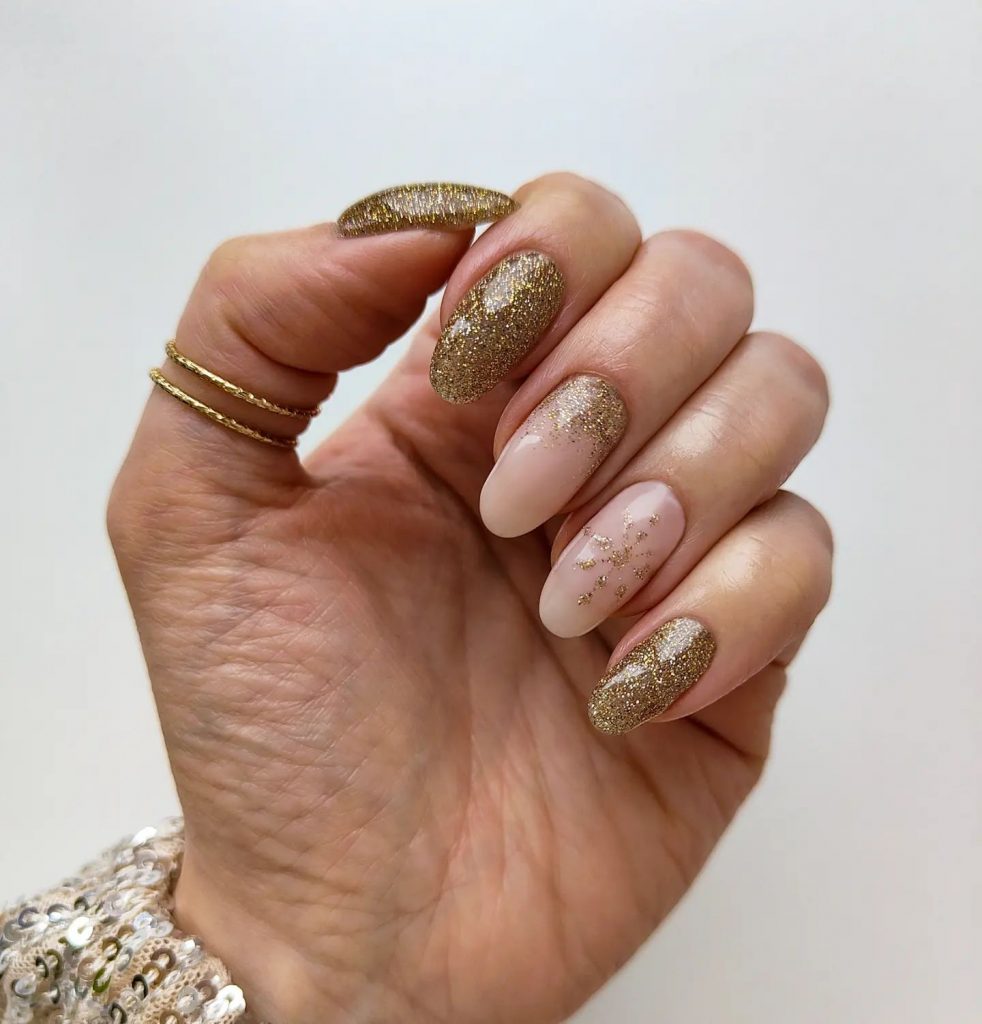
Gold and white glitter almond nails
This elegant nail design combines gold glitter and white accents for a stylish, simple winter look. The almond shape gives the nails a refined edge, while the white snowflake gives a festive touch. One nail features a full glitter finish, creating a perfect balance between shine and subtlety. This look is ideal for those who want winter nail designs that are stylish enough for both everyday wear and special occasions.
Consumables:
- OPI Nail Lacquer in “Love.Angel.Music.Baby” for the gold glitter
- Essie Nail Polish in “Blanc” for the white accents
- Nail art brush for painting snowflakes
How to make this design:
- Start by applying a gold glitter base to one nail and a white base to the other.
- Use a nail art brush to paint delicate snowflakes on two of the nails.
- Finish with a gel top coat for a long-lasting, festive look.
Icy blue gradient nails
These blue gradient nails capture the cool essence of winter with their icy, shimmering effect. The long almond shape combined with the soft, gradient blue creates an ethereal, icy atmosphere. This design is perfect for anyone looking for blue winter nail designs that are both chic and subtle. The ombre effect adds depth, while the shimmer brings out a glittery elegance.
Consumables:
- OPI Nail Lacquer in “I Can Never Hut Up” for the blue gradient
- Makeup sponge for creating the ombre effect
- Fine glitter powder for a shiny finish
How to make this design:
- Apply a light blue base to all nails.
- Use a makeup sponge to apply a dark blue nail polish from the tips and blend it halfway down the nail for a gradient effect.
- Dust lightly with fine glitter powder for extra shine and seal with a gel top coat.
Green and white festive bow nails
This elegant green and white manicure is perfect for the holidays, featuring intricate designs such as a small bow and festive leaves. The almond shape adds sophistication, while the matte green accents contrast beautifully with the glossy white. Perfect for a stylish winter event or casual gatherings, this winter nail design is understated yet festive.
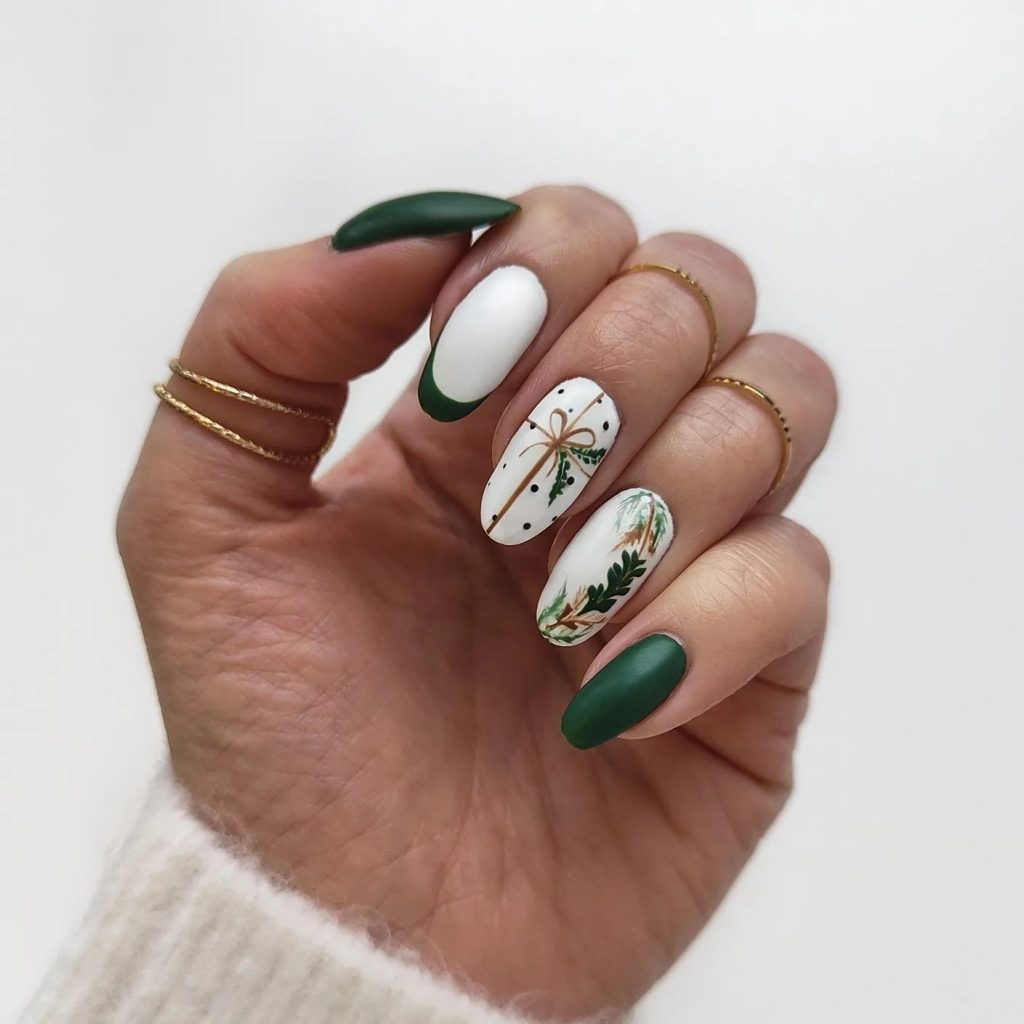
Consumables:
- OPI Nail Lacquer in “Alpine Snow” for the white base
- Essie Nail Polish in “Off Tropic” for the green accents
- Fine nail art brush for creating the bow and foliage
How to make this design:
- Apply a white base coat to two nails and a green base to the other.
- Use a fine brush to paint detailed leaves and a small bow on the accent nails.
- Finish with a matte top coat for the green nails and a glossy gel top coat for the white nails to create contrast.
Glitter French Tip winter nails
This stylish, simple French tip design adds a winter sparkle with a glittery twist. The nails have a nude base with white French tips, but the highlight is the accent nail, which is completely covered in silver glitter. This combination of subtle elegance and festive shine makes it perfect for winter nail designs that are both chic and minimalist. The coffin shape creates a chic, elongated look, perfect for any holiday event.
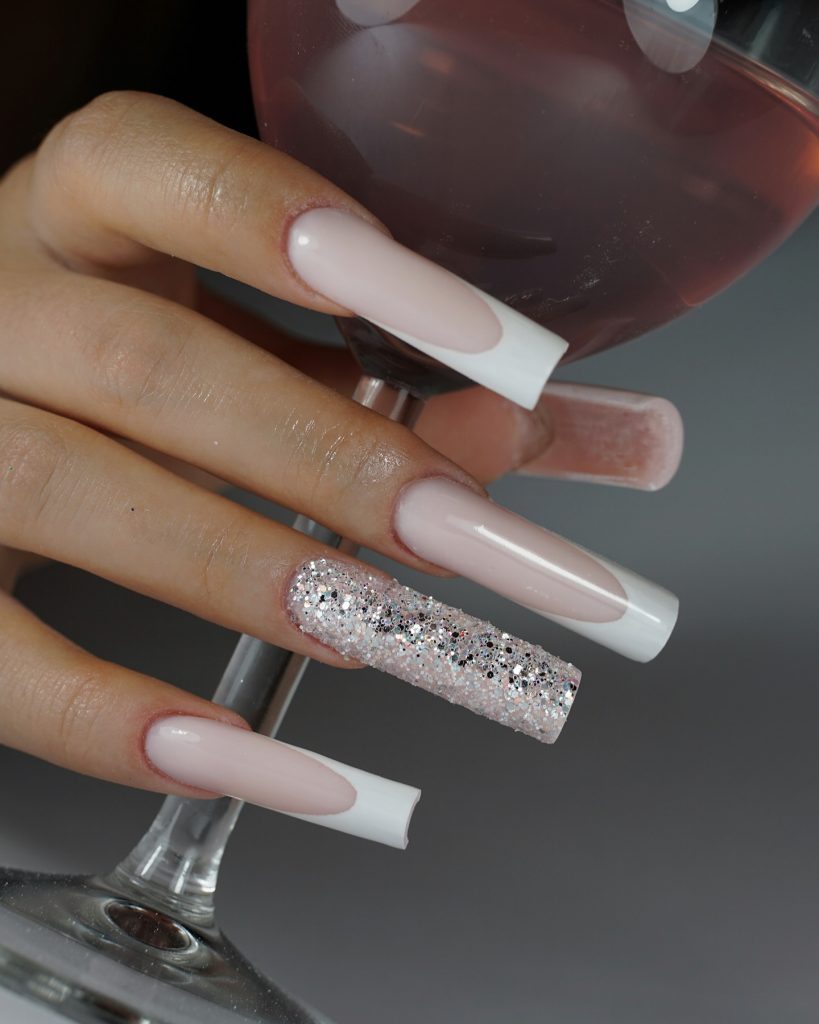
Consumables:
- OPI Nail Polish in “Bubble Bath” for the nude base
- Essie nail polish in “Blanc” for the French tips
- Glitter polish like OPI’s “Pirouette My Whistle” for the accent nail
- Clear gel top coat for extra shine
How to make this design:
- Start by applying a nude base coat to all nails.
- Paint the French tips with a fresh white polish, leaving one nail for the glitter accent.
- Apply a silver glitter polish to the accent nail.
- Seal the design with a clear gel topcoat to improve shine and longevity.
Gold glitter almond nails
This elegant winter design uses gold glitter to create a luxurious and festive look. The almond shape provides a refined edge, while the glitter accents catch the light beautifully. One of the nails features a delicate snowflake detail, making this a great choice for those looking for winter nail designs that are stylish, simple, yet gorgeous enough for special occasions.
Consumables:
- OPI Nail Polish in “Samoan Sand” for the base
- Essie nail polish in “Summit of Style” for the gold glitter
- Nail art brush for painting the snowflake detail
- Fine glitter powder for extra sparkle
How to make this design:
- Start by applying a nude base coat to all nails.
- Apply gold glitter polish to two nails, leaving one nail for snowflake details.
- Use a fine nail art brush to create a small snowflake on the accent nail.
- Seal with a clear gel top coat for extra protection and shine.
Frosted blue glitter almond nails
These blue matte nails add an icy touch to your winter nail designs. With a soft blue glitter accentuating the edges of the almond-shaped nails, this design creates a glamorous matte effect that mimics icy windows. This design is perfect for lovers of a chic look and will make your nails stand out in the coldest months of the year.
Consumables:
- Essie nail polish in “Find Me an Oasis” for the light blue base
- Zoya nail polish in “Dream” for the blue glitter
- Fine nail art brush for outlining the matte design
How to make this design:
- Apply a nude base coat to all nails.
- Use a fine nail art brush to outline the matte edges with blue glitter polish.
- Gradually fill in the edges to create a matte, gradient look.
- Seal with a gel top coat for extra shine and durability.
Pink glitter French tip
For a delicate and cute winter look, these pink glitter French tips are perfect. The nails are kept short and round, making them practical yet adding a festive touch. The pink glitter adds a subtle sparkle and gives a soft but glamorous atmosphere. This design is ideal for those who prefer short winter nail designs that still stand out.

Consumables:
- OPI Nail Polish in “Bubble Bath” for the pink base
- Essie nail polish in “Set in Stones” for the glitter French tips
- Clear gel top coat for shine and durability
How to make this design:
- Start by applying a light pink base coat to all nails.
- Use a fine brush to apply glitter polish along the ends.
- Finish with a gel top coat for a glossy, long-lasting finish.
Emerald coffin nails
This dark and rich emerald green design is perfect for a luxurious winter nail design. The metallic green color is accented with a negative space design on one nail, creating a chic and modern twist. The coffin shape and metallic sheen make this manicure a beautiful choice for any winter occasion, as it exudes a bold and chic vibe.
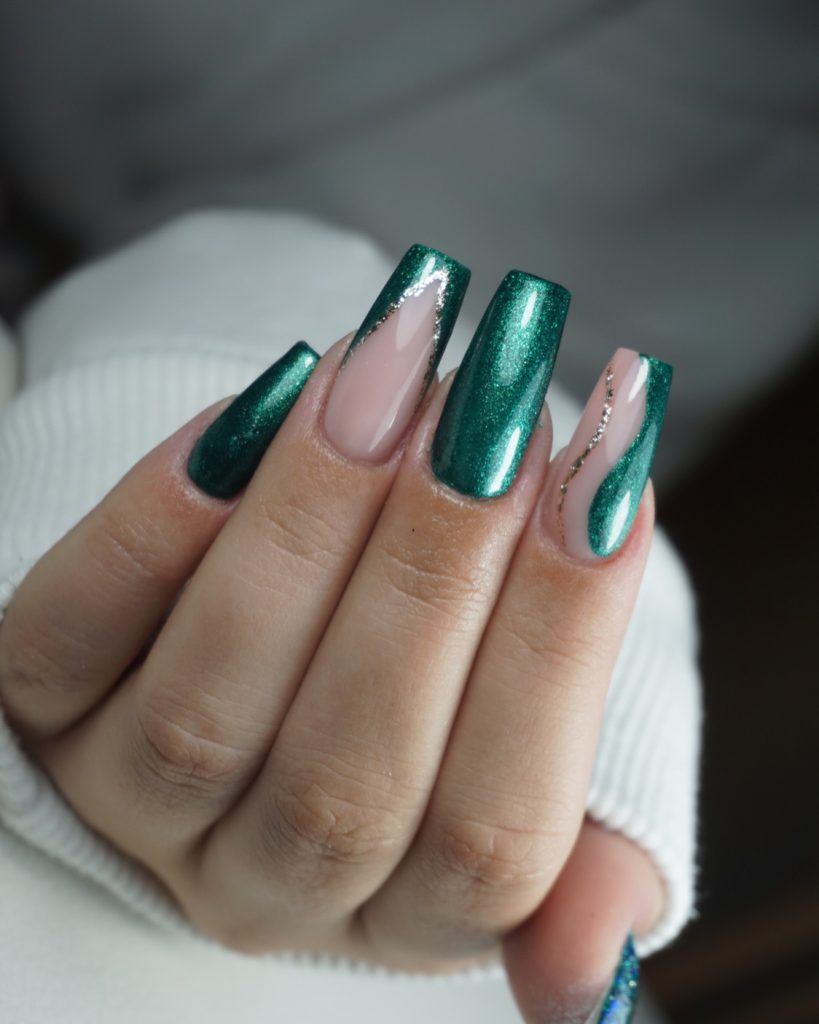
Consumables:
- Essie nail polish in “Off Tropic” for the deep green base
- Fine nail art brush for creating the negative space detail
- Metallic gel polish for the gloss effect
How to make this design:
- Apply the green base coat to all nails.
- Use a fine nail art brush to create the negative space design on one accent nail.
- Apply a thin line of metallic polish along the edge of the negative space for extra definition.
- Seal the entire design with a gel top coat to add shine and durability.
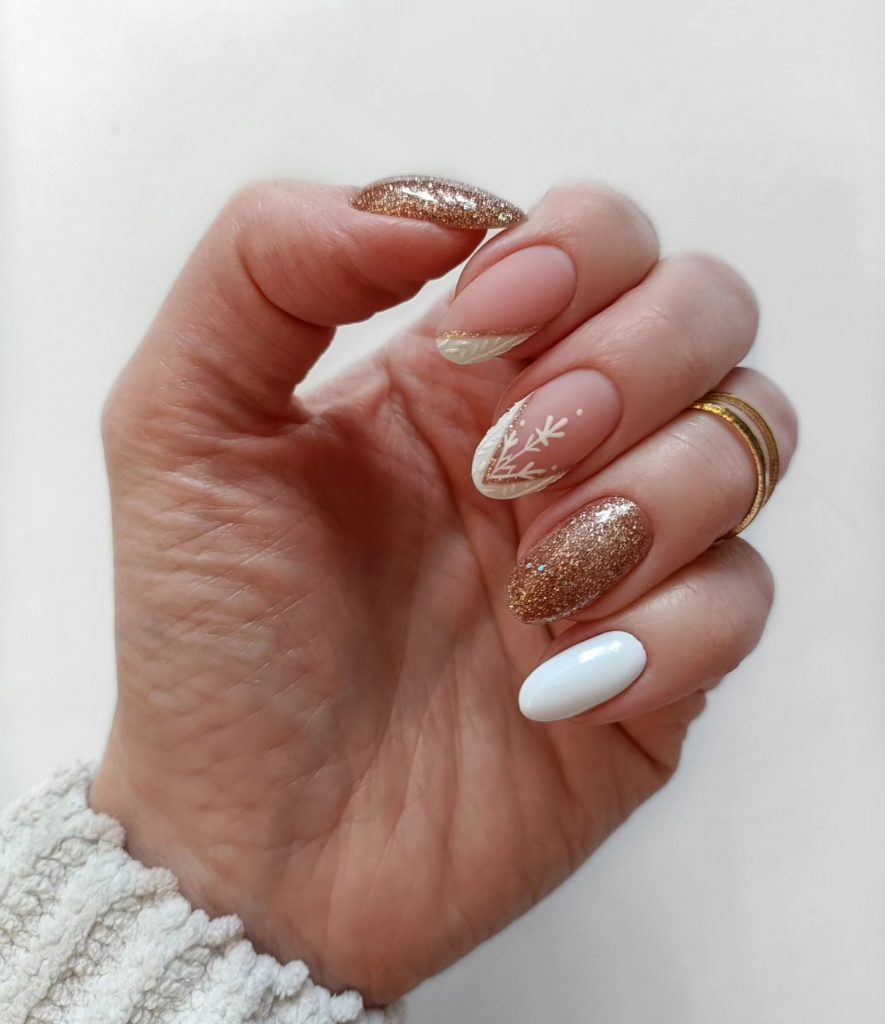
Snowflake white glitter nails
This ice white glitter design is a winter wonderland on your nails. Featuring delicate snowflakes painted on a matte white base, the entire design is dusted with fine glitter for a sparkling effect. The almond shape adds elegance and the rhinestone accent provides a touch of luxury, making this a perfect winter nail design for both everyday use and special occasions.
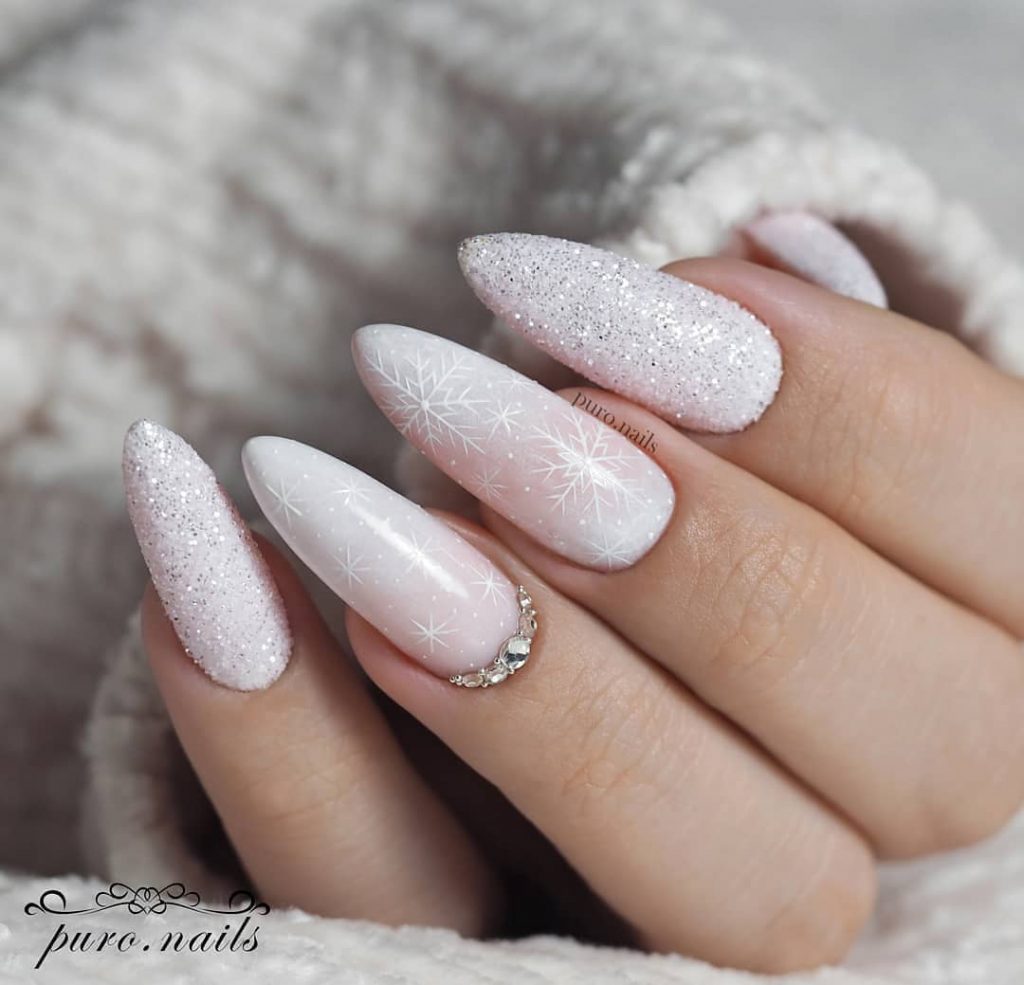
Consumables:
- OPI Nail Lacquer in “Alpine Snow” for the base
- Essie nail polish in “Set in Stones” for the glitter
- Fine nail art brush for snowflake details
- Stones for extra luxury
How to make this design:
- Apply a white base coat to all nails.
- Use a fine brush to paint snowflakes over two accent nails.
- Apply glitter polish to the rest of the nails to ensure even coverage.
- Add rhinestones to the base of one nail and finish with a gel top coat to seal everything.
Candy Cane red glitter nails
This red and white striped manicure brings festive cheer with a candy-inspired design. The red glitter provides a strong, sparkling contrast with the white stripes, giving the nails a festive and cute Christmas atmosphere. The box’s square shape keeps the design sleek and modern, while the snowflake accent nail adds a wintery touch.
Consumables:
- OPI Nail Lacquer in “Big Apple Red” for the red base
- Essie nail polish in “Blanc” for the stripes
- Red glitter polish like “Ruby Pumps” from China Glaze
- Fine nail art brush for the snowflake design
How to make this design:
- Start by applying a clear base coat.
- Use a fine nail brush to create red glitter and white stripes for a candy cane effect.
- Paint a snowflake design on one accent nail for a wintery feel.
- Finish with a high-gloss gel top coat for long-lasting shine.
Gold glitter snowflake nails
This design combines a soft pink base with elegant gold glitter accents and delicate white snowflakes. The nails are short and square in shape and offer a more practical but equally festive look. Perfect for anyone who wants short winter nail designs, this manicure combines festive elegance with easy wearability.
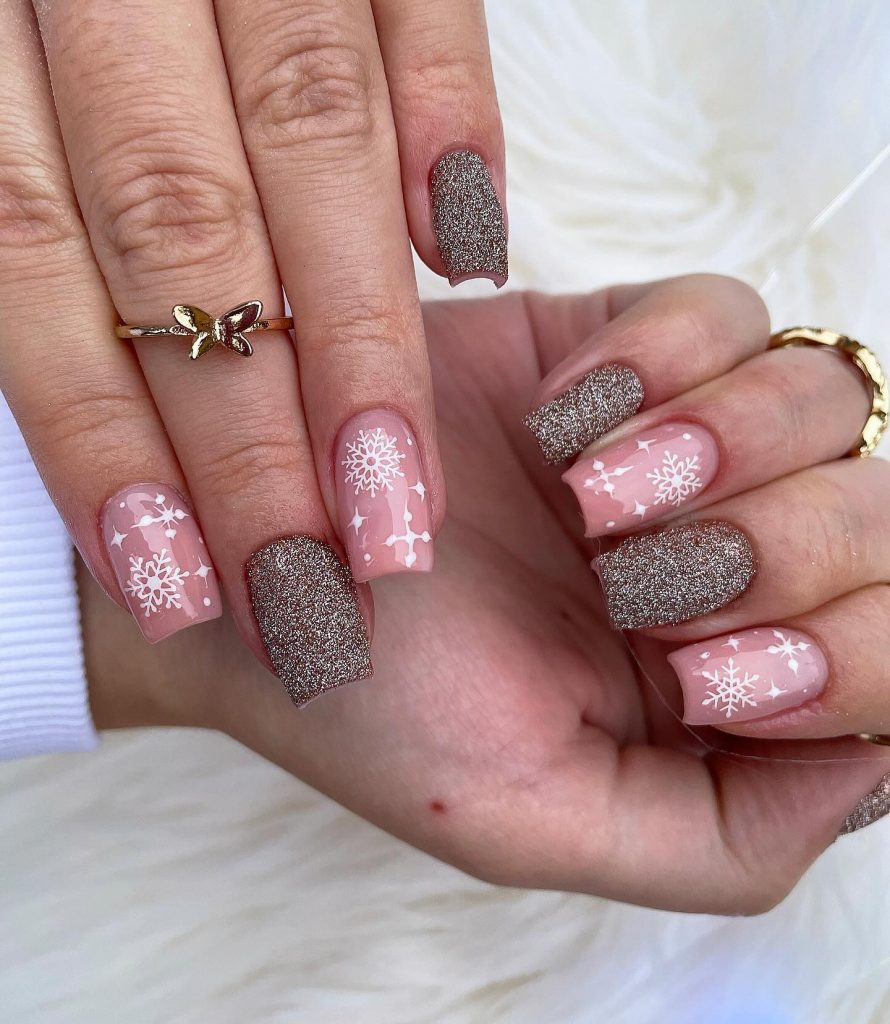
Consumables:
- OPI Nail Lacquer in “Be There in a Prosecco” for the pink base
- Essie nail polish in “Summit of Style” for the gold glitter
- Fine nail art brush for snowflake details
- Gel top coat for a glossy finish
How to make this design:
- Apply a soft pink base to all nails.
- Add gold glitter to two nails for accents.
- Paint white snowflakes on the remaining nails for a festive touch.
- Seal with a clear gel top coat for shine and durability.
Red Glitter French Tip Nails
This glamorous French tip design with red glitter is a bold take on the classic French manicure. The clear base gives a modern twist, while the red glitter tips make the nails stand out. The shape of the coffin enhances its elegance, making this design perfect for a Christmas party or any festive occasion.
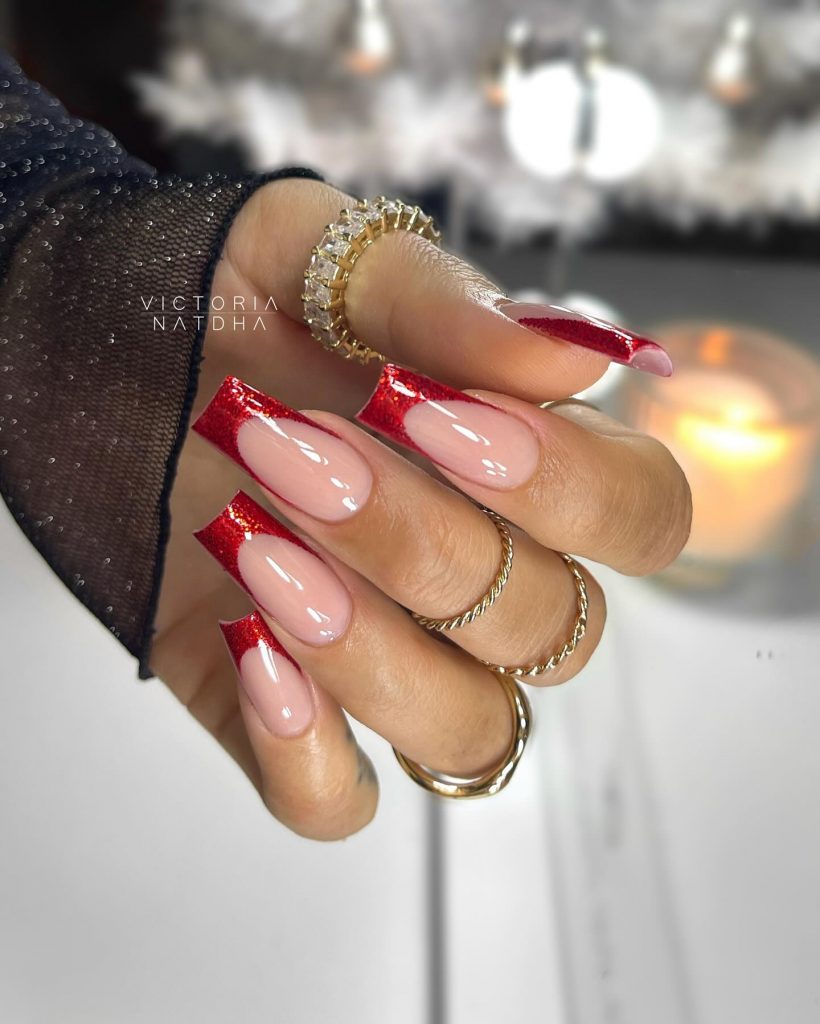
Consumables:
- Essie nail polish in “Mademoiselle” for the base
- OPI Nail Lacquer in “Big Apple Red” for the red glitter tips
- Clear gel top coat for a glossy finish
How to make this design:
- Apply a transparent pink base coat to all nails.
- Create red glitter French tips with a fine brush for precision.
- Finish with a clear gel top coat to enhance the shine and longevity of the design.
Transparent glitter winter nails
These beautiful transparent nails feature embedded silver glitter and delicate floral motifs, creating an ethereal, ice cream-inspired look. The almond shape adds sophistication, while the translucent base keeps the design light and airy. This is an ideal winter nail design for those looking for something special and unique.
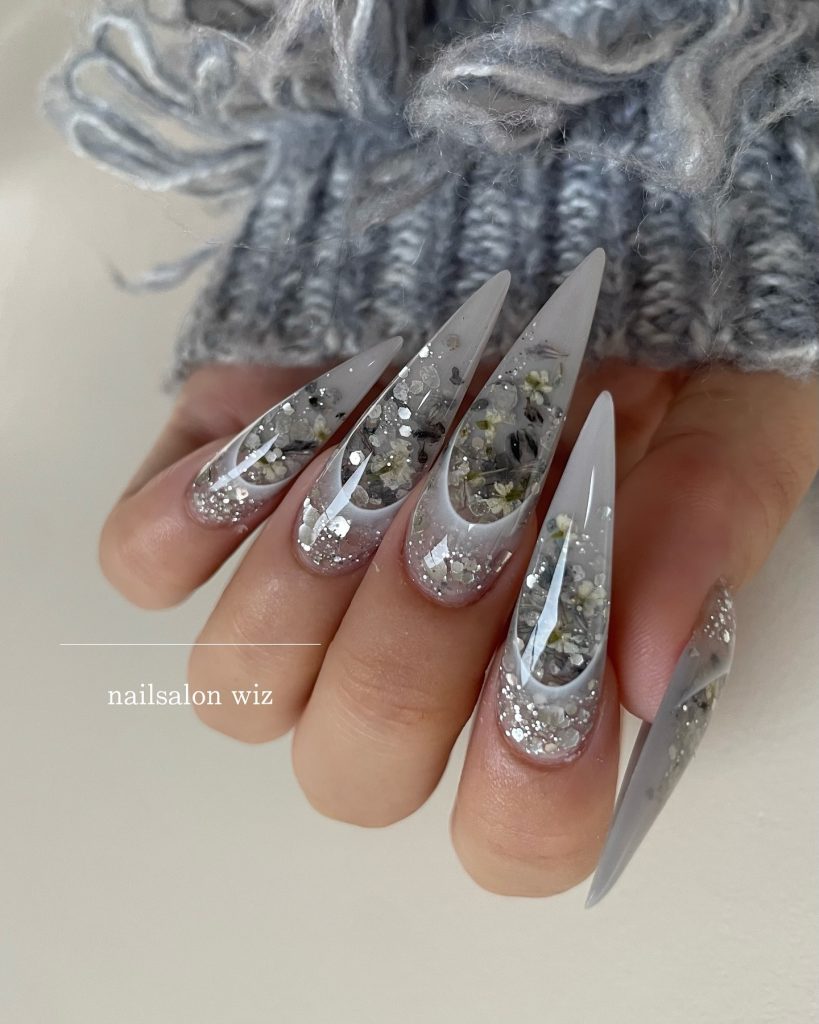
Consumables:
- OPI Nail Lacquer in “Funny Bunny” for the translucent base
- Essie Top Coat in “Set in Stones” for the embedded glitter
- Fine nail art brush for floral details
- Gel top coat for a smooth finish
How to make this design:
- Apply a translucent base coat to all nails.
- Use a fine brush to embed glitter and floral motifs in layers.
- Seal with a gel top coat to protect the design and add shine.
Save pin

Namie O, a talented writer at Willtiptop, conveys her passion for fashion and beauty in every word she writes. With a keen eye for detail and a deep insight into the latest trends, Namie’s articles and insights captivate readers and provide them with valuable knowledge and inspiration. Through her engaging and informative writing style, Namie aims to empower individuals to explore their style, experiment with beauty techniques, and embrace their unique sense of self.