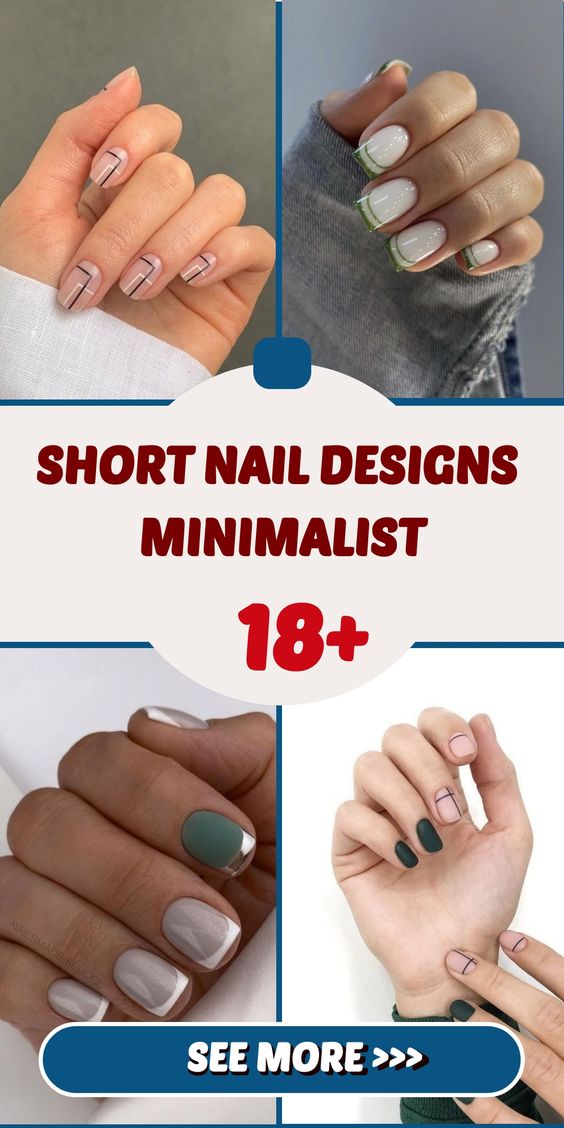
Xmas Nails 24 Ideas: Stylish and Simple Holiday Designs
The holidays are the perfect time to go all out with your nail art, and this year’s Christmas nail ideas are sure to dazzle. Whether you’re looking for something cute, minimalist or bold with glitter, there’s a design for everyone. From classic red and white shades to unique green and blue hues, these styles will make your nails the highlight of your holiday look. Here are some inspiring Christmas nail ideas that you will love.
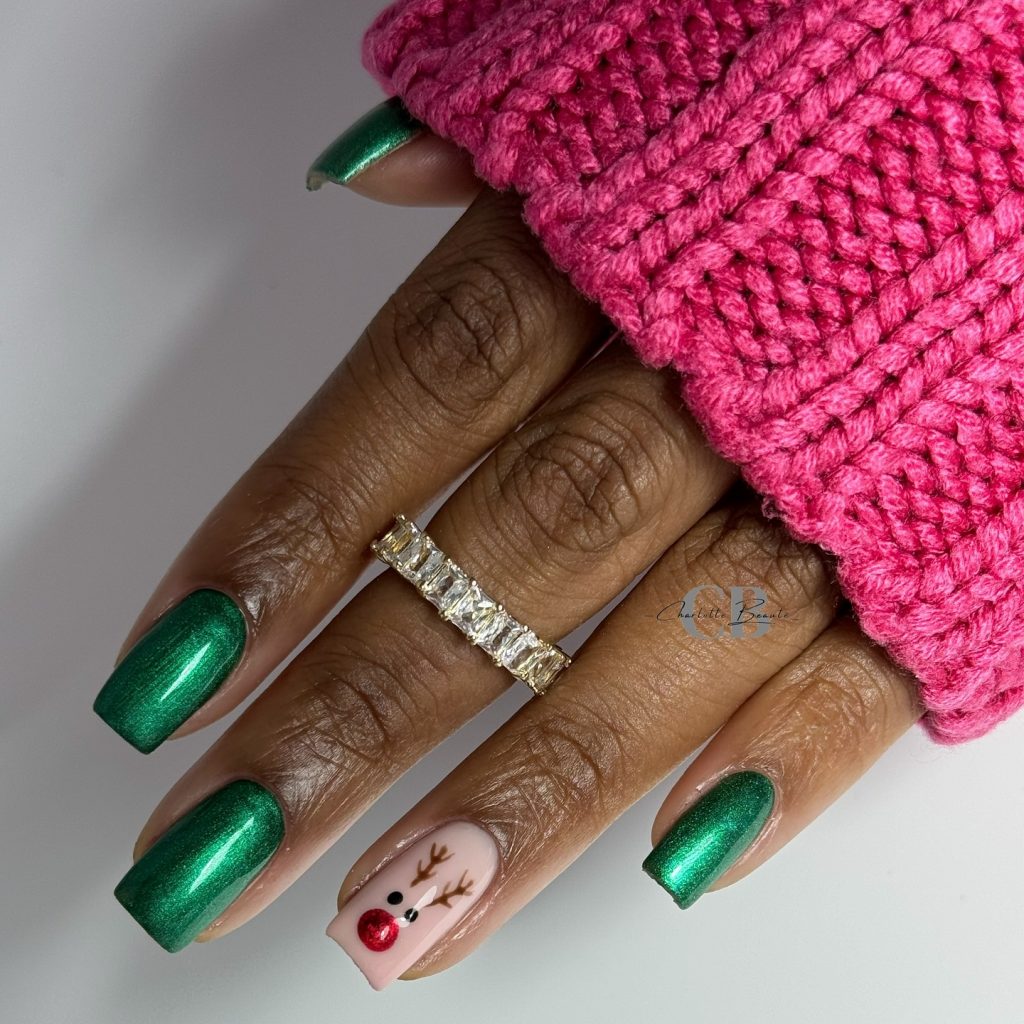
Festive gold and reindeer accents
This festive look combines the elegance of gold glitter with playful accents such as a reindeer and tree branches. The almond-shaped nails have a simple base of neutral pink, allowing the gold tips and hand-painted details to pop. It’s perfect for someone who wants a balance between cute and sophisticated for their Christmas nails.
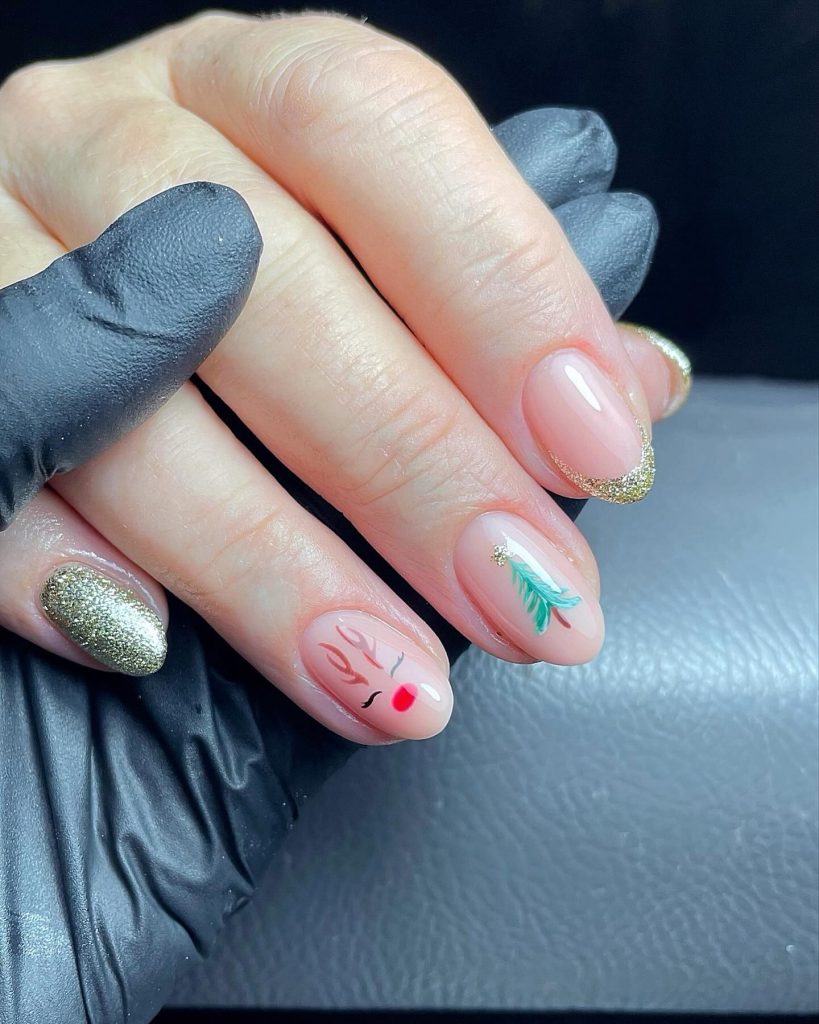
Consumables:
-
- Base coat: OPI Gel Color in “Bubble Bath”
- Gold glitter polish: Essie “Rock at the Top”
- Nail art brush: thin for fine details
- Top coat: Sally Hansen Miracle Gel
- Extra: Dotting tool for reindeer nose
To create this look at home:
-
- Start with a clean base of neutral pink with two coats.
- Apply gold glitter to the French style ends and let it dry completely.
- For the reindeer, use a fine brush to accurately paint the antlers and nose. The tree design can be achieved with a darker green sheen and small brush strokes. Finish with a glossy top coat to seal the design.
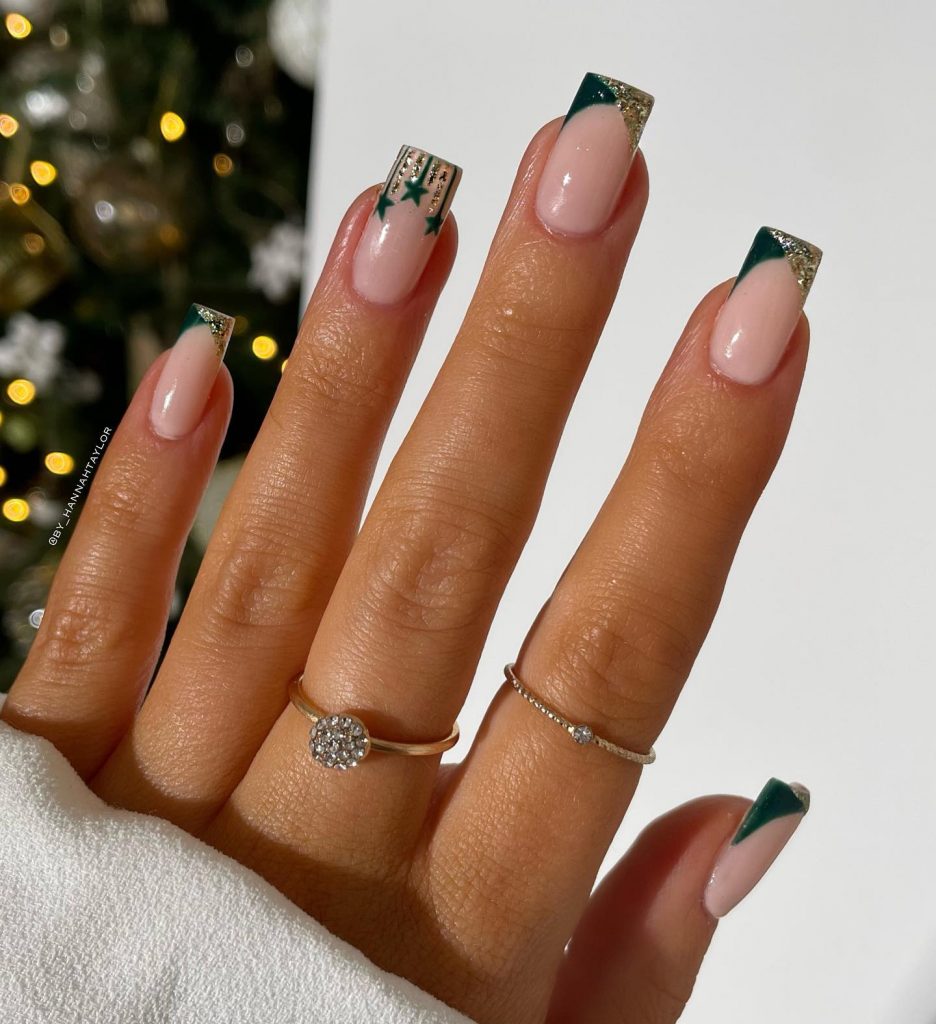
Green French tips with stars
This nail design combines modern square tips with a festive twist of deep green and star accents. The tips are a striking green and each ring finger has a Christmas tree-inspired pattern made of delicate zigzag lines. The minimalist design is perfect for someone looking for an elegant yet festive style that doesn’t overwhelm.
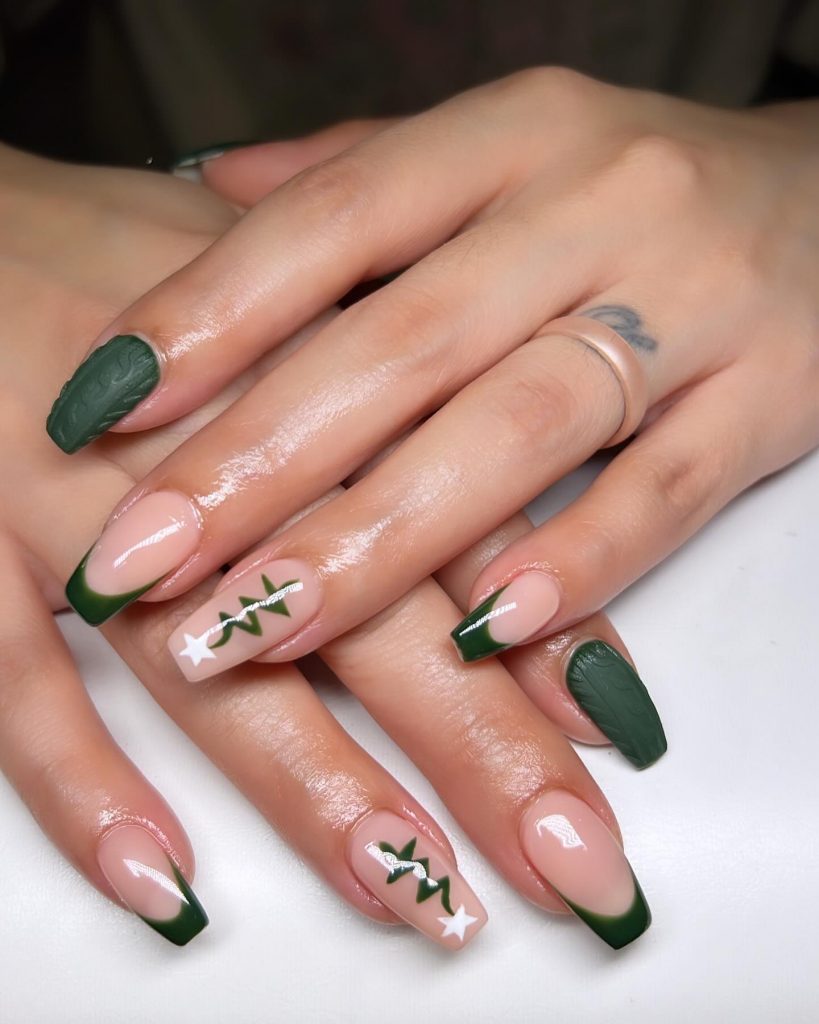
Consumables:
- Green polish: Essie “Off Tropic”
- White star stickers: Kiss Nail Art
- Nail tape for clean lines
- Top layer: Seche Vite Dry Fast
To create this look at home:
- Start by applying two coats of soft nude or pink base.
- Once the base is dry, use nail tape to mark the points and then paint with deep green for a sharp French point.
- Apply the star stickers to the ring fingers and use a fine brush for the zigzag tree motif. Finish with a quick-drying top coat to secure everything.
Snow white and glitter coffin nails
These long coffin-shaped nails are a winter dream, with a simple white matte base decorated with intricate glitter details. The snowflakes and gel-based accents add wintery charm, and the length adds drama. This Christmas nail idea is perfect for those who want a bold statement while sticking to classic white tones.
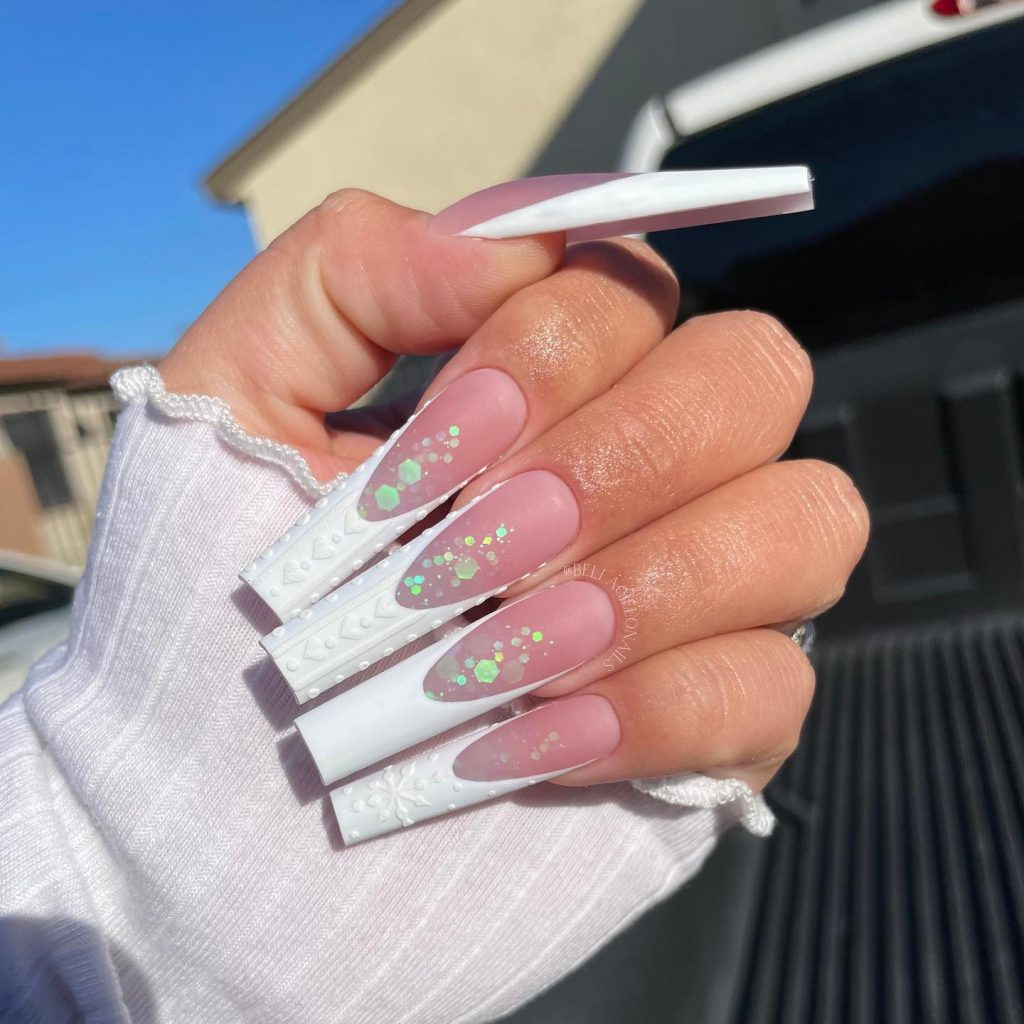
Consumables:
- White matte lacquer: Zoya “Purity”
- Thick glitter: China Glaze “Fairy Dust”
- Nail art brush for snowflakes
- Rhinestones: Swarovski crystals for extra sparkle
- Gel top coat: CND Shellac
To create this look at home:
- Apply a base coat, followed by two coats of white polish. Let it dry completely.
- Use a nail art brush to carefully paint snowflakes on alternate nails, placing small rhinestones in the center of each flake.
- Add a touch of glitter around the cuticles for extra shine and finish with a gel top coat to keep everything in place for longer wear.
Classic red and candy cane design
This cute and festive design embraces traditional Christmas colors with red, white and a touch of glitter. With a cute candy cane stripe on one nail and playful HO HO HO letters on the other nail, this set exudes Christmas cheer, yet remains simple yet powerful. The alternating nails in red and pink give the whole a creative twist.
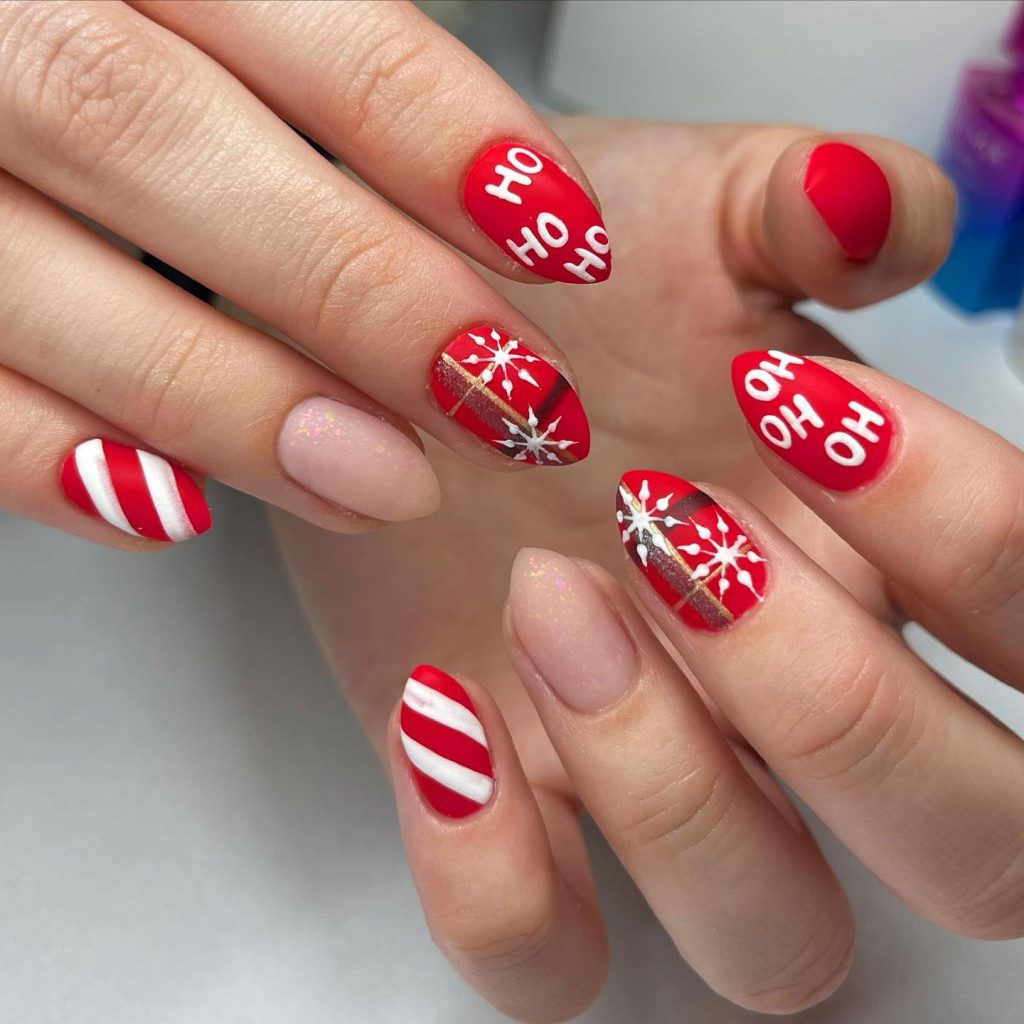
Consumables:
- Red paint: OPI “Big Apple Red”
- White stripe polish: Kiss Brush-On Nail Art
- Fine brush for lettering
- Pink glitter polish: Zoya “Monet”
- Top coat: Essie Gel Setter
To create this look at home:
- Start with alternating coats of red and pink polish for each nail.
- Use a fine brush or striping tool to create candy cane stripes on one nail.
- Carefully paint the HO HO HO design on another nail and add glitter accents to the remaining nails for a little sparkle. Seal with a top coat for long life.
Glittery evergreen French tips
For a minimalist yet festive approach, this design features deep green almond-shaped tips, accented with fine gold glitter. The look is clean, polished and unmistakably Christmassy without being overdone. It is ideal for those who prefer a simple yet festive manicure that works well for both informal and formal occasions.
Consumables:
- Green polish: OPI “Christmas Gone Plaid”
- Gold glitter: Orly “Halo”
- Fine brush for applying tips
- Top coat: Deborah Lippmann Gel Lab Pro
To create this look at home:
- To start, apply a clear or nude base coat.
- Use a fine brush to paint the points with a deep green varnish, making sure the lines are even and sharp.
- Apply a thin layer of gold glitter along the edge of the green tips for extra shine. Finish with a gel top coat for a long lasting finish.
Modern metallic and pink combo
This minimalist yet striking design features a combination of soft pink and shiny metallic accents. The short, round nails alternate between a soft, shiny pink and a silver metallic finish, with a simple dot pattern on the middle finger. The metallic silver dots on the ring finger add a touch of elegance to this otherwise subtle manicure, perfect for a chic and cute holiday look.
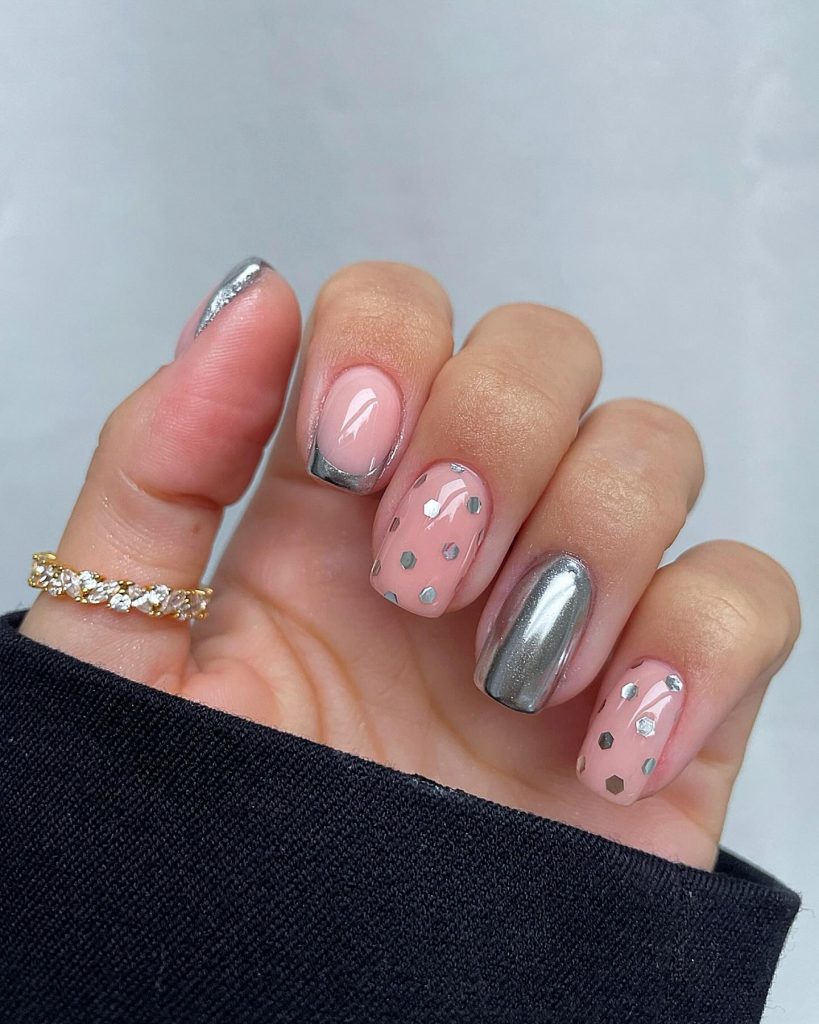
Consumables:
- Base layer: OPI “Bubble Bath”
- Silver metallic paint: Sally Hansen “Hard as Nails Xtreme Wear”
- Dotting tool for the dots
- Top layer: Seche Vite
Create this look at home
- Start with a soft pink base coat on all nails, using two coats for coverage.
- Apply silver metallic nail polish to alternate nails and use a dotting tool to create the simple polka dot design.
- For a sleek look, apply silver tips to the ring finger with a fine brush and finish with a top coat to seal the design.
Galaxy inspired purple and black nails
For a bold and glittery holiday look, this galaxy-inspired nail design features a black base with a deep purple glitter gradient. The short almond shape makes this set easy to wear and still make a statement. The play of colors between dark black and shimmering purple creates a heavenly atmosphere, perfect for those who want their holiday nails to stand out.
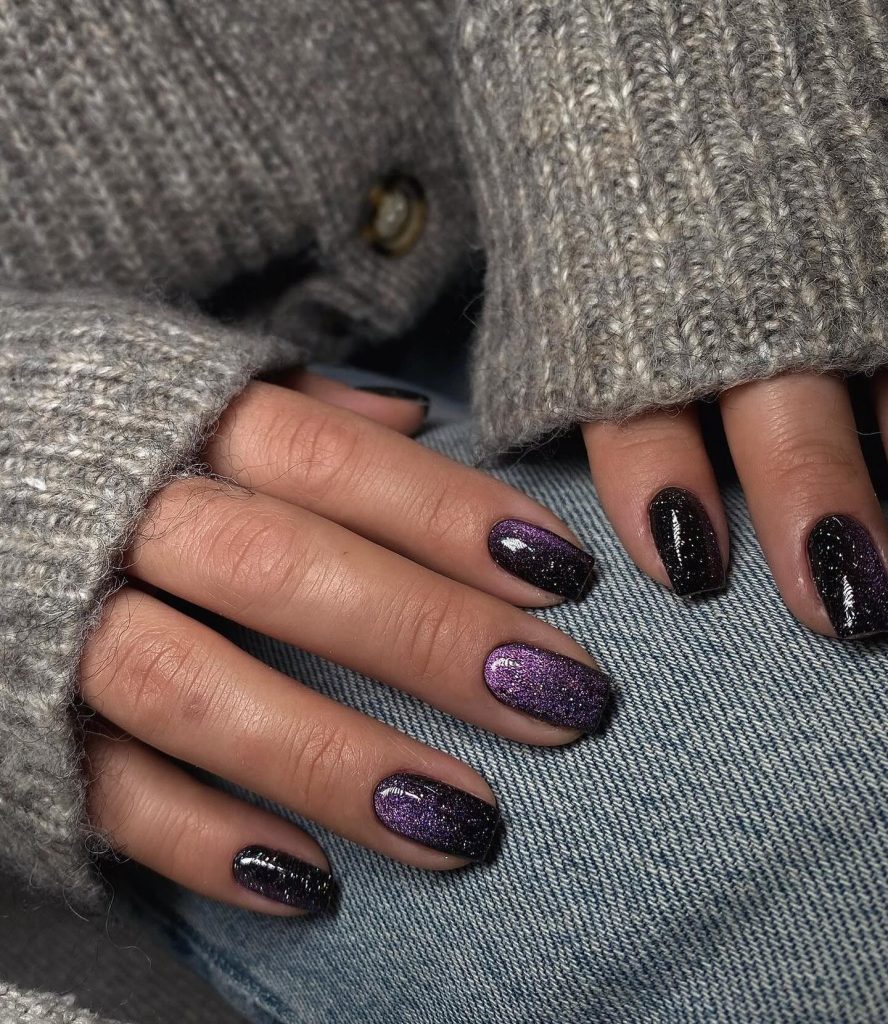
Consumables:
- Black polish: Essie “Licorice”
- Purple glitter: ILNP “Heavenly”
- Sponge for gradient effect
- Top layer: CND Vinylux
Create this look at home
- Apply a black base to all nails and let it dry completely.
- Use a sponge to gently dab the purple glitter polish from the tip downwards, creating a gradient effect.
- Seal the design with a glossy top coat to enhance the shine and protect the glitter design.
Festive green and white French tips
This classic Christmas-inspired design combines a soft nude base with green and white accents. The almond-shaped nails feature a French tip in festive forest green, while the ring finger is decorated with a 3D Christmas tree accent. This cute and simple design adds just the right touch of holiday spirit while remaining polished and minimalistic.
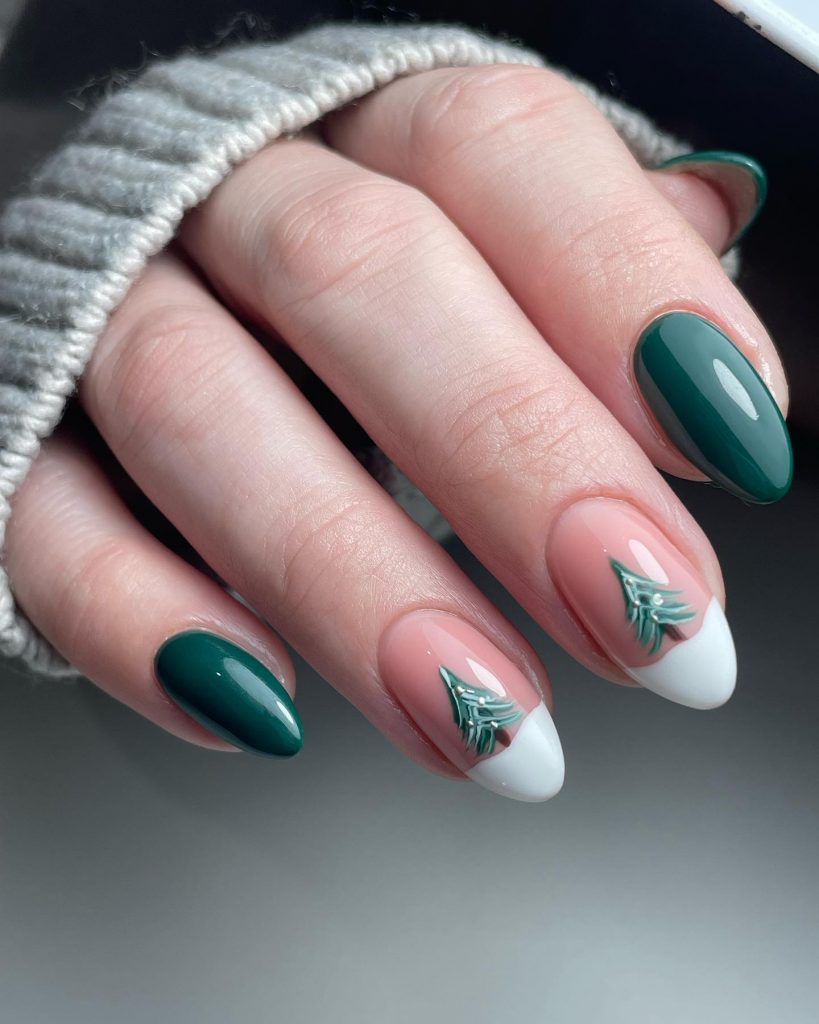
Consumables:
- Base layer: Zoya “Blush”
- Green polish: OPI “Christmas Gone Plaid”
- White polish: Essie “Blanc”
- Nail art brush for 3D tree details
- Gel top coat: Sally Hansen Miracle Gel
Create this look at home
- Apply a nude base coat and let it dry completely.
- Paint the French tips with green paint and create clean lines with a fine brush.
- Use a nail art brush to carefully add a white tip and decorate the ring finger with a Christmas tree accent. Finish the look with a gel top coat for extra shine and durability.
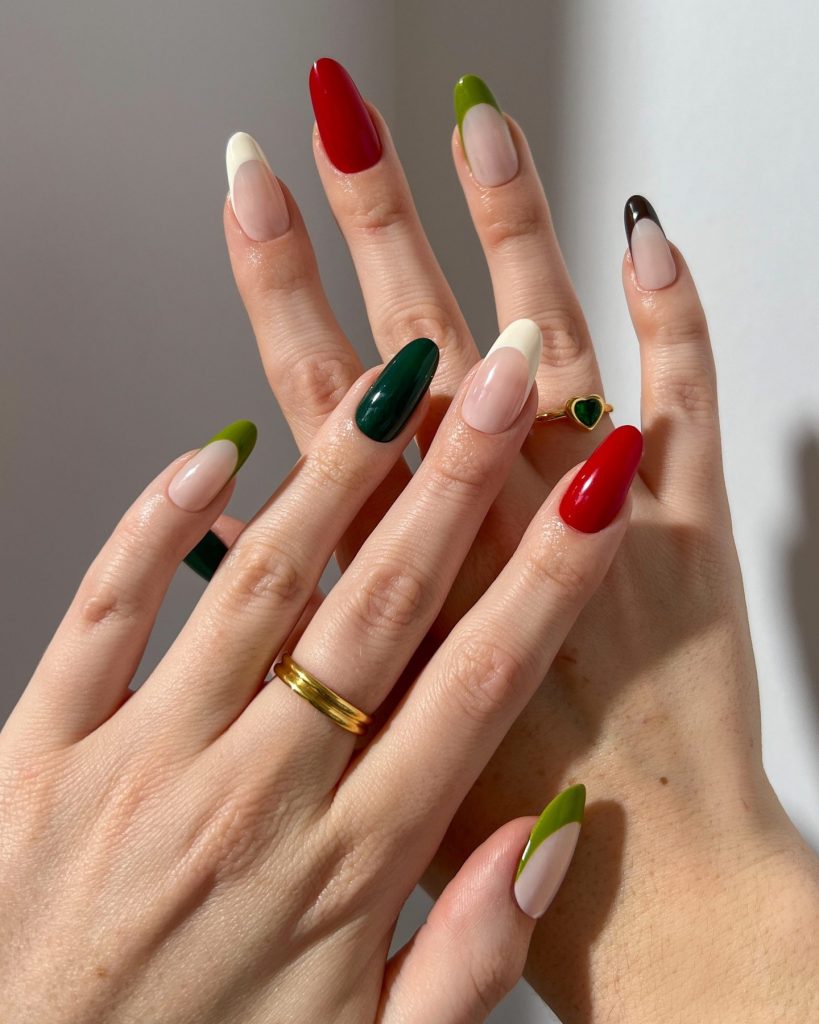
Green and gold Christmas elegance
This elegant design features a mix of green and nude nails with a touch of gold foil for extra luxury. The green polish covers the majority of the nails, while the accent nails have a half-nude, half-green design with scattered gold foil. This is a chic and minimalist design that adds a festive touch without going overboard.
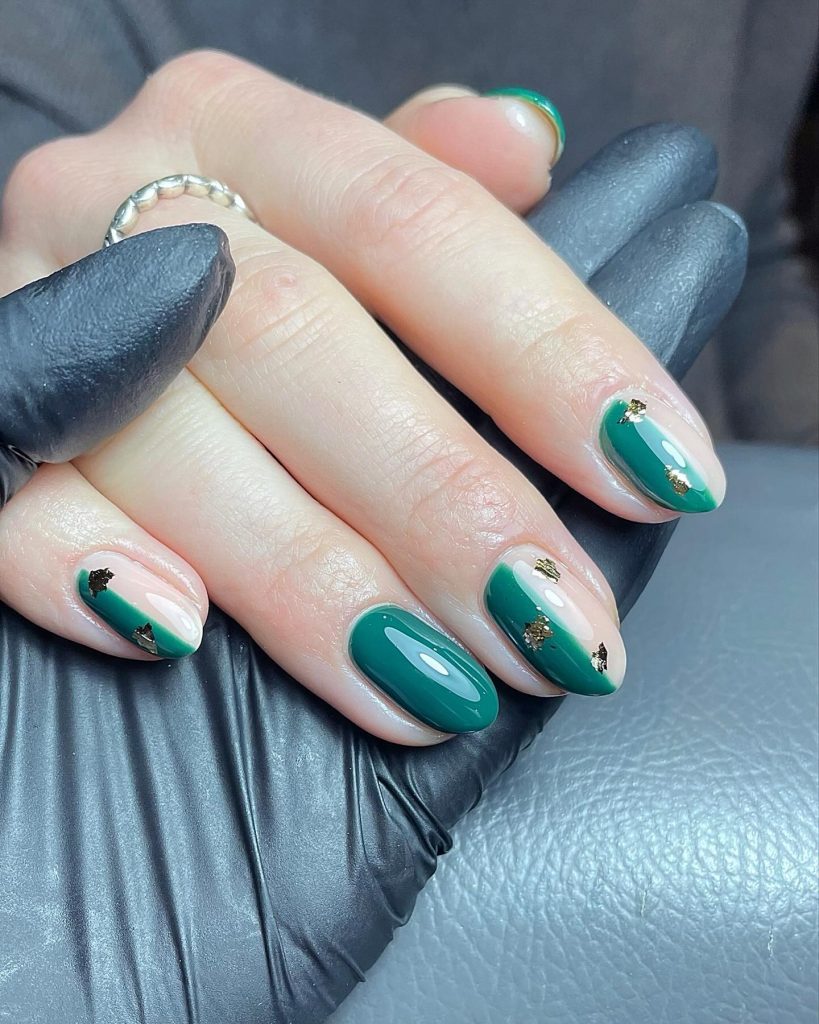
Consumables:
- Green polish: Essie “Trophy Wife”
- Gold Foil: Born Pretty Gold Leaf
- Nude paint: OPI “Be There in a Prosecco”
- Top coat: Essie Gel Couture
Create this look at home
- Start by applying green nail polish to most of the nails and a nude base to the accent nails.
- Use a fine brush to apply the green polish diagonally over the accent nails.
- Carefully place gold foil on the nails while the nail polish is still slightly sticky. Finish with a gel top coat for a smooth finish.
Red glitter and holly berries
This festive manicure features red glitter tips and delicate holly berry accents on the ring fingers. The almond-shaped nails alternate between a clear base with red glitter French tips and soft pink with holly berry details. This adorable design exudes the holiday spirit while keeping it simple and elegant, perfect for any Christmas party.
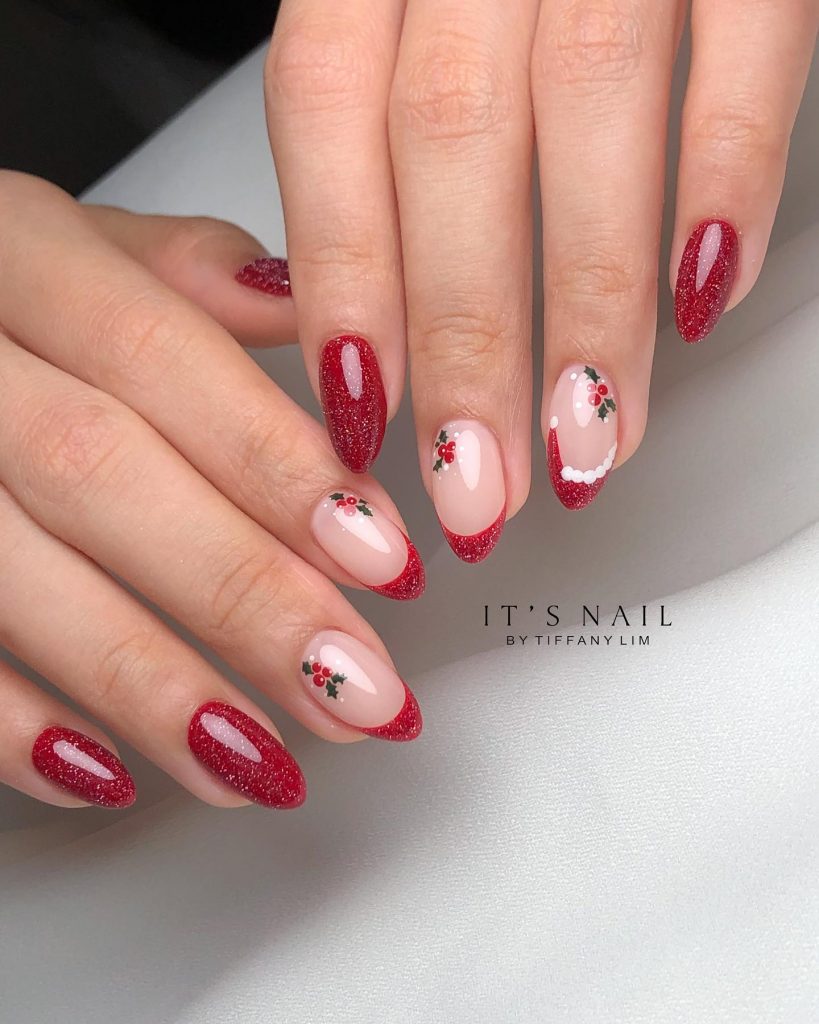
Consumables:
- Red glitter polish: China Glaze “Ruby Pumps”
- Nail art brush for holly details
- Green paint for leaves: OPI “Keep off the lawn”
- Red polish for berries: Essie “Rock the Runway”
- Top coat: Sally Hansen Miracle Gel
Create this look at home
- Start with a clear or soft pink base coat.
- Apply red glitter French tips to most nails.
- For the accent nails, use a fine brush to paint small holly leaves and berries on the ring finger. Seal the design with a gel top coat for a smooth and glossy finish.
Iridescent Aqua French Tips
These square nails have a beautiful twist on the classic French tip, with an iridescent aqua design that catches the light beautifully. The nails are kept neutral with a soft nude base, while the vibrant blue and green tones on the tips create a mesmerizing ocean-like effect. This simple yet striking design is perfect for anyone who loves a modern take on the French manicure.
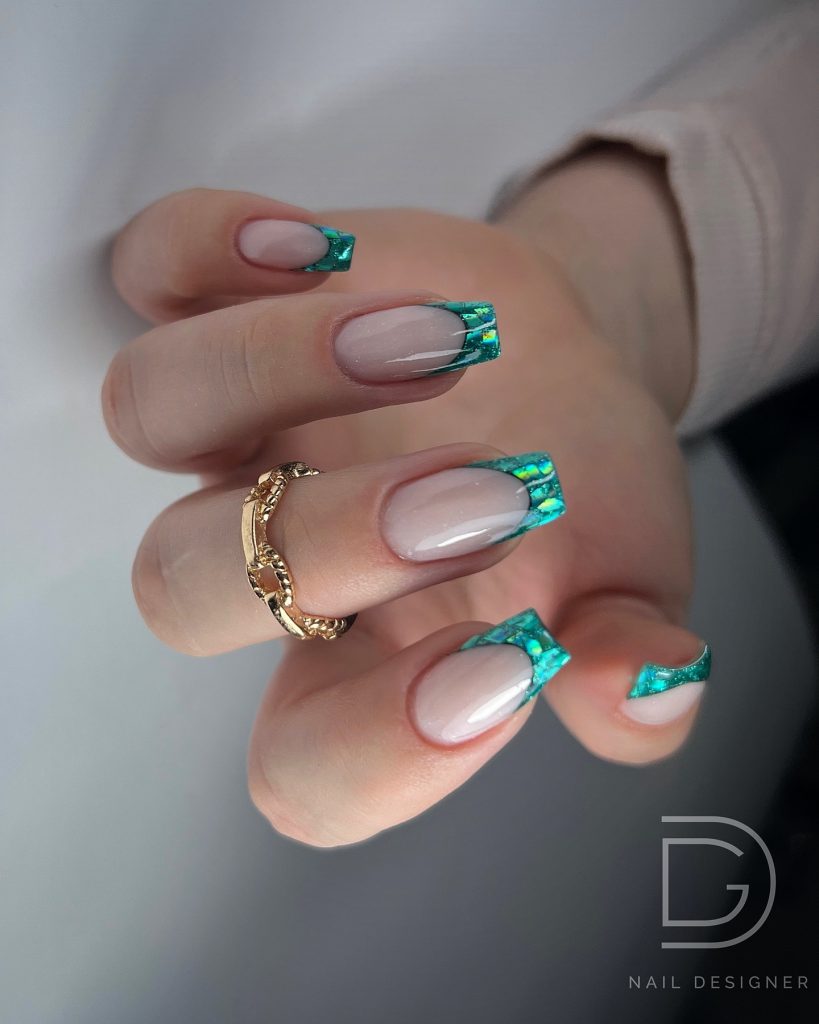
Consumables:
- Base layer: OPI “Bare My Soul”
- Iridescent foil: Born Pretty Mermaid Scales Foil
- Top coat: Essie Gel Couture
Create this look at home
- Apply a soft, nude base coat and let it dry.
- Use a blue or green iridescent foil for the French tips and apply them carefully with a nail foil adhesive.
- Seal the design with a gel top coat to enhance shine and hold the foil for longer shelf life.
Multicolored French tips
This bold and playful set includes a simple yet vibrant range of colored French tips. Each nail is a different color and contains a variety of red, green, white and black polishes. The almond-shaped nails are left largely naked, allowing the bright tips to take center stage. This manicure is ideal for someone who wants to incorporate holiday colors in a unique and adorable way.
Consumables:
- Red paint: OPI “Big Apple Red”
- Green polish: Zoya “Hunter”
- White polish: Essie “Blanc”
- Black paint: Sally Hansen “Black to Black”
- Top layer: Seche Vite
Create this look at home
- Start with a clear or nude base coat for all nails.
- Paint the tips of each nail in alternating colors, using a fine brush to ensure clean lines.
- Finish with a top coat to give the design a long lasting and glossy finish.
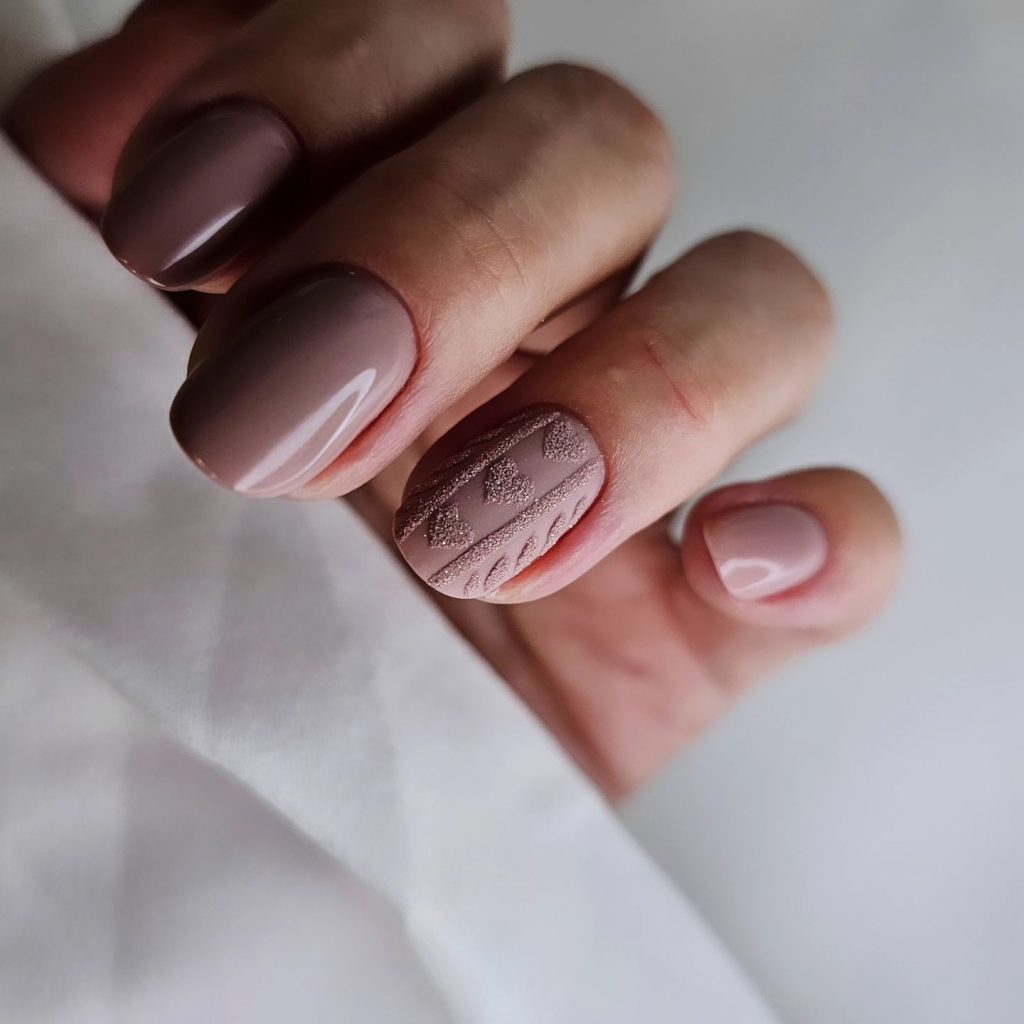
Cozy knitted sweater design
This warm and minimalist design mimics the texture of a cozy knit sweater, perfect for the winter season. The short, round nails have a muted taupe base with one accent nail with a 3D sweater pattern. The design uses a matte finish and soft brown tones, creating a subtle yet cute holiday look.
Consumables:
- Base layer: Zoya “Jackie”
- Matte top coat: OPI Matte Topcoat
- 3D gel for sweater texture: Born Pretty Knit Gel
Create this look at home
- Apply a brown or taupe base coat and let it dry.
- Use 3D gel to create the raised sweater pattern on one or two accent nails.
- Finish with a matte top coat to give the nails a soft, cozy look that enhances the 3D design.
Red glitter with snowflake accent
This glittery red design radiates festive cheer with its rich red hue and sparkling finish. The short almond-shaped nails have a simple but powerful look, with one nail showing a hand-painted white snowflake. It’s the perfect combination of cute and glamorous, ideal for the holidays.
Consumables:
- Red glitter polish: China Glaze “Ruby Pumps”
- White stripe polish: Kiss Brush-On Nail Art
- Nail art brush for snowflake
- Top coat: Sally Hansen Miracle Gel
Create this look at home
- Start by applying two coats of red glitter polish to all nails.
- Use a thin brush to paint a snowflake in white on one accent nail.
- Finish with a glossy top coat to make the design sparkle and last all season.
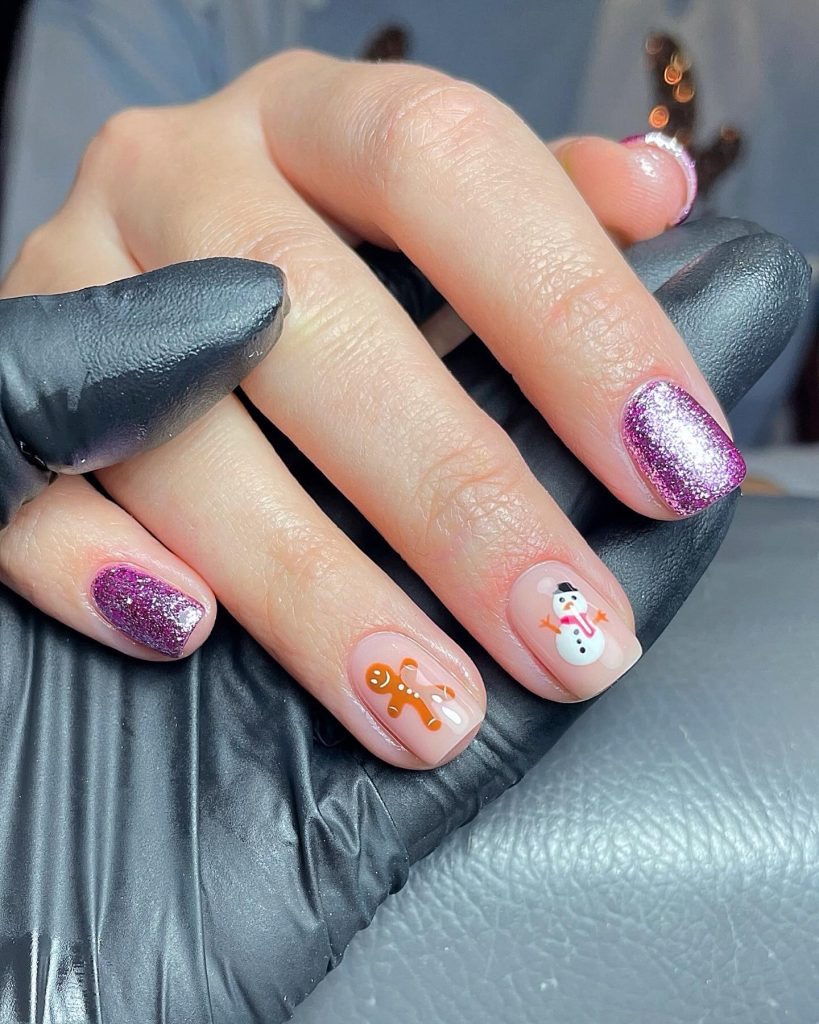
Gingerbread and snowman nails
This adorable Christmas design combines festive Christmas characters such as a gingerbread man and a snowman with a glittery touch. The short, square nails alternate between pink glitter polish and neutral nails with hand-painted holiday accents. This cute and playful design is perfect for a fun holiday look that still feels simple and wearable.
Consumables:
- Pink glitter polish: ILNP “Sugar High”
- Nail art brush for gingerbread and snowman details
- Top layer: CND Vinylux
Create this look at home
- Start by applying pink glitter polish to alternate nails.
- On the remaining nails, use a fine nail art brush to paint a gingerbread man on one and a snowman on the other.
- Finish with a top coat to seal the design and make the colors pop.
Christmas Confetti Dots
This playful and cute nail design features colorful confetti-like dots spread over a neutral base. The short nails are dotted with vibrant red, green, gold and white colors, radiating a festive and cheerful atmosphere. The simple nature of this design makes it perfect for anyone who wants a fun but easy holiday manicure.
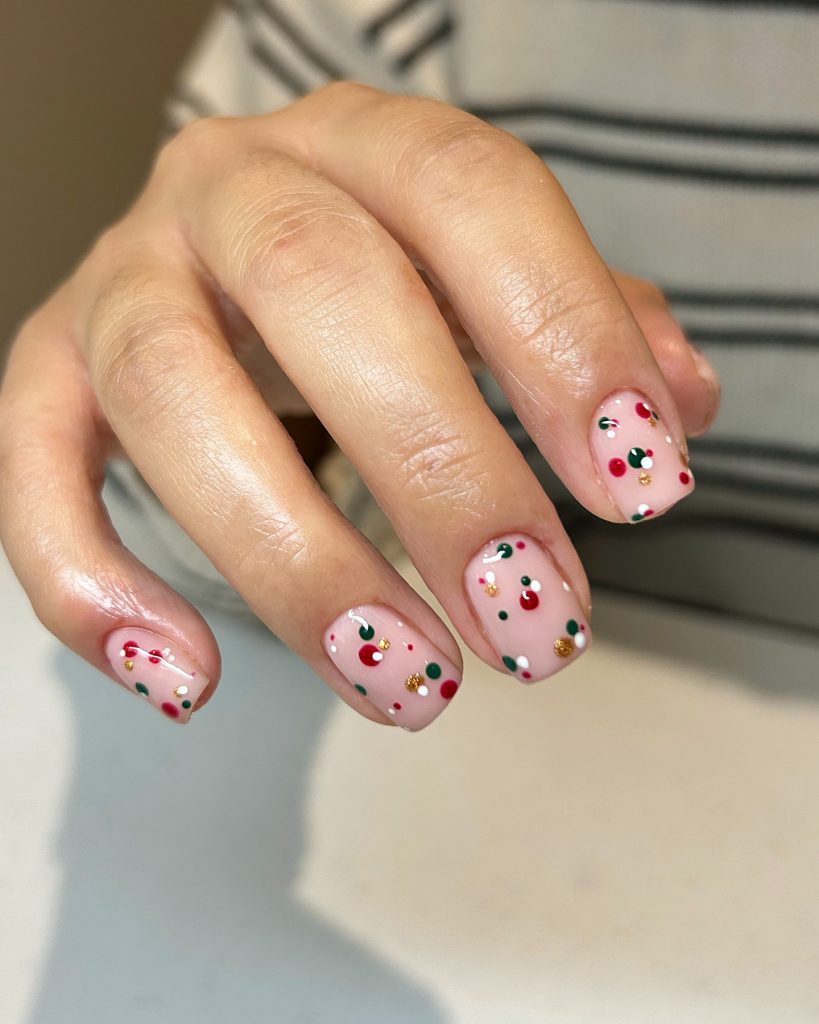
Consumables:
- Base layer: OPI “Bubble Bath”
- Dotting tools for perfect dots
- Red paint: Essie “Really Red”
- Green polish: Zoya “Hunter”
- Gold Lacquer: Sally Hansen “Golden-I”
- White polish: Essie “Blanc”
- Top layer: Seche Vite
Create this look at home
- Start with a neutral or soft pink base coat on all nails.
- Use dotting tools to apply red, green, gold and white dots randomly across the nails.
- Finish with a glossy top coat to seal the design and give it a polished look.
Black and nude winter elegance
This black and nude design brings winter to life with its detailed snowflake patterns and 3D sweater-like textures. The long, square nails alternate between a matte black sweater design and delicate snowflakes on a nude background. The use of black gives this manicure a cool, modern look while the snowflakes give it a festive touch.
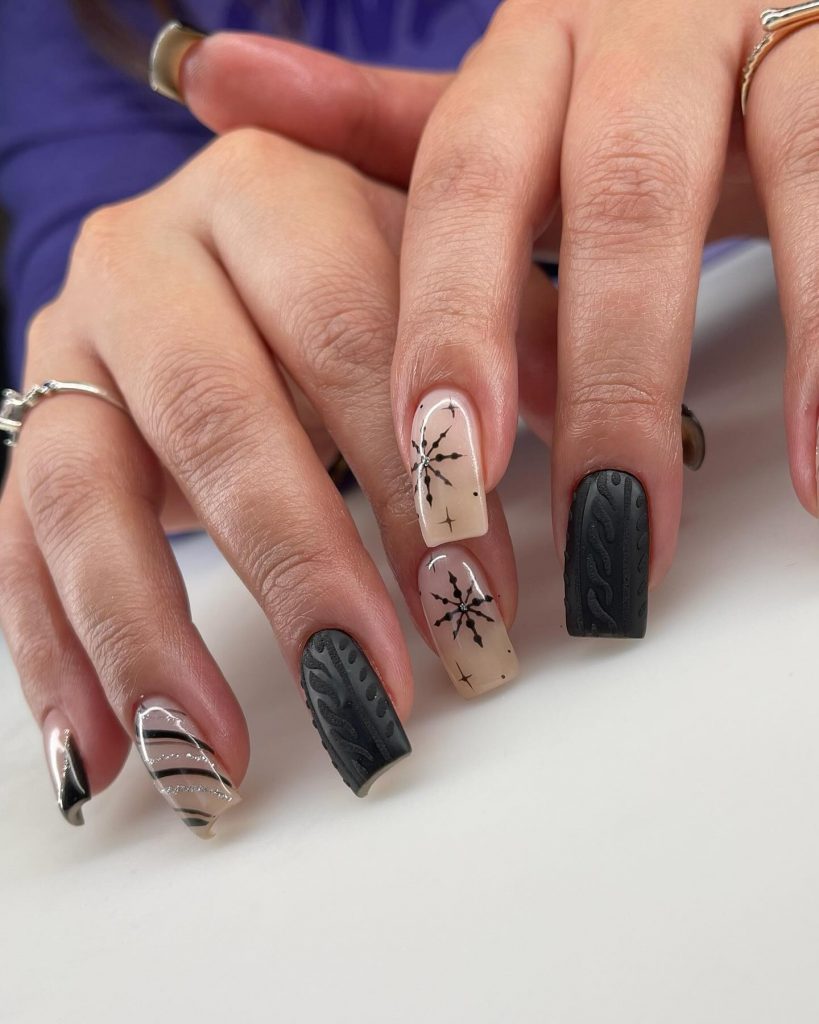
Consumables:
- Black matte paint: OPI “Black Onyx”
- Nude base layer: Essie “Ballet Slippers”
- 3D Gel: Born Pretty Knit Gel for the sweater texture
- Nail art brush for snowflake details
- Top layer: CND Vinylux
Create this look at home
- Apply a black matte polish to alternate nails and use a 3D gel to create the sweater texture.
- On the nude nails, use a fine nail art brush to draw snowflakes in black nail polish.
- Seal the design with a gel top coat for longer wearing pleasure.
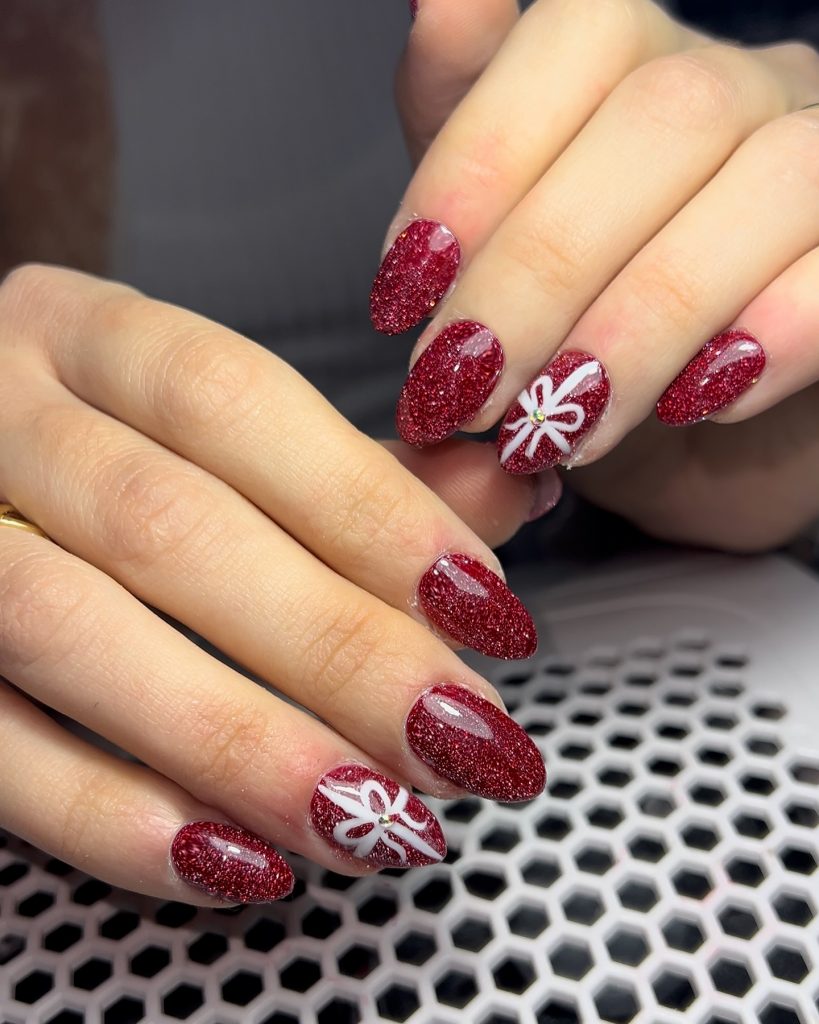
Glamorous red and glitter Ombre
This beautiful manicure is all about red glamor with a touch of glitter. The long acrylic nails are a mix of solid red, red glitter and a dazzling gold glitter ombre on one accent nail. This look is perfect for those who love long, dramatic nails that make a bold statement during the holidays.
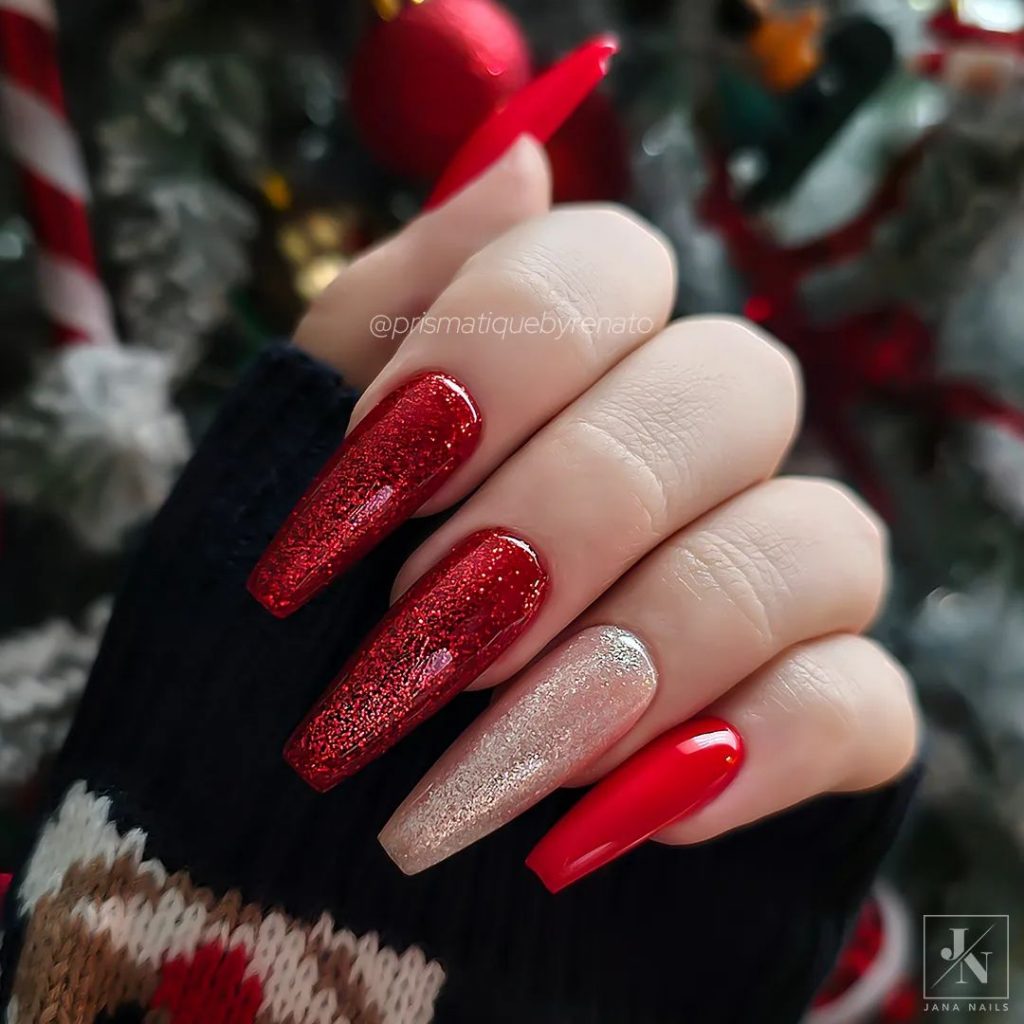
Consumables:
- Red paint: OPI “Big Apple Red”
- Red glitter polish: China Glaze “Ruby Pumps”
- Gold glitter polish: Essie “Golden Hour”
- Top coat: Sally Hansen Miracle Gel
Create this look at home
- Apply a solid red base to most nails.
- Create an ombre effect on one accent nail by blending gold glitter from the cuticle to the tip.
- Finish with a gel top coat to seal the design and add extra shine.
Silver snowflakes and stars
This minimalist and delicate winter design features soft pink nails decorated with white and silver snowflakes, stars and a silver glitter accent nail. The almond-shaped nails create an elegant silhouette, while the festive details make it a perfect option for someone who loves subtle Christmas cheer.
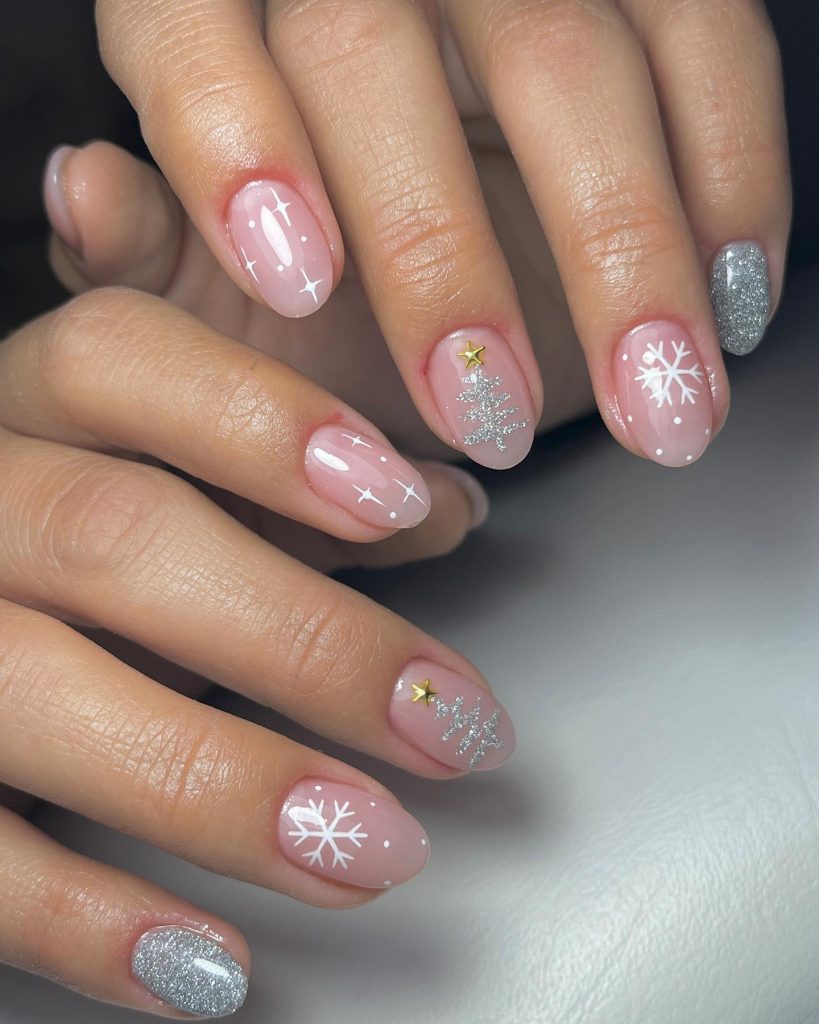
Consumables:
- Base layer: OPI “Bubble Bath”
- Silver glitter: ILNP “Mega”
- Nail art brush for snowflakes and stars
- White polish: Essie “Blanc”
- Top coat: Essie Gel Setter
Create this look at home
- Start by applying a soft pink base coat to all nails.
- Use a fine brush to paint white snowflakes and stars on several nails, and add a silver glitter accent nail for shine.
- Finish with a top coat to protect the design and give a glossy finish.
Green metallic with Rudolph accent
This festive manicure features beautiful green metallic nails with a cute Rudolph reindeer accent nail on the ring finger. The square nails radiate a holiday feeling, while the hand-painted reindeer gives a playful touch. This simple yet festive design is perfect for anyone who loves a balance of fun and glamour.
Consumables:
- Green metallic paint: Zoya “Merida”
- Nude base for accent nail: Essie “Ballet Slippers”
- Nail art brush for Rudolph details
- Red rhinestone for Rudolph’s nose
- Top coat: Sally Hansen Miracle Gel
Create this look at home
- Apply a green metallic polish to all nails except the accent nail.
- Use a fine brush to draw a reindeer on the accent nail and place a red rhinestone as a nose.
- Finish with a top coat to give the design shine and longevity.
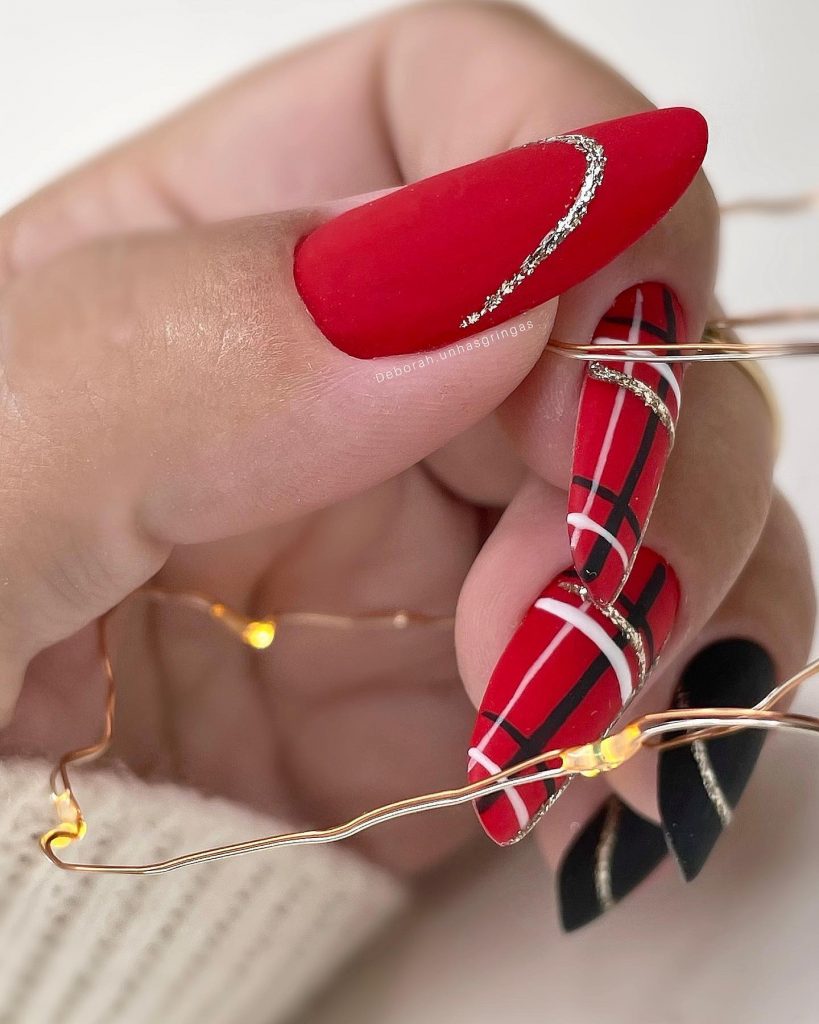
Red plaid and glitter accents
This striking nail design features bold red and black plaid patterns mixed with glitter accents for a chic holiday look. The long almond-shaped nails alternate between plain matte red and checkered, enhanced by shimmering gold lines. This design combines a traditional winter look with a modern twist, making it perfect for the holidays.
Consumables:
- Red matte paint: OPI “Matte Velvet”
- Black stripe polish for plaid: Kiss Brush-On Nail Art
- Gold Glitter Stripe Polish: Essie “Golden Hour”
- Top coat: Sally Hansen Miracle Gel
Create this look at home
- Apply a solid red matte base to half of the nails.
- On the other nails, use black and white stripe polish to create a diamond pattern, with gold glitter accents.
- Seal the design with a gel top coat to keep the glitter vibrant and long lasting.
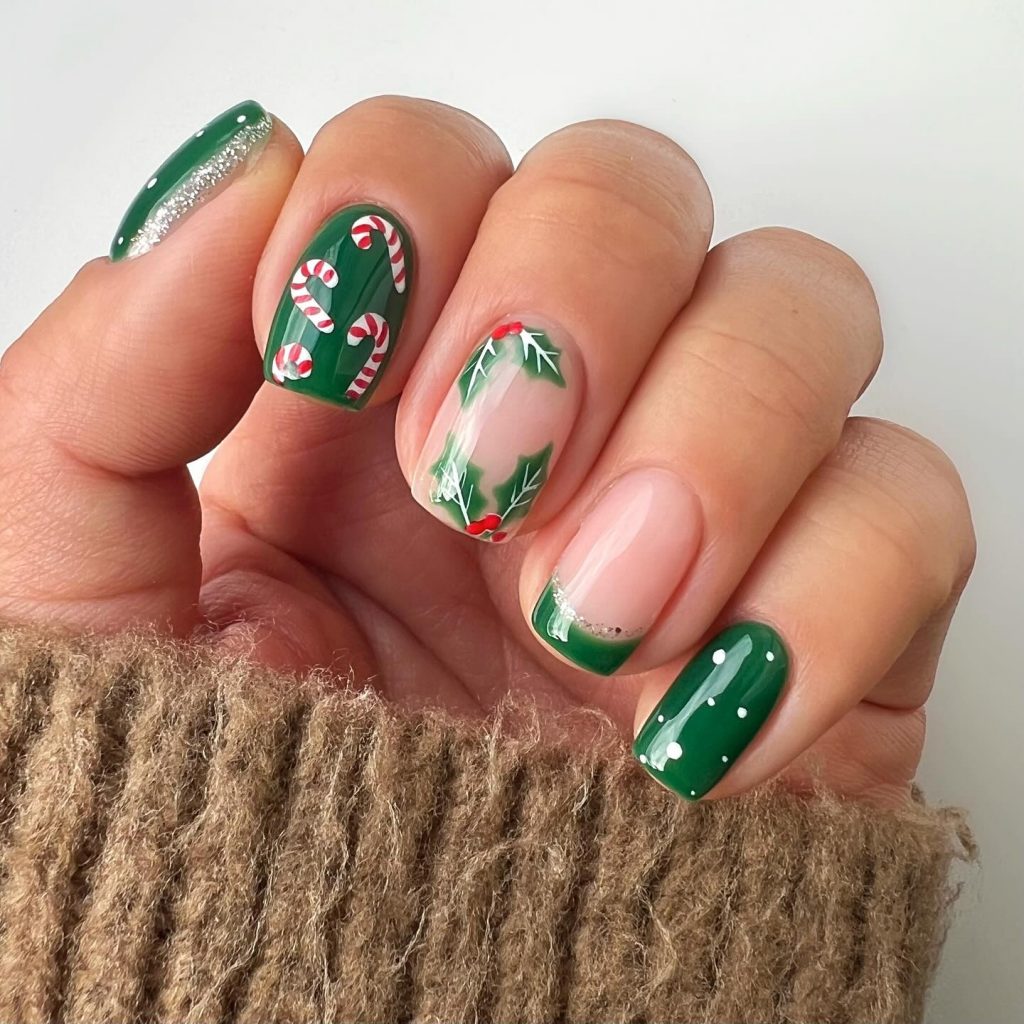
Green candy cane delight
This festive green and red manicure is decorated with cute candy canes and holly leaves. The green nails are contrasted by accent nails with hand-painted candy canes and holly berries. The combination of a simple French tip and detailed artwork makes this manicure perfect for those who love holiday-themed nails with a pop of color.
Consumables:
- Green polish: Essie “Off Tropic”
- Red and white candy cane stripe polish: Kiss Brush-On Nail Art
- Nail art brush for holly leaves and berries
- Top layer: Seche Vite
Create this look at home
- Start with a clear or nude base for the accent nails and apply green polish to the rest.
- Paint candy canes and holly leaves by hand with fine brushes and stripping tools.
- Finish with a top coat to keep the intricate design intact.
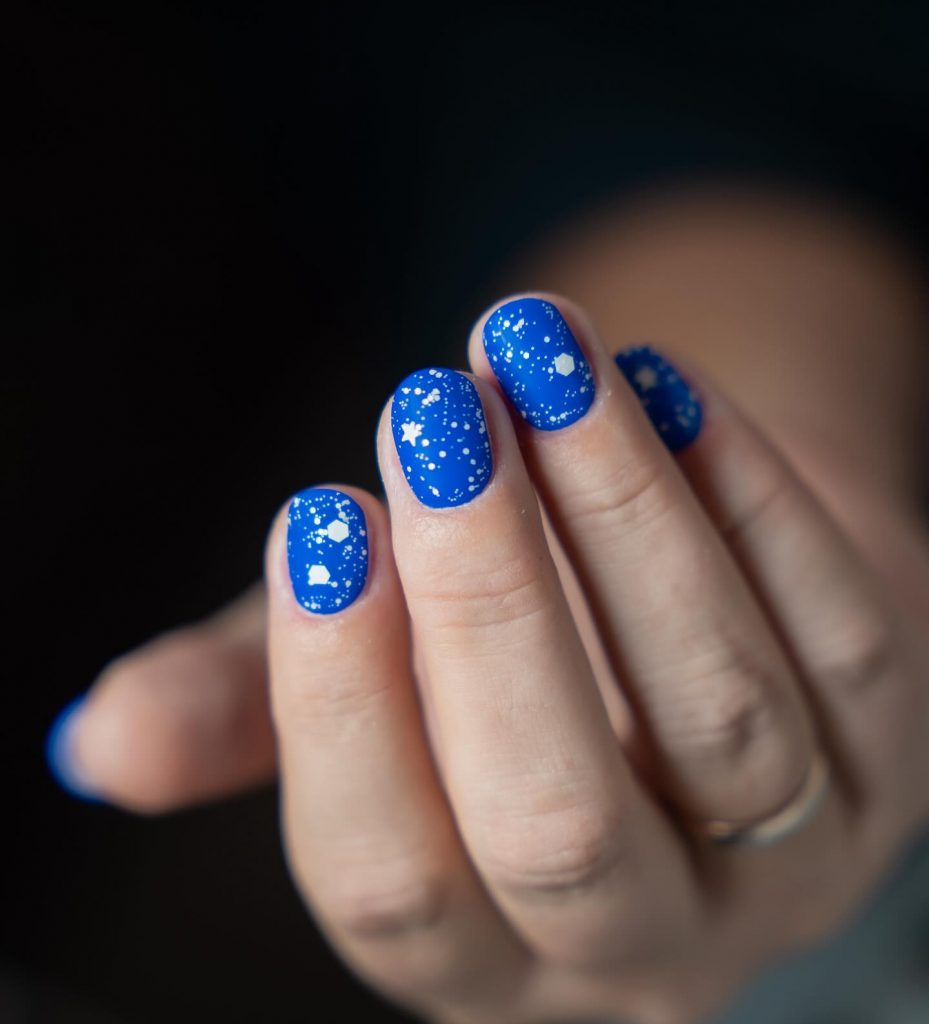
Starry blue snowflakes
This simple blue manicure is festive and fun, with hand-painted white stars and snowflakes. The medium-length oval nails are vibrant blue and decorated with stars and snowflakes of different sizes, creating a winter wonderland feel. This cute and playful design is perfect for someone looking for a simple yet powerful Christmas manicure.
Consumables:
- Blue polish: Essie “Butler Please”
- White stripe polish: Kiss Brush-On Nail Art
- Point tool for snowflake details
- Top layer: CND Vinylux
Create this look at home
- Apply a vibrant blue base coat to all nails.
- Use a fine brush and a dotting tool to create white stars and snowflakes on the nails.
- Finish with a top coat so the design will last throughout the holiday.
Green snowflake charm
This minimalist yet festive design features alternating green nails and bright base nails with delicate green snowflakes. The square nails are perfect for someone looking for a simple yet elegant holiday look. The hand-painted snowflakes add just the right Christmas spirit and keep things subdued.
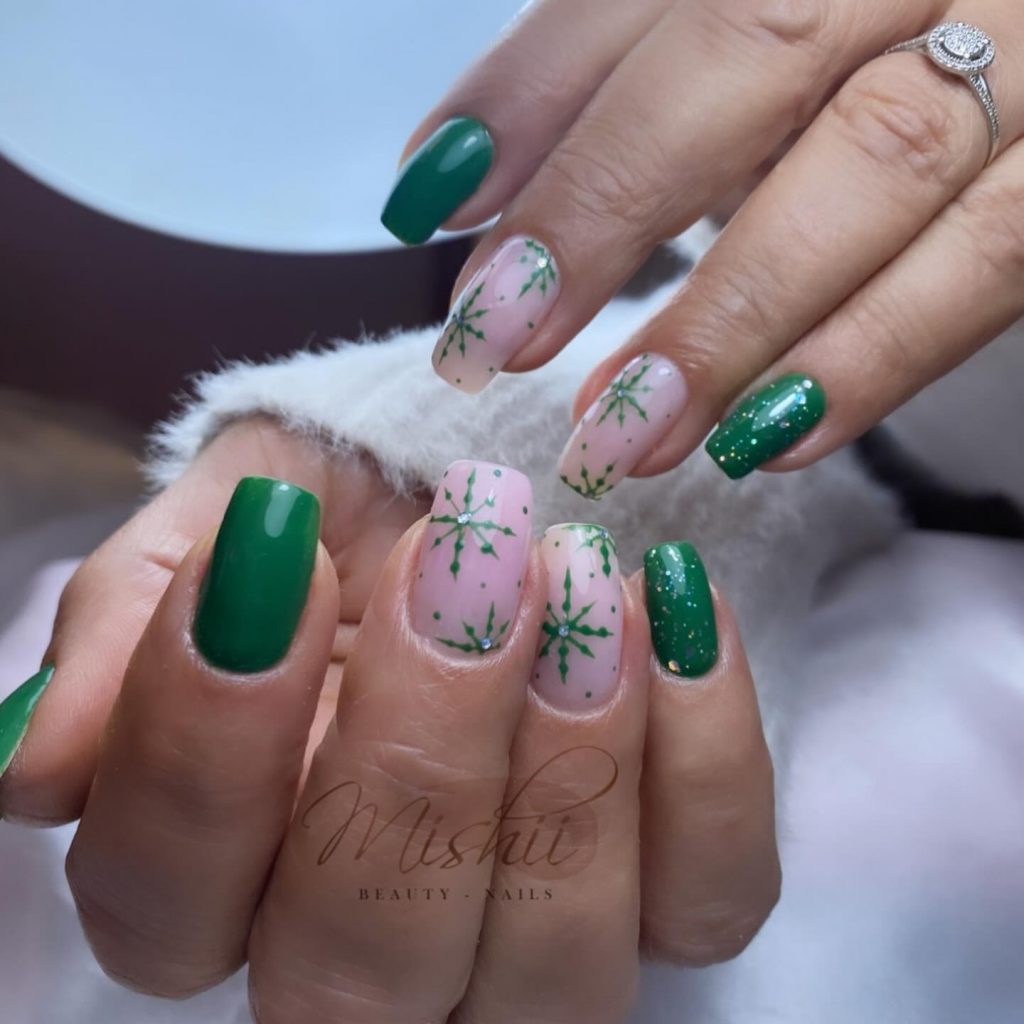
Consumables:
- Green polish: OPI “Christmas Gone Plaid”
- Nail art brush for snowflakes
- Top coat: Sally Hansen Miracle Gel
Create this look at home
- Apply alternately one green varnish and the other a clear base.
- Use a fine brush to paint fine snowflakes on the clear nails.
- Seal the design with a gel top coat for long lasting wear.
Save pin

Namie O, a talented writer at Willtiptop, conveys her passion for fashion and beauty in every word she writes. With a keen eye for detail and a deep insight into the latest trends, Namie’s articles and insights captivate readers and provide them with valuable knowledge and inspiration. Through her engaging and informative writing style, Namie aims to empower individuals to explore their style, experiment with beauty techniques, and embrace their unique sense of self.