Cooking chicken breast on Blackstone is an absolute game-changer. The even heat, the smoky sear, and the versatility make this griddle a top choice for home cooks and grill enthusiasts alike. But let’s be real—chicken breast can be tricky. If you’re not careful, it dries out fast, leaving you with a chewy, tasteless mess.
That’s why this guide is here. You’ll get everything you need to know to achieve perfectly juicy, flavorful chicken breast on Blackstone every single time. From preparation and seasoning to cooking times and pro-level tips, we’re covering it all. Plus, there’s a step-by-step recipe and an FAQ section to answer all your burning questions.
So, if you’ve ever struggled with dry or flavorless chicken, stick around.
Benefits of Using a Blackstone Griddle
Cooking chicken breast on Blackstone isn’t just about convenience—it’s about unlocking a whole new level of flavor. Unlike a traditional grill or stovetop pan, a Blackstone griddle delivers consistent heat, a perfect sear, and the ability to cook multiple pieces at once.
Even Heat Distribution
Ever had chicken that’s burnt on the outside but raw in the middle? That’s what happens when heat is uneven. A Blackstone griddle, however, spreads heat evenly across the surface, ensuring every bite of your chicken breast on Blackstone is cooked to perfection.
- No cold or hot spots
- Consistent cooking temperature
- No flare-ups like on a grill
Ample Cooking Space
Cooking for a crowd? No problem. Blackstone griddles come in various sizes, but even a mid-sized one gives you plenty of space. You can cook multiple chicken breasts on Blackstone at the same time without crowding, which helps maintain that golden sear.
- Cook several pieces simultaneously
- Prevents overcrowding, which leads to steaming instead of searing
- Great for meal prepping or family dinners
Versatility in Cooking Techniques
One of the best things about a Blackstone griddle is how much you can do with it. You can sear, sauté, steam, or even toast ingredients alongside your chicken.
- Searing: Locks in juices, giving a crispy, golden crust
- Steaming: Using a griddle dome keeps chicken moist while cooking evenly
- Sautéing: Cook veggies right next to your chicken breast on Blackstone for a full meal
A Blackstone griddle isn’t just for chicken—it’s a powerhouse for all kinds of meals. But when it comes to cooking juicy, flavorful chicken breast on Blackstone, these benefits make it one of the best tools you can have.
Now that you know why a Blackstone griddle is the ultimate cooking surface, let’s move on to Part 2—prepping your chicken the right way.
Preparing Chicken Breasts for the Griddle
Cooking chicken breast on Blackstone starts long before it touches the griddle. Proper preparation makes all the difference. From selecting quality meat to marinating, every step ensures a juicy, flavorful bite.
Selecting Quality Chicken Breasts
Not all chicken breasts are the same. Choosing the right cut impacts taste, texture, and cooking consistency.
- Opt for fresh, organic, or pasture-raised chicken—better flavor, fewer additives, and a juicier final result.
- Uniform-sized pieces cook evenly—uneven thickness leads to one side being overcooked while the other stays raw.
- Boneless, skinless breasts are ideal—they cook faster and develop a perfect golden crust.
Buying high-quality chicken breast on Blackstone ensures the best texture and taste. Now, let’s move on to a crucial step—pounding the chicken.
Pounding to Uniform Thickness
Pounding helps the chicken cook evenly, preventing dry or undercooked spots. Even thickness also promotes a better sear.
- Place chicken between plastic wrap—this prevents mess and keeps juices contained.
- Use a meat mallet or rolling pin—gently pound until breasts are about ½-inch thick.
- Focus on thickest areas—flattening them ensures even cooking and faster results.
Now that the thickness is even, it’s time to boost the flavor with a marinade.
Marinating for Enhanced Flavor
Marinades infuse the chicken with deep flavors while keeping it juicy. Even a short marinade works wonders.
- Acidic ingredients like lemon juice or vinegar tenderize the meat for a softer texture.
- Oil-based marinades prevent sticking and create a crisp, golden-brown crust.
- Seasonings like garlic, paprika, and black pepper add depth and enhance natural flavors.
For best results, marinate for at least 30 minutes, though overnight gives maximum flavor. If time’s short, a dry rub also works.
With the chicken perfectly prepped, let’s move on to the essential tools that make cooking even easier.
Essential Equipment and Tools
Cooking chicken breast on Blackstone is easier with the right tools. They improve consistency, texture, and overall results.
Instant-Read Thermometer
Cooking without checking the temperature leads to overcooked, dry chicken. A thermometer guarantees safe, juicy results every time.
- 165°F is the target temperature—remove at 160°F since resting increases the temperature slightly.
- Digital thermometers give instant, accurate readings—no need for guesswork or cutting into the meat.
- Insert into the thickest part—ensures even doneness without overcooking the thinner sections.
Griddle Dome or Cover
Using a dome traps heat, cooking chicken evenly. It also locks in moisture for juicier bites.
- Prevents drying out by creating a controlled cooking environment.
- Speeds up cooking by circulating heat around the chicken.
- Enhances melting if adding cheese or butter near the end.
Oil Sprayer or Squeeze Bottle
Applying oil correctly prevents sticking and helps develop a crispy, golden-brown crust.
- Use high-smoke-point oils like avocado, canola, or vegetable oil.
- Light, even coating prevents excess grease while ensuring a perfect sear.
- Reapply as needed if the griddle dries out during cooking.
With the right tools, cooking becomes easier and more precise. Now, let’s move on to the step-by-step cooking process for achieving the juiciest chicken.
Step-by-Step Cooking Instructions
Perfectly cooked chicken breast on Blackstone requires the right technique. Follow these steps for juicy, flavorful results.
Ingredients
| Ingredient | Quantity |
|---|---|
| Boneless, skinless chicken breasts | 2 large |
| Avocado or canola oil | 2 tbsp |
| Garlic powder | 1 tsp |
| Onion powder | 1 tsp |
| Smoked paprika | 1 tsp |
| Salt | ½ tsp |
| Black pepper | ½ tsp |
| Lemon juice | 1 tbsp |
| Butter (optional) | 1 tbsp |
Instructions
1️⃣ Preheat the Griddle
Preheat the Blackstone griddle to medium heat (about 350°F-375°F). Even heat ensures proper searing without burning.
- Allow at least 5 minutes for the surface to reach the right temperature.
- Test by sprinkling water—droplets should sizzle and evaporate quickly.
- If using an infrared thermometer, ensure the surface reads around 375°F.
2️⃣ Oil the Griddle Surface
A well-oiled surface prevents sticking and promotes even browning.
- Add 1 tbsp of oil and spread it evenly using a spatula.
- Let the oil heat for 30 seconds before placing the chicken.
- Avoid excess oil—too much causes uneven browning and soggy textures.
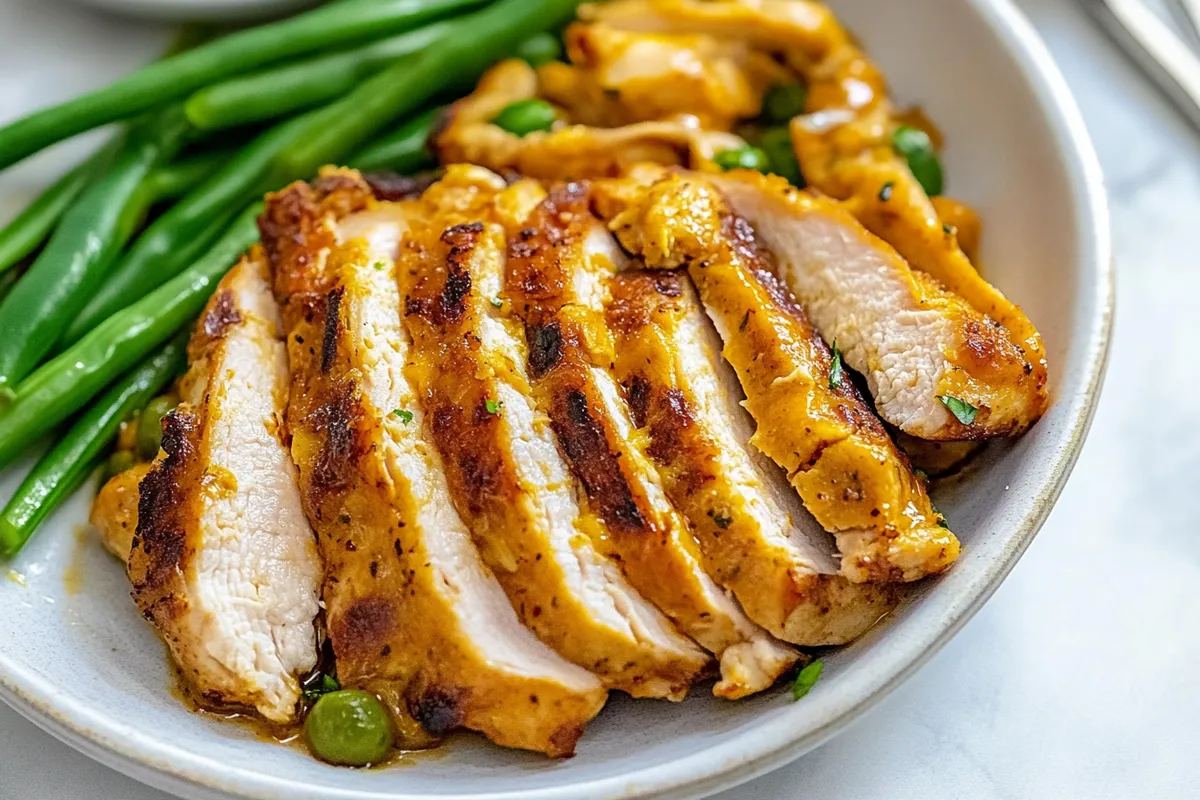
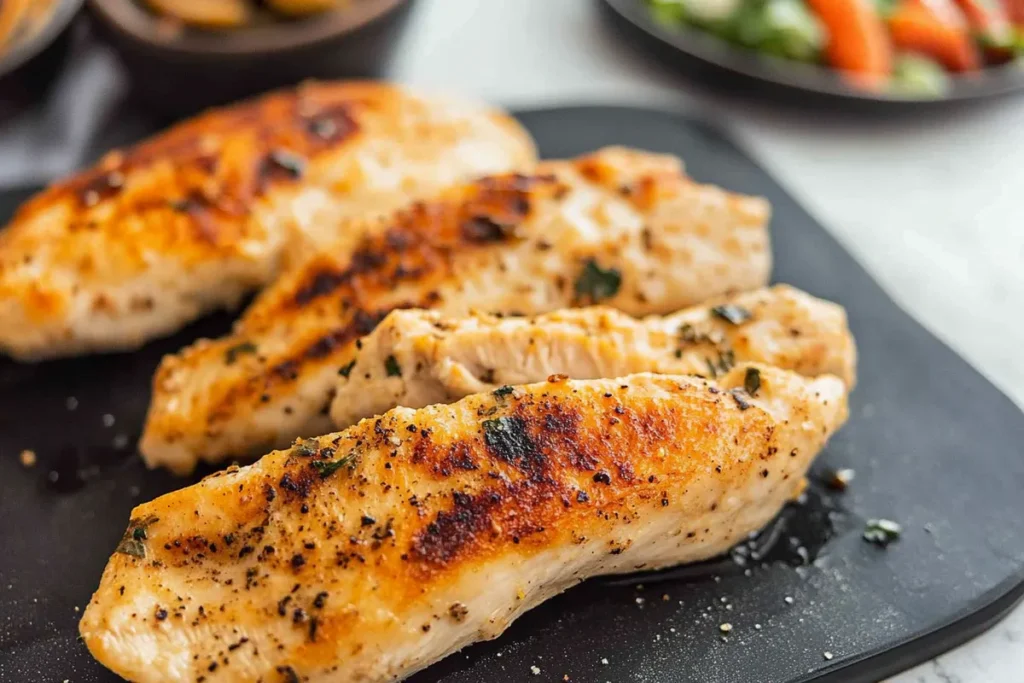
3️⃣ Place Chicken on the Griddle
Now, it’s time to cook the chicken breast on Blackstone and get that perfect sear.
- Lay the seasoned chicken flat without overlapping pieces.
- Let it cook undisturbed for 4-6 minutes to develop a golden crust.
- Flip only when the edges appear opaque and the surface is well-seared.
4️⃣ Cook the Other Side
Flipping too soon prevents proper browning. Let the second side cook thoroughly.
- Cook for another 4-6 minutes, adjusting based on thickness.
- Cover with a griddle dome for extra moisture retention.
- Press gently with a spatula to ensure even contact with the surface.
5️⃣ Check Internal Temperature
Overcooked chicken becomes dry, so monitoring doneness is crucial.
- Insert an instant-read thermometer into the thickest part.
- Remove from heat at 160°F—carryover cooking will raise it to 165°F.
- If undercooked, continue cooking in 1-minute intervals until reaching the safe temperature.
6️⃣ Let the Chicken Rest
Resting keeps the juices locked inside, ensuring tender meat.
- Transfer to a plate and tent loosely with foil.
- Rest for at least 5 minutes before slicing.
- Cutting too soon releases moisture, making the meat dry.
With the chicken perfectly cooked, let’s explore expert tips to make it even better.
Pro Tips for Juicy Chicken Breasts
Cooking chicken breast on Blackstone is simple, but a few expert tips make it even better. Small adjustments help prevent dryness, enhance flavor, and improve texture.
Avoid Overcooking
Nothing ruins chicken faster than leaving it on the heat too long. Precise cooking ensures perfect juiciness.
- Use an instant-read thermometer—remove at 160°F, as resting brings it to 165°F.
- Cut thick breasts in half to reduce cooking time and ensure even doneness.
- Flip only once to maintain moisture and achieve a beautiful golden crust.
Letting Chicken Rest
Slicing too soon causes juices to escape, leading to dry, bland meat. Resting helps retain moisture.
- Rest for at least 5 minutes—longer if the breasts are extra thick.
- Tent with foil loosely to keep warmth without trapping steam.
- Slice against the grain to maximize tenderness and juiciness.
Using a Griddle Dome
A dome helps create a balanced cooking environment, keeping chicken juicy while cooking evenly.
- Prevents excessive drying by trapping heat and moisture.
- Helps cook thicker pieces without burning the exterior.
- Great for melting cheese or butter for extra flavor.
Mastering these simple tricks elevates your chicken breast on Blackstone to perfection. Now, let’s dive into delicious serving suggestions to complete your meal.
Serving Suggestions
Perfectly cooked chicken breast on Blackstone pairs well with a variety of sides and meal ideas. Whether you prefer something light, hearty, or flavorful, there’s an option to enhance your dish.
Side Dishes
Balanced sides make your meal complete. Choose from crisp vegetables, hearty grains, or fresh salads.
- Grilled asparagus or zucchini—adds smoky char and a crisp texture.
- Garlic butter roasted potatoes—a flavorful, satisfying pairing with juicy chicken.
- Fresh garden salad with vinaigrette—light, refreshing, and perfect for a healthier meal.
Incorporating into Other Dishes
Use chicken breast on Blackstone in various meals for added versatility.
- Slice and add to pasta—pairs well with creamy or tomato-based sauces.
- Shred for tacos or wraps—toss with spices and serve in warm tortillas.
- Top over rice bowls—combine with vegetables and sauce for a quick, flavorful dish.
With so many serving options, this dish fits any meal plan. Now, let’s answer common questions to help you perfect your technique.
Frequently Asked Questions
Cooking chicken breast on Blackstone brings up many questions. Here are answers to the most common concerns.
How do I prevent chicken from sticking to the Blackstone griddle?
Sticking happens when the griddle isn’t hot enough or lacks oil.
- Preheat the griddle to at least 350°F before placing the chicken.
- Use high-smoke-point oil like avocado or canola for a non-stick surface.
- Avoid flipping too soon—let a crust form before moving the chicken.
What’s the best temperature for cooking chicken breast on Blackstone?
Maintaining the right heat prevents dryness and ensures even cooking.
- Set the griddle to medium heat (about 350°F–375°F).
- Use an infrared thermometer to check surface temperature.
- Adjust heat as needed to prevent burning.
How can I add more flavor to my chicken?
Simple ingredients create bold flavors without overpowering the meat.
- Marinate for at least 30 minutes using citrus, herbs, or spices.
- Apply a dry rub with garlic, paprika, salt, and pepper.
- Brush with butter after cooking for extra richness.
With these tips, your chicken will always turn out flavorful and juicy. Now, let’s wrap things up with a strong conclusion.
Conclusion
Mastering chicken breast on Blackstone is easier than you think. With the right preparation, tools, and techniques, every bite stays juicy and flavorful.
- Preheat the griddle properly to avoid uneven cooking and sticking.
- Use marinades or dry rubs for enhanced flavor and moisture retention.
- Monitor temperature closely to prevent dryness and ensure perfect doneness.
Whether you’re making a quick meal or meal-prepping for the week, these tips guarantee success. Now, it’s time to fire up your Blackstone and cook the juiciest chicken ever. Enjoy experimenting with flavors, sides, and techniques for the best results!